Panasonic SCPT1050 SCPT1050 User Guide - Page 13
Listening caution
 |
View all Panasonic SCPT1050 manuals
Add to My Manuals
Save this manual to your list of manuals |
Page 13 highlights
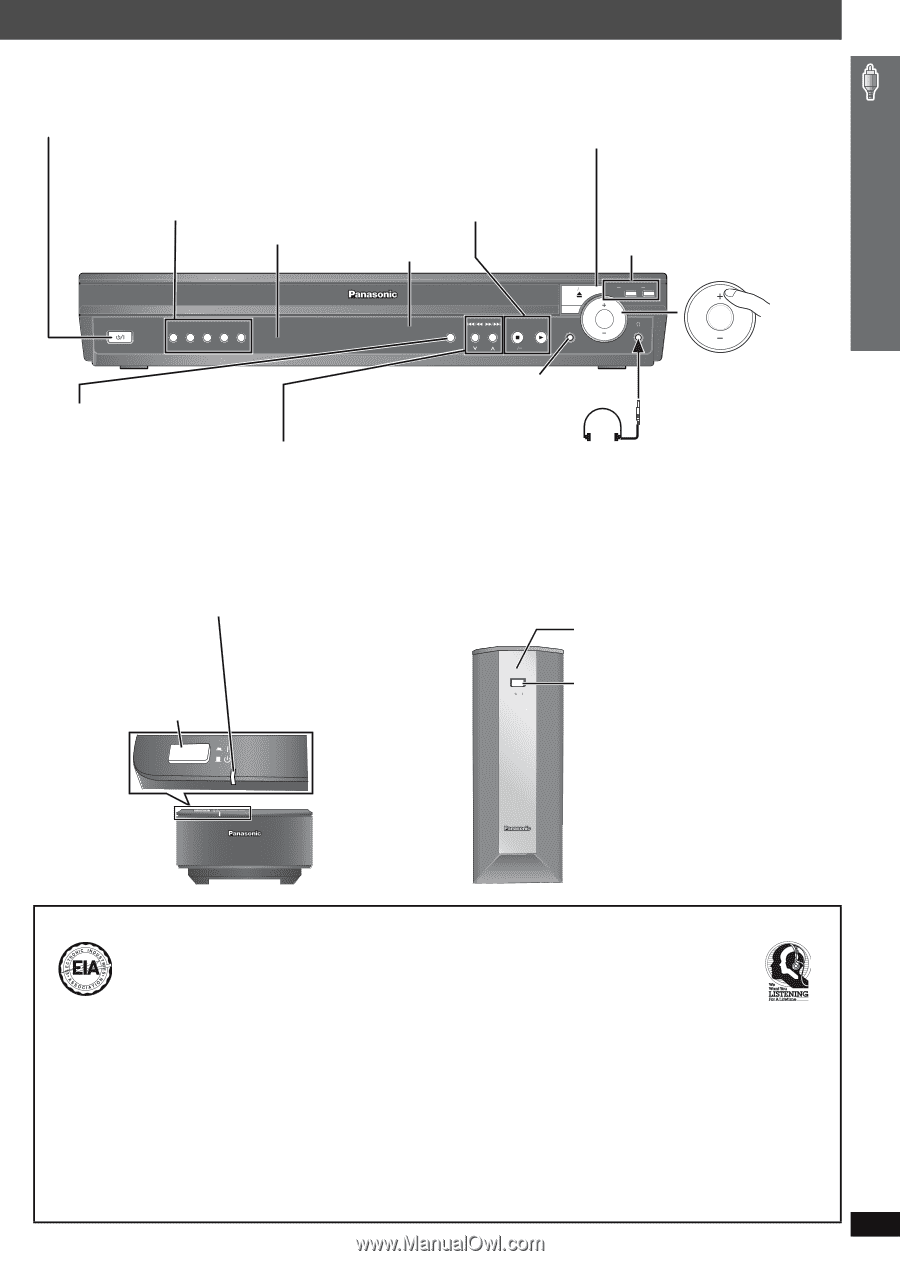
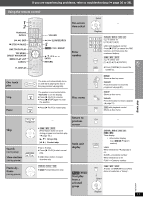
Control reference guide Standby/on switch [POWER Í/I] Turn the main unit on/off. Press to switch the unit from on to standby mode or vice versa. In standby mode, the unit is still consuming a small amount of power. (16) 5 DISC SELECTOR Select a disc directly (16) ≥ A disc indicator lights if a disc is detected or a tray is unchecked. Remote control signal sensor ∫ / -TUNE MODE / -FM MODE < OPEN/CLOSE Stop playing (16)/ Open/Close the disc drawer (16) Select the tuning mode (29) Adjust the FM reception condition (29) 1/ MEMORY Play discs (16)/Memorize the receiving radio stations/channels (29, 31) DISC EXCHANGE Open the disc drawer to exchange the disc in the play position (16) DISC SKIP Display Skip to the next disc tray (16) OPEN CLOSE DISC EXCHANGE SKIP POWER 12345 SELECTOR MUSIC PORT VOLUME VOLUME 5 DISC SELECTOR SELECTOR (29) DVD/CD#FM#AM#XM# AUX#MUSIC P.#D-IN ([PT1050])# OPTION#Return to DVD/CD TUNING TUNE MODE FM MODE MEMORY SETUP MIC MUSIC PORT/SETUP MIC Connect an external device (34)/ Connect the setup microphone (33) Adjust the volume of the main unit. 4, 5 / X TUNING W Skip or slow-search play (16)/ Select the radio stations/channels (29, 31) Headphones (not included) Headphone plug type: ‰3.5 mm (1/8z) stereo mini plug ≥ Reduce the volume before connecting. ≥ Audio is automatically switched to 2-channel stereo. ≥ To prevent hearing damage, avoid listening for prolonged periods of time. AUTO OPERATION ON/OFF indicator The indicator lights red when the wireless system is turned on and lights green when the wireless link is activated. When the wireless link is inactive for a long time, it turns red. Unit on/off button [POWER C I, B Í] Use this button to turn the unit on and off. C I: This unit is on. B Í: This unit is off. POWER AUTO OPERATION ON/OFF [PT1050] POWER AUTO OPERATION ON/OFF AUTO OPERATION ON/OFF indicator The indicator lights red when the wireless system is turned on and lights green when the wireless link is activated. When the wireless link is inactive for a long time, it turns red. Unit on/off button [POWER B Í, C I] Use this button to turn the unit on and off. B Í: This unit is off. C I: This unit is on. Listening caution EST. 1924 Selecting fine audio equipment such as the unit you've just purchased is only the start of your musical enjoyment. Now it's time to consider how you can maximize the fun and excitement your equipment offers. This manufacturer and the Electronic Industries Association's Consumer Electronics Group want you to get the most out of your equipment by playing it at a safe level. One that lets the sound come through loud and clear without annoying blaring or distortion-and, most importantly, without affecting your sensitive hearing. We recommend that you avoid prolonged exposure to excessive noise. Sound can be deceiving. Over time your hearing "comfort level" adapts to higher volumes of sound. So what sounds "normal" can actually be loud and harmful to your hearing. Guard against this by setting your equipment at a safe level BEFORE your hearing adapts. To establish a safe level: ≥ Start your volume control at a low setting. ≥ Slowly increase the sound until you can hear it comfortably and clearly, and without distortion. Once you have established a comfortable sound level: ≥ Leave it there. Taking a minute to do this now will help to prevent hearing damage or loss in the future. After all, we want you listening for a lifetime. RQTX0064 13
-
 1
1 -
2
-
3
-
4
-
5
-
6
-
7
-
 8
8 -
 9
9 -
 10
10 -
 11
11 -
 12
12 -
 13
13 -
 14
14 -
 15
15 -
 16
16 -
 17
17 -
 18
18 -
19
-
20
-
21
-
22
-
23
-
24
-
25
-
26
-
27
-
28
-
29
-
30
-
31
-
32
-
33
-
34
-
35
-
36
-
37
-
38
-
39
-
40
-
41
-
42
-
43
-
44
 |
 |