Panasonic SCPT1050 SCPT1050 User Guide - Page 8
Speaker connections, Radio antenna connections, Cable connections - sc pt1050 system
 |
View all Panasonic SCPT1050 manuals
Add to My Manuals
Save this manual to your list of manuals |
Page 8 highlights
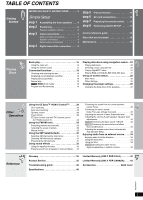
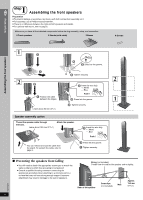
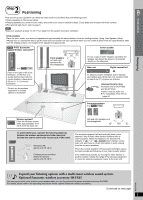
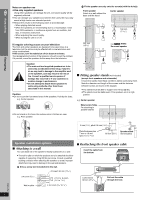
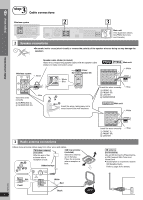
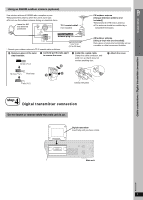
Simple Setup Cable connections 3 step Cable connections Wireless system 2 3 FM ANT 75 LOOP ANT GND LOOP XM AM ANT EXT Main unit (The illustration shows SC-PT950 for U.S.A. and Canada.) 2 Speaker connections ≥Be careful not to cross (short-circuit) or reverse the polarity of the speaker wires as doing so may damage the speakers. Speaker cable sticker (included) Attach the corresponding speaker cables with the speaker-cable stickers to make connection easier. Wireless system i: White e.g. [PT950] [PT953] Surround speaker (R) i: White j: Blue [PT950] [PT953] Main unit i: White FRONT Lch 1 SURROUND Rch 4 Insert the wires correctly. 3 SURROUND (L) 4 SURROUND (R) j: Blue 3 1 2 Insert the wires, taking care not to insert beyond the wire insulation. Insert the wires correctly. 1 FRONT (L) 2 FRONT (R) 5 CENTER 6 SUBWOOFER j: Blue [PT1050] Main unit i: White 3 Radio antenna connections ≥ Keep loose antenna cables away from other wires and cables. [FM\indoor\antenna] (included) Affix this end of the antenna where reception is best. 1 Adhesive tape [AM\loop\antenna] (included) Stand the antenna up on its base. Place the antenna where reception is best. 3 2 FM ANT 75 Push! LOOP ANT GND LOOP AM ANT EXT White Red RQTX0064 Black 8 Click! FRONT Lch 1 Insert the wires correctly. 1 FRONT (L) 2 FRONT (R) 5 CENTER j: Blue [XM\antenna] (not included) Use an XM Connect & Play antenna, or XM Passport Mini-Tuner and Home Dock. ≥ Subscription is required to receive XM Satellite Radio. Refer to page 30 for details. XM
-
 1
1 -
2
-
 3
3 -
 4
4 -
 5
5 -
 6
6 -
 7
7 -
 8
8 -
 9
9 -
 10
10 -
 11
11 -
 12
12 -
 13
13 -
14
-
15
-
16
-
17
-
18
-
19
-
20
-
21
-
22
-
23
-
24
-
25
-
26
-
27
-
28
-
29
-
30
-
31
-
32
-
33
-
34
-
35
-
36
-
37
-
38
-
39
-
40
-
41
-
42
-
43
-
44
 |
 |
