Panasonic SCPT1050 SCPT1050 User Guide - Page 24
Picture Menu, Audio Menu, Display Menu, Other Menu
 |
View all Panasonic SCPT1050 manuals
Add to My Manuals
Save this manual to your list of manuals |
Page 24 highlights
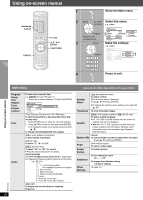
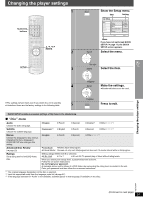
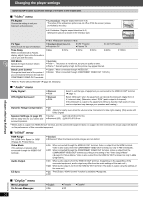
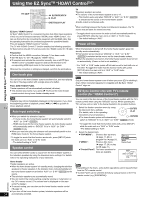
Using on-screen menus Other Settings Items shown differ depending on the type of disc. ∫ Picture Menu (Continued) HD Picture Enhancer This works when the HDMI connection is being used and "Video Mode" (➜ page 26, "HDMI" menu) is set to "On". To sharpen the "720p, "1080i" and "1080p" picture quality Off,------. 1,------.2,------.3 (sharpest picture J This works when the HDMI connection is being used and "Video Mode" (➜ page 26, "HDMI" menu) is set to "On". HDMI Color Space To select suitable picture color with your television RGB YCbCr (4:4:4) YCbCr (4:2:2) ≥ If the setting above is not compatible with your television, it will not be displayed. ≥ "RGB Range" (➜ page 26, "HDMI" menu) is available when "RGB" is selected. ∫ Audio Menu Dolby Pro Logic II (➜ page 32, Enhancing the stereo sound: Dolby Pro Logic II/Super Surround) Dialogue Enhancer To make the dialogue in movies easier to hear [DVD-V] (Dolby Digital, DTS, 3-channel or higher, with the dialogue recorded in the center channel) On ,------. Off ∫ Display Menu Information [JPEG] On ,------. Off Subtitle Position 0 to s60 (in 2 unit steps) Subtitle Brightness Auto, 0 to s7 To select how to show images made for 4:3 aspect screens on a 16:9 aspect television 4:3 Aspect Normal: Laterally stretches images. Auto: Expands 4:3 letterbox images to fill more of the screen. Other images appear in full in the center of the screen. Shrink: Images appear in the center of the screen. Zoom: Expands to 4:3 aspect ratio. If your television has a similar feature, use it instead for a better effect. To select the appropriate screen size to fit your television screen Just Fit Zoom [DVD-VR] [DVD-V] [VCD] Auto, 4:3 Standard, European Vista, 16:9 Standard, American Vista, Cinemascope1, Cinemascope2 e.g. 4:3 Standard (4:3) European Vista (1.66:1) 16:9 Standard (16:9) American Vista (1.85:1) Cinemascope1 (2.35:1) Cinemascope2 (2.55:1) Manual Zoom Bit Rate Display GUI See-through GUI Brightness HDMI Status Quick OSD To zoom in and out manually - in 0.01-unit steps from "k1.00" to "k1.60" - in 0.02-unit steps from "k1.60" to "k2.00" ≥ To change the steps more quickly, press and hold [3, 4]. [DVD-VR] [DVD-V] [VCD] On ,------. Off To make the on-screen menu transparent Off, On, Auto To adjust the on-screen menu brightness s3 to r3 Indicates various information when connected with HDMI AV OUT terminal. (➜ below, Confirming HDMI information) To display current playback condition Off, Basics, Details After registering the item, press [RETURN] to show the QUICK OSD screen (➜ page 18). ∫ Other Menu Setup Play as DVD-VR, Play as HighMAT or Play as Data Disc (➜ page 25) To use functions for data discs (➜ page 20) (To play MP3 or JPEG files on DVD-RAM or DVD-R/RW, or to play a HighMAT disc without using the HighMAT function) Select "Play as Data Disc". Confirming HDMI information e.g. Connection status HDMI Status --- HDMI is connected. HDMI Information Audio Stream Max Channel Color Space Video Format PCM 2ch YCbCr (4:4:4)/YCbCr (4:2:2)/RGB 480i/480p 720p/1080i/1080p (➜ page 23, Video Output Mode) (➜ above, HDMI Color Space) Shows the number of audio channels. Shows the output signal type. [Note] ≥ All possible types of output are displayed. ≥ The current output for "Audio Stream", "Color Space" and "Video Format" will be underlined. (If you select a video output without an "¢" mark in the "Video Output Mode" in Picture Menu, the selected video format will not be underlined.) ≥ When "Off" is selected in "Audio Output" (➜ page 26, "HDMI" menu), "- - -" will be displayed in "Audio Stream" and "Max Channel". Using on-screen menus RQTX0064 24
-
 1
1 -
2
-
3
-
4
-
5
-
6
-
7
-
8
-
9
-
10
-
11
-
12
-
13
-
14
-
15
-
16
-
17
-
18
-
 19
19 -
 20
20 -
 21
21 -
 22
22 -
 23
23 -
 24
24 -
 25
25 -
 26
26 -
 27
27 -
 28
28 -
 29
29 -
30
-
31
-
32
-
33
-
34
-
35
-
36
-
37
-
38
-
39
-
40
-
41
-
42
-
43
-
44
 |
 |