Panasonic SV-AV30 Sd Multi Media Termi - Page 39
USING AUTO RECORDING FUNCTION, Connect the SD Multi AV Device with
 |
UPC - 820799004733
View all Panasonic SV-AV30 manuals
Add to My Manuals
Save this manual to your list of manuals |
Page 39 highlights
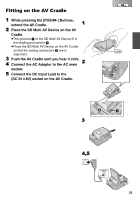
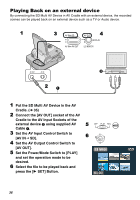
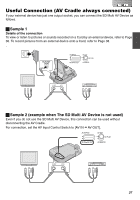
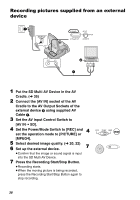
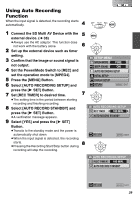
Using Auto Recording Function 4 When the input signal is detected, the recording starts automatically. 1 Connect the SD Multi AV Device with the 5 external device. (l 38) 6 ≥Always use the AC adaptor. This function does not work with the battery alone. 2 Set up the external device such as timer setting. 3 Confirm that the image or sound signal is not output. 4 Set the Power/Mode Switch to [REC] and set the operation mode to [MPEG4]. 5 Press the [MENU] Button. 6 Select [AUTO RECORDING SETUP] and press the [1 SET] Button. 7 Set [REC TIMER] to desired time. 7 ≥The setting time is the period between starting recording and finishing recording. 8 Select [AUTO RECORD STANDBY] and press the [1 SET] Button. ≥A verification message appears. 9 Select [YES] and press the [1 SET] Button. ≥Transits to the standby mode and the power is automatically shut down. ≥When the input signal is detected, the recording starts. ≥Pressing the Recording Start/Stop button during 8 recording will stop the recording. OFF PLAY REC MODE MENU SETUP MENU MPEG4 MODE FINE BEEP SOUND ON AUTO RECORDING SETUP INITIAL SETUP DISPLAY SETUP RETURN MENU EXIT AUTO RECORDING SETUP REC TIMER 180 MIN. AUTO RECORD STANDBY RETURN MENU EXIT AUTO RECORDING SETUP REC TIMER 180 MIN. AUTO RECORD STANDBY RETURN MENU EXIT 39
-
 1
1 -
2
-
3
-
4
-
5
-
6
-
7
-
8
-
9
-
10
-
11
-
12
-
13
-
14
-
15
-
16
-
17
-
18
-
19
-
20
-
21
-
22
-
23
-
24
-
25
-
26
-
27
-
28
-
29
-
30
-
31
-
32
-
33
-
 34
34 -
 35
35 -
 36
36 -
 37
37 -
 38
38 -
 39
39 -
 40
40 -
 41
41 -
 42
42 -
 43
43 -
 44
44 -
45
-
46
-
47
-
48
-
49
-
50
-
51
-
52
-
53
-
54
-
55
-
56
-
57
-
58
-
59
-
60
-
61
-
62
-
63
-
64
-
65
-
66
-
67
-
68
-
69
-
70
-
71
-
72
-
73
-
74
 |
 |
