Panasonic UF 8200 Facsimile - Page 17
Abbr Dial Key, Flash/Sub-addr Key - function keys
 |
UPC - 000037529468
View all Panasonic UF 8200 manuals
Add to My Manuals
Save this manual to your list of manuals |
Page 17 highlights
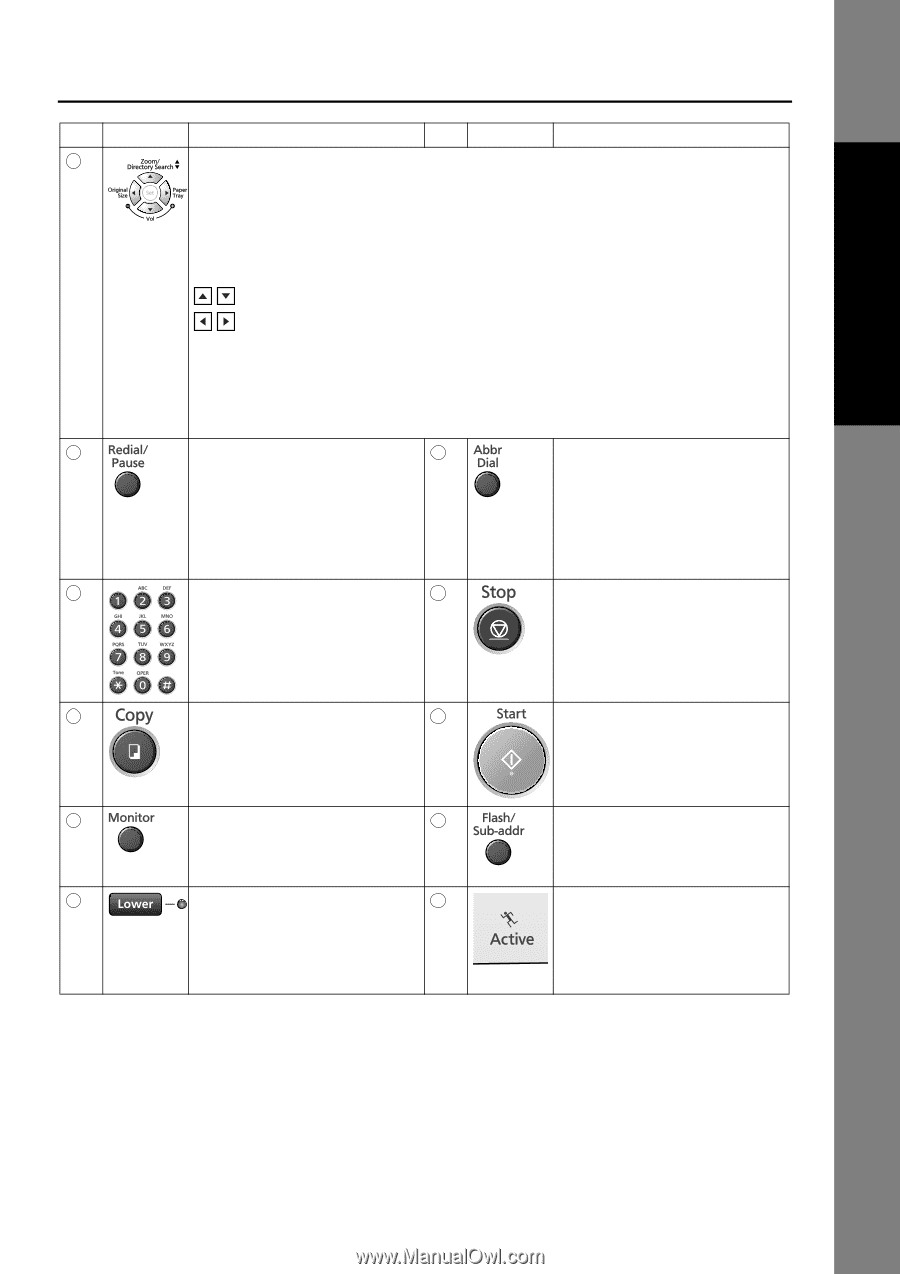
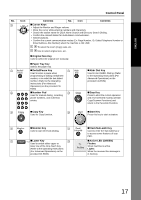
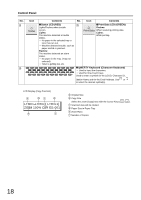
ENGLISH Control Panel No. Icon Contents No. Icon Contents 13 „ Cursor Keys • Adjust the Monitor and Ringer volume. • Move the cursor while entering numbers and characters. • Search the station name for Quick Name Search and Directory Search Dialing. • Confirm the entered station for multi-station communication. • Select functions. • Confirm the current communication modes (Ex: Page Number, ID, Dialed Telephone Number or Email Address, File Number) when the machine is ON LINE. To select the zoom (Copy) ratio, etc. Use to select original size, etc. „ Original Size Key Used to select the original size manually. „ Paper Tray Key Selects the paper tray. 14 „ Redial/Pause Key 15 „ Abbr Dial Key Used to enter a pause when Used to start ABBR. Dialing. (Refer programming or dialing a telephone to the Operating Instructions (For number, or to redial the last dialed Advanced Operations) on the number. (Refer to the Operating provided CD-ROM) Instructions (For Advanced Operations) on the provided CD- ROM) 16 „ Number Pad 17 „ Stop Key Used for manual dialing, recording Press to abort the current operation phone numbers, and numerical and reset selected mode(s) (Email/ entries. Copy/Scanner Functions) and return to the Facsimile Function. 18 „ Copy Key 19 „ Start Key Used for Copy function. Press this key to start activation. 20 „ Monitor Key 21 „ Flash/Sub-addr Key Used to start On-Hook Dialing. Used to enter the Sub-Address or to access some features of your PBX. 22 „ Lower Key 23 „ Active LED (GREEN) Used to switch either upper or Flashes: lower row of the One-Touch Key. When machine is active. (Refer to the Operating Instructions Lights: (For Advanced Operations) on the When the received fax message is provided CD-ROM) in memory. 17
-
 1
1 -
2
-
3
-
4
-
5
-
6
-
7
-
8
-
9
-
10
-
11
-
 12
12 -
 13
13 -
 14
14 -
 15
15 -
 16
16 -
 17
17 -
 18
18 -
 19
19 -
 20
20 -
 21
21 -
 22
22 -
23
-
24
-
25
-
26
-
27
-
28
-
29
-
30
-
31
-
32
-
33
-
34
-
35
-
36
-
37
-
38
-
39
-
40
-
41
-
42
-
43
-
44
-
45
-
46
-
47
-
48
-
49
-
50
-
51
-
52
-
53
-
54
-
55
-
56
-
57
-
58
-
59
-
60
-
61
-
62
 |
 |