Panasonic UF 8200 Facsimile - Page 45
Symptom, Cause / Action, If the Fax Parameter No.13 AUTO JOURNAL PRINT is
 |
UPC - 000037529468
View all Panasonic UF 8200 manuals
Add to My Manuals
Save this manual to your list of manuals |
Page 45 highlights
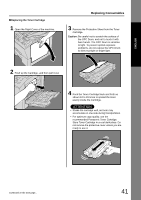
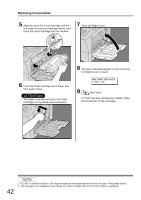
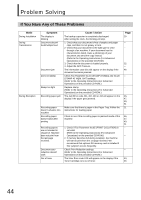
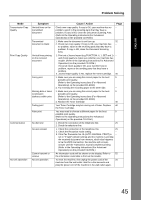
ENGLISH Problem Solving Mode Transmission Copy Quality Print Copy Quality Communication No Unit Operation Symptom Vertical lines on the transmitted document Transmitted document is blank Vertical lines printing on the received document Fuzzy print Missing dots or lines/ inconsistent darkness within print Fading print Faint print No dial tone No auto answer Cannot transmit or receive No unit operation Cause / Action Page Check own copy quality. If copy is OK, your machine has no -problem, report to the receiving party that they have a problem. If copy is NG, clean the Document Scanning Area. (Refer to the Operating Instructions (For Advanced Operations) on the provided CD-ROM.) 1. Make sure the document is set face up. 32 2. Check own copy quality. If copy is OK, your machine has -- no problem, report to the receiving party that they have a problem. If copy is NG, clean the Document Scanning Area. 1. Print out a Journal report (e.g.FUNCTION, 6, 1, SET and 1) -and check quality to make sure whether your machine has trouble. (Refer to the Operating Instructions (For Advanced Operations) on the provided CD-ROM.) If Journal report quality is OK, your machine has no problem, report to the sending party that they have a problem. 2. Journal report quality is NG, replace the Toner Cartridge. 40 1. Make sure you are using the correct paper for the best 9 possible print quality. (Refer to the Operating Instructions (For Advanced Operations) on the provided CD-ROM.) 2. Try reversing the recording paper to the other side. -- 1. Make sure you are using the correct paper for the best 9 possible print quality. (Refer to the Operating Instructions (For Advanced Operations) on the provided CD-ROM.) 2. Replace the Toner Cartridge. 40 Your Toner Cartridge may be running out of toner. Replace 40 the Toner Cartridge. You may need to choose a different paper for the best 9 possible print quality. (Refer to the Operating Instructions (For Advanced Operations) on the provided CD-ROM.) 1. Check the connection of the telephone line. 25 2. Check the telephone line. 1. Check the connection of the telephone line. 25 2. Check the Reception mode setting. -- 3. If the Fax Parameter No.13 (AUTO JOURNAL PRINT) is -- set to "2:Valid" (default setting) and the machine is printing the received document from memory, which also happens to be the 200th transaction, the machine will not auto answer until the Transaction Journal completes printing. (Refer to the Operating Instructions (For Advanced Operations) on the provided CD-ROM.) An information code will be shown on the display. Refer to 52 the information code table to find out the trouble. To reset the machine, first unplug the power cord of the 25 machine from the wall outlet. Wait for a few seconds and plug the power cord of the machine in the wall outlet again. 45
-
 1
1 -
2
-
3
-
4
-
5
-
6
-
7
-
8
-
9
-
10
-
11
-
12
-
13
-
14
-
15
-
16
-
17
-
18
-
19
-
20
-
21
-
22
-
23
-
24
-
25
-
26
-
27
-
28
-
29
-
30
-
31
-
32
-
33
-
34
-
35
-
36
-
37
-
38
-
39
-
 40
40 -
 41
41 -
 42
42 -
 43
43 -
 44
44 -
 45
45 -
 46
46 -
 47
47 -
 48
48 -
 49
49 -
 50
50 -
51
-
52
-
53
-
54
-
55
-
56
-
57
-
58
-
59
-
60
-
61
-
62
 |
 |