Pentax 18506 Operation Manual - Page 73
Selecting the Recorded Pixels, Press the MENU button in Capture mode., Use the four-way controller
 |
UPC - 027075114531
View all Pentax 18506 manuals
Add to My Manuals
Save this manual to your list of manuals |
Page 73 highlights
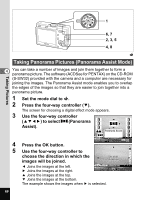
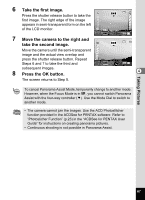
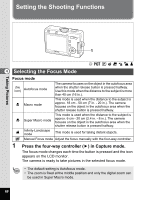
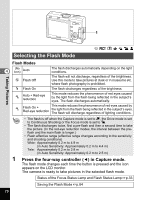
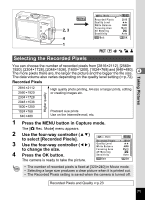
Taking Pictures MENU 2, 3 4 1 Rec. Mode Recorded Pixels Quality Level White Balance Focusing Area AE Metering Sensitivity MENU E x i t 2816 AWB Multi Auto OK OK d R + . H = Selecting the Recorded Pixels You can choose the number of recorded pixels from [2816×2112], [2560× 1920], [2304×1728], [2048×1536], [1600×1200], [1024×768] and [640×480]. The more pixels there are, the larger the picture and the bigger the file size. 4 The data volume also varies depending on the quality level setting (1p.72). Recorded Pixels 2816 ×2112 2560 ×1920 2304 ×1728 2048 ×1536 1600 ×1200 1024 ×768 640 ×480 Higher quality High quality photo printing, A4 size or larger prints, editing or creating images etc. Postcard size prints Use on the Internet/e-mail, etc. 1 Press the MENU button in Capture mode. The [A Rec. Mode] menu appears. 2 Use the four-way controller (23) to select [Recorded Pixels]. Rec. Mode Recorded Pixels 2816 3 Use the four-way controller (45) Quality Level White Balance AWB to change the size. Focusing Area Multi 4 Press the OK button. AE Metering Sensitivity Auto The camera is ready to take the picture. MENU E x i t OK OK • The number of recorded pixels is fixed at [320×240] in Movie mode. • Selecting a large size produces a clear picture when it is printed out. • The Recorded Pixels setting is saved when the camera is turned off. Recorded Pixels and Quality 1p.23 71
-
 1
1 -
2
-
3
-
4
-
5
-
6
-
7
-
8
-
9
-
10
-
11
-
12
-
13
-
14
-
15
-
16
-
17
-
18
-
19
-
20
-
21
-
22
-
23
-
24
-
25
-
26
-
27
-
28
-
29
-
30
-
31
-
32
-
33
-
34
-
35
-
36
-
37
-
38
-
39
-
40
-
41
-
42
-
43
-
44
-
45
-
46
-
47
-
48
-
49
-
50
-
51
-
52
-
53
-
54
-
55
-
56
-
57
-
58
-
59
-
60
-
61
-
62
-
63
-
64
-
65
-
66
-
67
-
 68
68 -
 69
69 -
 70
70 -
 71
71 -
 72
72 -
 73
73 -
 74
74 -
 75
75 -
 76
76 -
 77
77 -
 78
78 -
79
-
80
-
81
-
82
-
83
-
84
-
85
-
86
-
87
-
88
-
89
-
90
-
91
-
92
-
93
-
94
-
95
-
96
-
97
-
98
-
99
-
100
-
101
-
102
-
103
-
104
-
105
-
106
-
107
-
108
-
109
-
110
-
111
-
112
-
113
-
114
-
115
-
116
-
117
-
118
-
119
-
120
-
121
-
122
-
123
-
124
-
125
-
126
-
127
-
128
-
129
-
130
-
131
-
132
-
133
-
134
-
135
-
136
-
137
-
138
-
139
-
140
-
141
-
142
-
143
-
144
-
145
-
146
-
147
-
148
-
149
-
150
-
151
-
152
-
153
-
154
-
155
-
156
 |
 |
