Pentax 18506 Operation Manual - Page 77
Changing the Focusing Area, Press the MENU button in Capture mode., Use the four-way controller
 |
UPC - 027075114531
View all Pentax 18506 manuals
Add to My Manuals
Save this manual to your list of manuals |
Page 77 highlights
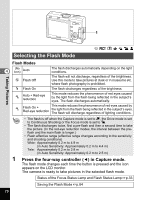
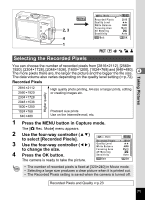
Taking Pictures MENU 2, 3 4 1 Rec. Mode Recorded Pixels Quality Level White Balance Focusing Area AE Metering Sensitivity MENU E x i t 2816 AWB Multi Auto OK OK d R + . H = Changing the Focusing Area You can change the autofocus area (Focusing Area). Focusing Area 4 Multi This is the default setting with the camera checking several points over a larger area of the image ensuring that the main subject is in focus. Spot The camera only focuses on a small area in the center of the screen, this is ideal for precise focusing on a specific point of the subject. 1 Press the MENU button in Capture mode. The [A Rec. Mode] menu appears. 2 Use the four-way controller (23) Rec. Mode to select [Focusing Area]. Recorded Pixels 2816 3 Use the four-way controller (45) Quality Level White Balance AWB to change the setting. Focusing Area AE Metering Multi 4 Press the OK button. Sensitivity MENU E x i t Auto OK OK The camera is ready to take the picture. When the shutter release button is pressed while [Multi] is selected for the focusing area, the focus frame lights at the focus position. Always check the focusing area on the LCD monitor when using the autofocus area to focus on your subject. Saving the Focusing Area Setting 1p.84 75
-
 1
1 -
2
-
3
-
4
-
5
-
6
-
7
-
8
-
9
-
10
-
11
-
12
-
13
-
14
-
15
-
16
-
17
-
18
-
19
-
20
-
21
-
22
-
23
-
24
-
25
-
26
-
27
-
28
-
29
-
30
-
31
-
32
-
33
-
34
-
35
-
36
-
37
-
38
-
39
-
40
-
41
-
42
-
43
-
44
-
45
-
46
-
47
-
48
-
49
-
50
-
51
-
52
-
53
-
54
-
55
-
56
-
57
-
58
-
59
-
60
-
61
-
62
-
63
-
64
-
65
-
66
-
67
-
68
-
69
-
70
-
71
-
 72
72 -
 73
73 -
 74
74 -
 75
75 -
 76
76 -
 77
77 -
 78
78 -
 79
79 -
 80
80 -
 81
81 -
 82
82 -
83
-
84
-
85
-
86
-
87
-
88
-
89
-
90
-
91
-
92
-
93
-
94
-
95
-
96
-
97
-
98
-
99
-
100
-
101
-
102
-
103
-
104
-
105
-
106
-
107
-
108
-
109
-
110
-
111
-
112
-
113
-
114
-
115
-
116
-
117
-
118
-
119
-
120
-
121
-
122
-
123
-
124
-
125
-
126
-
127
-
128
-
129
-
130
-
131
-
132
-
133
-
134
-
135
-
136
-
137
-
138
-
139
-
140
-
141
-
142
-
143
-
144
-
145
-
146
-
147
-
148
-
149
-
150
-
151
-
152
-
153
-
154
-
155
-
156
 |
 |
