Pentax Optio RZ18 White Operation Manual - Page 131
Selecting the Recorded Pixels and Frame Rate for Movies, Press the, button in, mode.
 |
View all Pentax Optio RZ18 White manuals
Add to My Manuals
Save this manual to your list of manuals |
Page 131 highlights
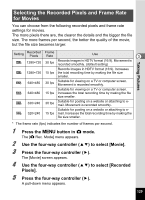
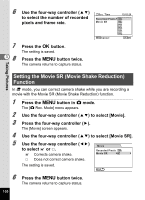
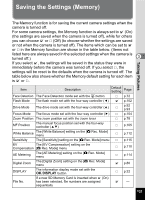
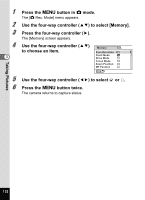
Selecting the Recorded Pixels and Frame Rate for Movies You can choose from the following recorded pixels and frame rate settings for movies. The more pixels there are, the clearer the details and the bigger the file size. The more frames per second, the better the quality of the movie, but the file size becomes larger. Taking Pictures Setting Recorded Pixels Frame Rate Use 3 M 1280×720 30 fps Records images in HDTV format (16:9). Movement is recorded smoothly. (default setting) Records images in HDTV format (16:9). Increases F 1280×720 15 fps the total recording time by making the file size smaller. G 640×480 30 fps Suitable for viewing on a TV or computer screen. Movement is recorded smoothly. Suitable for viewing on a TV or computer screen. H 640×480 15 fps Increases the total recording time by making the file size smaller. I 320×240 30 fps Suitable for posting on a website or attaching to email. Movement is recorded smoothly. Suitable for posting on a website or attaching to eJ 320×240 15 fps mail. Increases the total recording time by making the file size smaller. * The frame rate (fps) indicates the number of frames per second. 1 Press the 3 button in A mode. The [A Rec. Mode] menu appears. 2 Use the four-way controller (23) to select [Movie]. 3 Press the four-way controller (5). The [Movie] screen appears. 4 Use the four-way controller (23) to select [Recorded Pixels]. 5 Press the four-way controller (5). A pull-down menu appears. 129
-
 1
1 -
2
-
3
-
4
-
5
-
6
-
7
-
8
-
9
-
10
-
11
-
12
-
13
-
14
-
15
-
16
-
17
-
18
-
19
-
20
-
21
-
22
-
23
-
24
-
25
-
26
-
27
-
28
-
29
-
30
-
31
-
32
-
33
-
34
-
35
-
36
-
37
-
38
-
39
-
40
-
41
-
42
-
43
-
44
-
45
-
46
-
47
-
48
-
49
-
50
-
51
-
52
-
53
-
54
-
55
-
56
-
57
-
58
-
59
-
60
-
61
-
62
-
63
-
64
-
65
-
66
-
67
-
68
-
69
-
70
-
71
-
72
-
73
-
74
-
75
-
76
-
77
-
78
-
79
-
80
-
81
-
82
-
83
-
84
-
85
-
86
-
87
-
88
-
89
-
90
-
91
-
92
-
93
-
94
-
95
-
96
-
97
-
98
-
99
-
100
-
101
-
102
-
103
-
104
-
105
-
106
-
107
-
108
-
109
-
110
-
111
-
112
-
113
-
114
-
115
-
116
-
117
-
118
-
119
-
120
-
121
-
122
-
123
-
124
-
125
-
 126
126 -
 127
127 -
 128
128 -
 129
129 -
 130
130 -
 131
131 -
 132
132 -
 133
133 -
 134
134 -
 135
135 -
 136
136 -
137
-
138
-
139
-
140
-
141
-
142
-
143
-
144
-
145
-
146
-
147
-
148
-
149
-
150
-
151
-
152
-
153
-
154
-
155
-
156
-
157
-
158
-
159
-
160
-
161
-
162
-
163
-
164
-
165
-
166
-
167
-
168
-
169
-
170
-
171
-
172
-
173
-
174
-
175
-
176
-
177
-
178
-
179
-
180
-
181
-
182
-
183
-
184
-
185
-
186
-
187
-
188
-
189
-
190
-
191
-
192
-
193
-
194
-
195
-
196
-
197
-
198
-
199
-
200
-
201
-
202
-
203
-
204
-
205
-
206
-
207
-
208
-
209
-
210
-
211
-
212
-
213
-
214
-
215
-
216
-
217
-
218
-
219
-
220
-
221
-
222
-
223
-
224
-
225
-
226
-
227
-
228
-
229
-
230
-
231
-
232
-
233
-
234
-
235
-
236
-
237
-
238
-
239
-
240
-
241
-
242
-
243
-
244
-
245
-
246
-
247
-
248
-
249
-
250
-
251
-
252
-
253
-
254
-
255
-
256
-
257
-
258
-
259
-
260
 |
 |
