Pentax Optio RZ18 White Operation Manual - Page 62
Press the, button or the four-way controller, Press the shutter release button halfway., button.
 |
View all Pentax Optio RZ18 White manuals
Add to My Manuals
Save this manual to your list of manuals |
Page 62 highlights
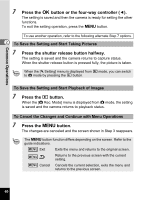
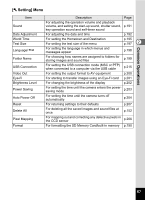
Common Operations 7 Press the 4 button or the four-way controller (4). The setting is saved and then the camera is ready for setting the other functions. To exit the setting operation, press the 3 button. To use another operation, refer to the following alternate Step 7 options. 2 To Save the Setting and Start Taking Pictures 7 Press the shutter release button halfway. The setting is saved and the camera returns to capture status. When the shutter release button is pressed fully, the picture is taken. When the [W Setting] menu is displayed from Q mode, you can switch to A mode by pressing the Q button. To Save the Setting and Start Playback of Images 7 Press the Q button. When the [A Rec. Mode] menu is displayed from A mode, the setting is saved and the camera returns to playback status. To Cancel the Changes and Continue with Menu Operations 7 Press the 3 button. The changes are canceled and the screen shown in Step 3 reappears. The 3 button function differs depending on the screen. Refer to the guide indications. MENU Exit Exits the menu and returns to the original screen. MENU Returns to the previous screen with the current setting. MENU Cancel Cancels the current selection, exits the menu and returns to the previous screen. 60
-
 1
1 -
2
-
3
-
4
-
5
-
6
-
7
-
8
-
9
-
10
-
11
-
12
-
13
-
14
-
15
-
16
-
17
-
18
-
19
-
20
-
21
-
22
-
23
-
24
-
25
-
26
-
27
-
28
-
29
-
30
-
31
-
32
-
33
-
34
-
35
-
36
-
37
-
38
-
39
-
40
-
41
-
42
-
43
-
44
-
45
-
46
-
47
-
48
-
49
-
50
-
51
-
52
-
53
-
54
-
55
-
56
-
 57
57 -
 58
58 -
 59
59 -
 60
60 -
 61
61 -
 62
62 -
 63
63 -
 64
64 -
 65
65 -
 66
66 -
 67
67 -
68
-
69
-
70
-
71
-
72
-
73
-
74
-
75
-
76
-
77
-
78
-
79
-
80
-
81
-
82
-
83
-
84
-
85
-
86
-
87
-
88
-
89
-
90
-
91
-
92
-
93
-
94
-
95
-
96
-
97
-
98
-
99
-
100
-
101
-
102
-
103
-
104
-
105
-
106
-
107
-
108
-
109
-
110
-
111
-
112
-
113
-
114
-
115
-
116
-
117
-
118
-
119
-
120
-
121
-
122
-
123
-
124
-
125
-
126
-
127
-
128
-
129
-
130
-
131
-
132
-
133
-
134
-
135
-
136
-
137
-
138
-
139
-
140
-
141
-
142
-
143
-
144
-
145
-
146
-
147
-
148
-
149
-
150
-
151
-
152
-
153
-
154
-
155
-
156
-
157
-
158
-
159
-
160
-
161
-
162
-
163
-
164
-
165
-
166
-
167
-
168
-
169
-
170
-
171
-
172
-
173
-
174
-
175
-
176
-
177
-
178
-
179
-
180
-
181
-
182
-
183
-
184
-
185
-
186
-
187
-
188
-
189
-
190
-
191
-
192
-
193
-
194
-
195
-
196
-
197
-
198
-
199
-
200
-
201
-
202
-
203
-
204
-
205
-
206
-
207
-
208
-
209
-
210
-
211
-
212
-
213
-
214
-
215
-
216
-
217
-
218
-
219
-
220
-
221
-
222
-
223
-
224
-
225
-
226
-
227
-
228
-
229
-
230
-
231
-
232
-
233
-
234
-
235
-
236
-
237
-
238
-
239
-
240
-
241
-
242
-
243
-
244
-
245
-
246
-
247
-
248
-
249
-
250
-
251
-
252
-
253
-
254
-
255
-
256
-
257
-
258
-
259
-
260
 |
 |
