Pentax Optio RZ18 White Operation Manual - Page 164
Processing Images to Make Faces Look Smaller, Small Face
 |
View all Pentax Optio RZ18 White manuals
Add to My Manuals
Save this manual to your list of manuals |
Page 164 highlights
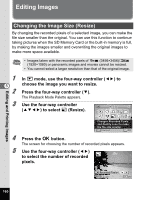
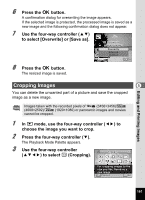
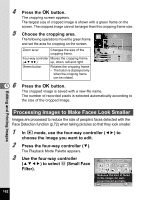
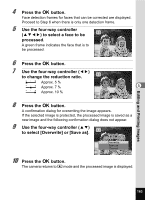
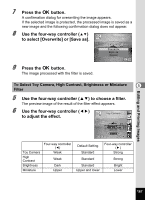
4 5 56 Press the 4 button. The cropping screen appears. The largest size of cropped image is shown with a green frame on the screen. The cropped image cannot be larger than this cropping frame size. Choose the cropping area. The following operations move the green frame and set the area for cropping on the screen. Zoom lever Changes the size of the cropping frame. Four-way controller Moves the cropping frame MENU Cancel OK OK (2345) up, down, left and right. Green button Rotates the cropping frame. • The button is displayed only when the cropping frame can be rotated. Press the 4 button. The cropped image is saved with a new file name. The number of recorded pixels is selected automatically according to the size of the cropped image. Editing and Printing Images Processing Images to Make Faces Look Smaller Images are processed to reduce the size of people's faces detected with the Face Detection function (p.72) when taking pictures so that they look smaller. 1 In Q mode, use the four-way controller (45) to choose the image you want to edit. 2 Press the four-way controller (3). The Playback Mode Palette appears. 3 Use the four-way controller (2345) to select k (Small Face Filter). Small Face Filter 1/2 Reduces the size of faces in the image, for well- proportioned portraits MENU Cancel OK OK 162
-
 1
1 -
2
-
3
-
4
-
5
-
6
-
7
-
8
-
9
-
10
-
11
-
12
-
13
-
14
-
15
-
16
-
17
-
18
-
19
-
20
-
21
-
22
-
23
-
24
-
25
-
26
-
27
-
28
-
29
-
30
-
31
-
32
-
33
-
34
-
35
-
36
-
37
-
38
-
39
-
40
-
41
-
42
-
43
-
44
-
45
-
46
-
47
-
48
-
49
-
50
-
51
-
52
-
53
-
54
-
55
-
56
-
57
-
58
-
59
-
60
-
61
-
62
-
63
-
64
-
65
-
66
-
67
-
68
-
69
-
70
-
71
-
72
-
73
-
74
-
75
-
76
-
77
-
78
-
79
-
80
-
81
-
82
-
83
-
84
-
85
-
86
-
87
-
88
-
89
-
90
-
91
-
92
-
93
-
94
-
95
-
96
-
97
-
98
-
99
-
100
-
101
-
102
-
103
-
104
-
105
-
106
-
107
-
108
-
109
-
110
-
111
-
112
-
113
-
114
-
115
-
116
-
117
-
118
-
119
-
120
-
121
-
122
-
123
-
124
-
125
-
126
-
127
-
128
-
129
-
130
-
131
-
132
-
133
-
134
-
135
-
136
-
137
-
138
-
139
-
140
-
141
-
142
-
143
-
144
-
145
-
146
-
147
-
148
-
149
-
150
-
151
-
152
-
153
-
154
-
155
-
156
-
157
-
158
-
 159
159 -
 160
160 -
 161
161 -
 162
162 -
 163
163 -
 164
164 -
 165
165 -
 166
166 -
 167
167 -
 168
168 -
 169
169 -
170
-
171
-
172
-
173
-
174
-
175
-
176
-
177
-
178
-
179
-
180
-
181
-
182
-
183
-
184
-
185
-
186
-
187
-
188
-
189
-
190
-
191
-
192
-
193
-
194
-
195
-
196
-
197
-
198
-
199
-
200
-
201
-
202
-
203
-
204
-
205
-
206
-
207
-
208
-
209
-
210
-
211
-
212
-
213
-
214
-
215
-
216
-
217
-
218
-
219
-
220
-
221
-
222
-
223
-
224
-
225
-
226
-
227
-
228
-
229
-
230
-
231
-
232
-
233
-
234
-
235
-
236
-
237
-
238
-
239
-
240
-
241
-
242
-
243
-
244
-
245
-
246
-
247
-
248
-
249
-
250
-
251
-
252
-
253
-
254
-
255
-
256
-
257
-
258
-
259
-
260
 |
 |
