Pentax Optio RZ18 White Operation Manual - Page 234
Troubleshooting
 |
View all Pentax Optio RZ18 White manuals
Add to My Manuals
Save this manual to your list of manuals |
Page 234 highlights
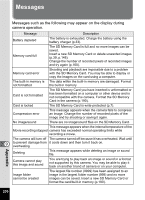
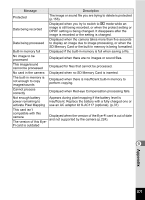
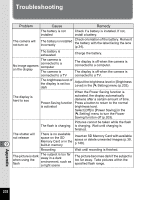
Troubleshooting Problem Cause Remedy The battery is not installed Check if a battery is installed. If not, install a battery. The camera will not turn on The battery is installed incorrectly Check orientation of the battery. Reinsert the battery with the label facing the lens (p.34). The battery is exhausted Charge the battery. The camera is connected to a No image appears computer on the display The camera is connected to a TV The display is off when the camera is connected to a computer. The display is off when the camera is connected to a TV. The brightness level of the display is set too dark Adjust the brightness level in [Brightness Level] in the [W Setting] menu (p.202). The display is hard to see When the Power Saving function is activated, the display automatically darkens after a certain amount of time. Power Saving function Press a button to return to the normal is activated brightness level. Select [Off] in [Power Saving] in the [W Setting] menu to turn the Power Saving function off (p.203). Pictures cannot be taken while the flash The flash is charging is charging. Wait until charging is finished. The shutter will not release 9 There is no available space on the SD Memory Card or in the built-in memory Insert an SD Memory Card with available space or delete unwanted images (p.39, p.148). Recording Wait until recording is finished. The picture is dark when using the flash The subject is too far away in a dark environment, such as a night scene The picture becomes dark if the subject is too far away. Take pictures within the specified flash range. Appendix 232
-
 1
1 -
2
-
3
-
4
-
5
-
6
-
7
-
8
-
9
-
10
-
11
-
12
-
13
-
14
-
15
-
16
-
17
-
18
-
19
-
20
-
21
-
22
-
23
-
24
-
25
-
26
-
27
-
28
-
29
-
30
-
31
-
32
-
33
-
34
-
35
-
36
-
37
-
38
-
39
-
40
-
41
-
42
-
43
-
44
-
45
-
46
-
47
-
48
-
49
-
50
-
51
-
52
-
53
-
54
-
55
-
56
-
57
-
58
-
59
-
60
-
61
-
62
-
63
-
64
-
65
-
66
-
67
-
68
-
69
-
70
-
71
-
72
-
73
-
74
-
75
-
76
-
77
-
78
-
79
-
80
-
81
-
82
-
83
-
84
-
85
-
86
-
87
-
88
-
89
-
90
-
91
-
92
-
93
-
94
-
95
-
96
-
97
-
98
-
99
-
100
-
101
-
102
-
103
-
104
-
105
-
106
-
107
-
108
-
109
-
110
-
111
-
112
-
113
-
114
-
115
-
116
-
117
-
118
-
119
-
120
-
121
-
122
-
123
-
124
-
125
-
126
-
127
-
128
-
129
-
130
-
131
-
132
-
133
-
134
-
135
-
136
-
137
-
138
-
139
-
140
-
141
-
142
-
143
-
144
-
145
-
146
-
147
-
148
-
149
-
150
-
151
-
152
-
153
-
154
-
155
-
156
-
157
-
158
-
159
-
160
-
161
-
162
-
163
-
164
-
165
-
166
-
167
-
168
-
169
-
170
-
171
-
172
-
173
-
174
-
175
-
176
-
177
-
178
-
179
-
180
-
181
-
182
-
183
-
184
-
185
-
186
-
187
-
188
-
189
-
190
-
191
-
192
-
193
-
194
-
195
-
196
-
197
-
198
-
199
-
200
-
201
-
202
-
203
-
204
-
205
-
206
-
207
-
208
-
209
-
210
-
211
-
212
-
213
-
214
-
215
-
216
-
217
-
218
-
219
-
220
-
221
-
222
-
223
-
224
-
225
-
226
-
227
-
228
-
 229
229 -
 230
230 -
 231
231 -
 232
232 -
 233
233 -
 234
234 -
 235
235 -
 236
236 -
 237
237 -
 238
238 -
 239
239 -
240
-
241
-
242
-
243
-
244
-
245
-
246
-
247
-
248
-
249
-
250
-
251
-
252
-
253
-
254
-
255
-
256
-
257
-
258
-
259
-
260
 |
 |
