Pfaff 139 Owner's Manual - Page 18
supérleur
 |
View all Pfaff 139 manuals
Add to My Manuals
Save this manual to your list of manuals |
Page 18 highlights
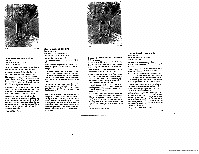
Schrägband-Einfal3apparat ..lApparat: Best.-Nr. 91-041 894-23, Full: Best.-Nr. 91-041 895-04) Apparat mit der Schraube A aut der Gnundplatte testschrauben. Dazugehoiigen Full, nach Enttemen des norma en Nithtulles anschrauben. Baridanfang spitz zuschneiden cod Band durch die BandfUhnung schieben bis es am Auslaut hervortittl. Aid gluiuhinäl3igs Umschlagen des Bandes achten und Band bia unter den Nithtull ziehen. ArbeitsstOck mit der Kanlo in die FUhrung am abgewickolton Ausisuf des Apparales schie ben. Einstellung: Schraube A lösen und Apparat so lostsetzen, daJ3 die Naht auf Ober- cod Unter seite im gteichori Abstand zur Bandkante verläuft. Schraube A wieder testziehen. Bias binder (Part No. ot attachment: 91-041 894-23, part No. of foot: 91-041 895-04) Secure the bias binder to the bodplato with screw A, snd replace the normal presser toot by the special presser root to be used with the binder. Cut the end of the tape to a long point and push the tape through the binder unlit it emerges in the exit. Make sure the binding is bIded evenly and pull it through the attachment until its end is posi tioned under the presser loot. Insert the edge to be bound in the slot of the binder. Setting: Loosen screw A and adjust the binder so that tim stitching margin is the same on the top and bottom ot the binding. Tighten screw A again. Bordeur au biais (Appareil n 91-041 894-23, Pied n 91-041 895-04) Fixer lappareit it laldo de a vis A sur lo plateau fondamental. Remplacer lo pied normal par Ia pied bordeur. Couper 'extrémitit du biais en pointe pour pouvoir Jo taire passer plus I acilemnnl par to bordeur. Veil ler au rempliage régutier dii biaix nIle tirer jusque sous In pied bordeur. Engager Jo bord it border it bond clans Ia goulotle coudito do lappareil. Réglage: Desserrer Ia vis A 01 régter tappareil Jusquit ce quo, it lenvers 01 it lendroil, a cou ture paraisso it distances itgalos du bord. Rex serrer Ia vis A. Aparato ribeteador para cintas al sesgo (Apsrato: N° do podido 91-041 594-23: Pie: Mde pedido 91-041 895-04) Fije el sparato en Ia placa base medianle el honiillo A. Atomille ol pie especial, quo reomplaza al pie normal. Corto en punlael comienzo do Ia cinta, lntroduzca Is cinta en Ia guia y empUjela hasta quo asorno pm Ia salida. Vaya doblando Ia cinta unitormo manley Ilitvela hasta debajo del pie prensatelas. lntroduzca el canlo do Ia pieza de 005tura en Ia tormlnación angular del aparato. Ajuste: atloje el tornillo A y posicione el oparato do forms quo Ia costura, tanto on a cars como en el rosits, so halle exactamonte ala misma distan cia del borde de Ia cinta. Apriole de nuovo el tomillo A. Belt guard above the tabletop The bolt guard is titled as follows: Place belt guard 1 on the table and secure it in position with screws 2. Adjust it so that it reliably covers the point of bolt entry. Tighten screws 2 securely. Achtung: Maschinon ohne Riomenschutz in mit Motorantrieb Betrieb setzon. nb DunalnegsserttheNbeevlet rguruanrdahpasowbeere-ndrpivroepnermlyafcihttiende. Attention: machines No jamais mettro it commando par en marcho les moteur sans le gardo-courroie en place. Atenclón: martha xiii No pongs nunca to mitquina en haber colocado antos ol guarda corroas. Garde-courrole supérleur Monter lo garde-courroio on procédant comme suit Monler to garde-courroio 1 ella tixer it raido dos vis 2, Alignar los plaques do manlitro quo le point dattaquo do Ia courrolo soil couvort avec certitude. Sorror los via 2. Riemenschutz oberhaib der Tischplatte Schulz wie tolgt montieron: Riemenschulz 1 autsotzon urid mit den ben 2 tixioren. Sctiutz so ausrictiton, Riemoneinlauf sicher abgeachirmt wird. Schrau doll dor Schrau ben 2 testziehon. Guardacorreas superior Monte ol guardacorreas do Ia torma siguiente: CtqouomoloilqIlaousoco2e.rlrPogaousaqircudiaaodcnoearrbeolioagnsuap1 rrydoataecsgoeigrdrOse.raosAlopdrocioottonermllooass tomillos 2. 35
-
 1
1 -
2
-
3
-
4
-
5
-
6
-
7
-
8
-
9
-
10
-
11
-
12
-
 13
13 -
 14
14 -
 15
15 -
 16
16 -
 17
17 -
 18
18 -
 19
19 -
 20
20 -
 21
21
 |
 |
