Pfaff ambition Owner's Manual - Page 27
Sewing
 |
View all Pfaff ambition manuals
Add to My Manuals
Save this manual to your list of manuals |
Page 27 highlights
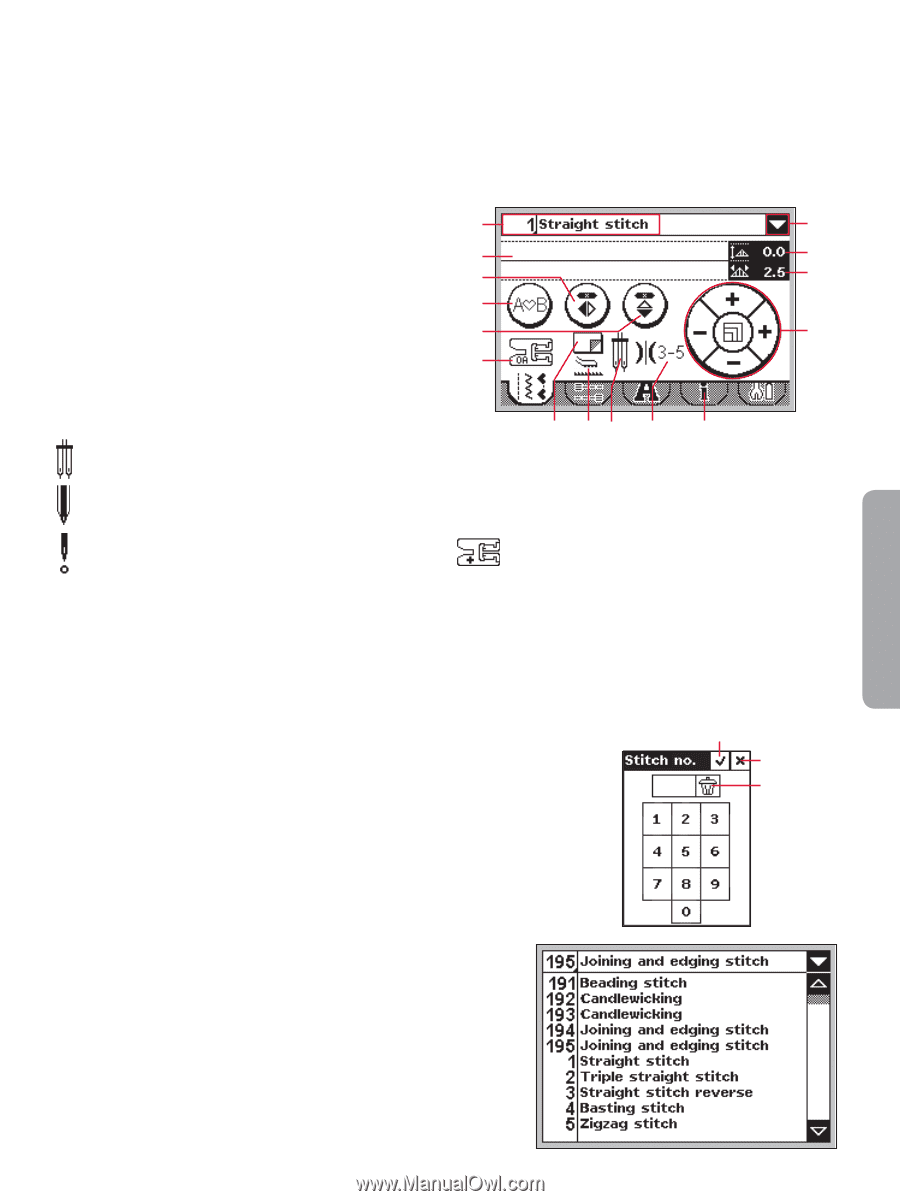
Sewing Sewing Sewing mode is the first view on the screen after you turn on the machine. Your selected stitch will be shown in real size in the stitch field. Here you will find all the basic information you need to start sewing. Straight stitch is selected by default. Sewing mode - overview (1.5) 1. Selected stitch number and name 1 11 2. Stitch field 3. Sequencing 2 4 12 13 4. Mirror side to side 3 5. Mirror end to end 5 14 6. Presser foot recommendation 7. Stabilizer recommendation 6 8. Feed dog/IDT™ recommendation 9. Needle recommendation/setting 7 8 9 10 A Set for twin needle Wing needle recommended Set for stitch width safety 10. Recommended tension 11. Drop down stitch selection 12. Stitch width/stitch positioning 13. Stitch length/density 14. Touch wheel Note: All symbols and options will not be shown at the same time. Note: If the presser foot recommendation shows a presser foot with a "+", an optional presser foot is required for the selected stitch. Go to the stitch information tab (A) for details. 15 17 16 Select a stitch Touch the stitch number on the screen (1) to open the selection keypad. Touch 1-9 to select the corresponding stitch. Press two or three digits in quick succession to select a stitch from 10 and up. Touch the OK icon (15) to confirm your stitch selection. Touch the delete icon (16) to erase entered number. Touch cancel (17) to close the keypad without selecting a stitch. If the stitch number does not exist, you will hear a beep and the first entered digit will be selected as a stitch. You can also select a stitch by touching the drop down stitch selection (11), and select from the drop down list. Touch the arrows to scroll up and down in the list and touch a stitch name to select it. 3:1
-
 1
1 -
2
-
3
-
4
-
5
-
6
-
7
-
8
-
9
-
10
-
11
-
12
-
13
-
14
-
15
-
16
-
17
-
18
-
19
-
20
-
21
-
 22
22 -
 23
23 -
 24
24 -
 25
25 -
 26
26 -
 27
27 -
 28
28 -
 29
29 -
 30
30 -
 31
31 -
 32
32 -
33
-
34
-
35
-
36
-
37
-
38
-
39
-
40
-
41
-
42
-
43
-
44
-
45
-
46
-
47
-
48
-
49
-
50
-
51
-
52
 |
 |