Pfaff creative 2170 Owner's Manual - Page 44
Function Buttons
 |
View all Pfaff creative 2170 manuals
Add to My Manuals
Save this manual to your list of manuals |
Page 44 highlights
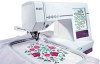
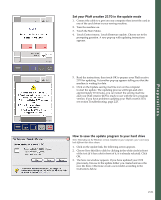
Sewing Function Buttons A. Thread Snips Button B. Pattern start C. Sew Slow Button D. Needle Up/Down Button E. Bobbin Thread Monitor F. Reverse Sewing Button A. Thread Snips Button When pressing this button the machine automatically cuts the bobbin and needle thread. If you press the button while sewing, the machine will finish the stitch, make a tie-off and cut the threads. B. Pattern start This button has two functions. If you press this button while sewing, the machine finishes the stitch its own and makes a tie-off. If you press it once you have stopped the machine, it goes back to the beginning of that stitch. C. Sew Slow Button When pressing this button the sewing speed is lowered. D. Needle Up/Down Button If you press this button, the needle automatically comes to rest in the lower position when you stop sewing. When pressing this button the following dialog window (G) opens on your screen. You can choose how high you want the presser foot to be lifted when you take your foot off the foot control. When you press the foot control again the presser foot is automatically lowered again. This makes it easy for you when turning a corner, quilting etc. E F G. E. Bobbin Thread Monitor When the bobbin thread is running out the bobbin thread monitor flashes. Note: The Bobbin Thread Monitor only works if the hook cover is closed. F. Reverse Sewing Button The Reverse Sewing Button has several different functions in the sewing mode. 1. If you press the button while sewing, the machine sews in reverse for as long as you keep the button pressed. 2. If you press this button before starting to sew, the machine sews in reverse until you press the button again. When the function is activated, a reverse sewing arrow appears on the Multi Color H Touch Screen (H). 3. If you have activated the Tie-off program, tie-off at the end is initiated via this button. When the tie-off is selected it is indicated by that the single stitch icon is activated. 4. In the Patchwork, Tapering, Four sewing directions and Darning programs, you determine the length of the seams with this button. 5. If you are programming the length of a buttonhole, you determine the length of the buttonhole seam with this button. 3:2 A BCD
-
 1
1 -
2
-
3
-
4
-
5
-
6
-
7
-
8
-
9
-
10
-
11
-
12
-
13
-
14
-
15
-
16
-
17
-
18
-
19
-
20
-
21
-
22
-
23
-
24
-
25
-
26
-
27
-
28
-
29
-
30
-
31
-
32
-
33
-
34
-
35
-
36
-
37
-
38
-
 39
39 -
 40
40 -
 41
41 -
 42
42 -
 43
43 -
 44
44 -
 45
45 -
 46
46 -
 47
47 -
 48
48 -
 49
49 -
50
-
51
-
52
-
53
-
54
-
55
-
56
-
57
-
58
-
59
-
60
-
61
-
62
-
63
-
64
-
65
-
66
-
67
-
68
-
69
-
70
-
71
-
72
-
73
-
74
-
75
-
76
-
77
-
78
-
79
-
80
-
81
-
82
-
83
-
84
-
85
-
86
-
87
-
88
-
89
-
90
-
91
-
92
-
93
-
94
-
95
-
96
-
97
-
98
-
99
-
100
-
101
-
102
-
103
-
104
-
105
-
106
-
107
-
108
-
109
-
110
-
111
-
112
-
113
-
114
-
115
-
116
-
117
-
118
-
119
-
120
-
121
-
122
-
123
-
124
-
125
-
126
-
127
-
128
-
129
-
130
-
131
-
132
-
133
-
134
-
135
-
136
-
137
-
138
-
139
-
140
-
141
-
142
-
143
-
144
-
145
-
146
-
147
-
148
-
149
-
150
-
151
-
152
-
153
-
154
-
155
-
156
-
157
-
158
-
159
-
160
-
161
-
162
-
163
-
164
-
165
-
166
-
167
-
168
-
169
-
170
-
171
-
172
-
173
-
174
-
175
-
176
-
177
-
178
-
179
-
180
 |
 |
