Pfaff performance 2058 Owner's Manual - Page 4
Table of content - accessories
 |
View all Pfaff performance 2058 manuals
Add to My Manuals
Save this manual to your list of manuals |
Page 4 highlights
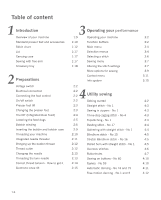
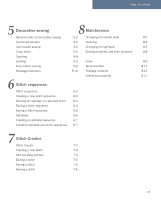
Table of content 1 Introduction Overview of your machine Standard presser feet and accessories Stitch chart Lid Carrying case Sewing with free arm Accessory tray 2 Preparations Voltage switch Electrical connection Connecting the foot control On/off switch Presser foot lift Changing the presser foot The IDT (Integrated Dual Feed) Lowering the feed dogs Bobbin winding Inserting the bobbin and bobbin case Threading your machine Integrated needle threader Bringing up the bobbin thread Thread cutter Changing the needle Threading the twin needle Correct thread tension - How to get it Electronic knee lift 3 Operating your performance 1:9 Operating your machine 1:10 Function buttons 1:12 Main menu 1:17 Selection menus 1:17 Selecting a stitch 1:17 Sewing menu 1:18 Altering the stitch settings More options for sewing Context menu Info system 2:2 42:2 2:2 Utility sewing 2:2 Getting started 2:3 Straight stitch - No 1 2:3 Sewing in zippers - No 1 2:4 Three-step zigzag stitch - No 4 2:5 Topstitching - No 1 2:6 Basting stitch - No 17 2:9 Gathering with straight stitch - No 1 2:10 Blindhem stitch - No 15 2:11 Stretch Blindhem stitch - No 16 2:12 Rolled hem with straight stitch - No 1 2:12 Overlock stitches 2:13 Buttonholes 2:13 Sewing on buttons - No 60 2:14 Eyelets - No 59 2:15 Automatic darning - No 74 and 75 Free motion darning - No 1 and 3 3:2 3:2 3:4 3:4 3:6 3:7 3:7 3:9 3:11 3:15 4:2 4:3 4:3 4:3 4:4 4:4 4:4 4:5 4:5 4:5 4:6 4:7 4:10 4:10 4:11 4:12 1:4
-
 1
1 -
 2
2 -
 3
3 -
 4
4 -
 5
5 -
 6
6 -
 7
7 -
 8
8 -
 9
9 -
 10
10 -
11
-
12
-
13
-
14
-
15
-
16
-
17
-
18
-
19
-
20
-
21
-
22
-
23
-
24
-
25
-
26
-
27
-
28
-
29
-
30
-
31
-
32
-
33
-
34
-
35
-
36
-
37
-
38
-
39
-
40
-
41
-
42
-
43
-
44
-
45
-
46
-
47
-
48
-
49
-
50
-
51
-
52
-
53
-
54
-
55
-
56
-
57
-
58
-
59
-
60
-
61
-
62
-
63
-
64
-
65
-
66
-
67
-
68
-
69
-
70
-
71
-
72
-
73
-
74
-
75
-
76
-
77
-
78
-
79
-
80
-
81
-
82
-
83
-
84
-
85
-
86
-
87
-
88
-
89
-
90
-
91
-
92
-
93
-
94
-
95
-
96
-
97
-
98
 |
 |
