Pfaff performance 2058 Owner's Manual - Page 75
Creating a new stitch sequence
 |
View all Pfaff performance 2058 manuals
Add to My Manuals
Save this manual to your list of manuals |
Page 75 highlights
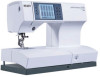
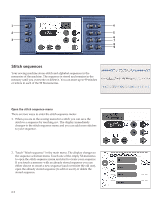
C AE FB Stitch sequences D Creating a new stitch sequence In the stitch sequence menu you can see the selected stitch in the preview field (A). To insert the stitch to a sequence touch the icon m+. The stitch is added to the action field (B), to the right of the cursor (D). To delete a stitch from the action field touch m-. The stitch to the left of the cursor is deleted. If you want to insert or delete a stitch before an already added stitch, activate the action field (B) by touching it and use the scroll buttons (4) to move the cursor (D) to the wanted position. You can also touch any stitch in the sequence to select it and position the cursor to the right of the selected stitch. The numbers (E) show the position of the selected stitch out of the total number of stitches in your sequence. If a stitch sequence extends over more than one display width, an arrow appears (C) on the left or right border of the action field, indicating one or more preceding pages. Select stitches to a sequence There are several ways to call up stitches that you wish to add in the stitch sequence: 1. Selection by scroll buttons. Activate the preview field (A), by touching it. Use the scroll buttons (4) to browse through all stitches, including stitches created and stored in Stitch Creator. To insert a stitch to the sequence touch m+. 2. Selection by repetition. Touching m+ once again inserts the same stitch once more with the same settings. If you wish to insert the same stitch but with changed settings, you can either do the changes to the stitch before inserting the stitch with m+ or after you have inserted the stitch by selecting it in the sequence. 3. Selection by number. Press the selection by number button (7) to open the selection by number keypad. Enter the number of the stitch you wish to use and touch "ok". Touch m+ to insert the stitch to the sequence. If you select a stitch that cannot be used in a stitch sequence a popup message is displayed: "This stitch cannot be used!" Close the pop-up window by touching it. 4. Selection by category. Touch the stitch selection menu icon (F) to open the stitch selection menu. Only categories with stitches that can be used in a stitch sequence are available. Choose a category and then the stitch you wish to use. Touch m+ to insert the stitch to the sequence. From here you can also insert stitches created and stored in Stitch Creator. Choose "Stitch Creator sts." and then touch the stitch you wish to insert. Touch m+ to insert the stitch to the sequence. Note: The eyelet stitch, no. 59 and the stippling stitch no. 73, can be used in stitch sequences but cannot be selected by category since the buttonhole and the darning and bartack categories are unavailable. To select stitch no. 59 or 73, use one of the other methods mentioned above. 6:3
-
 1
1 -
2
-
3
-
4
-
5
-
6
-
7
-
8
-
9
-
10
-
11
-
12
-
13
-
14
-
15
-
16
-
17
-
18
-
19
-
20
-
21
-
22
-
23
-
24
-
25
-
26
-
27
-
28
-
29
-
30
-
31
-
32
-
33
-
34
-
35
-
36
-
37
-
38
-
39
-
40
-
41
-
42
-
43
-
44
-
45
-
46
-
47
-
48
-
49
-
50
-
51
-
52
-
53
-
54
-
55
-
56
-
57
-
58
-
59
-
60
-
61
-
62
-
63
-
64
-
65
-
66
-
67
-
68
-
69
-
 70
70 -
 71
71 -
 72
72 -
 73
73 -
 74
74 -
 75
75 -
 76
76 -
 77
77 -
 78
78 -
 79
79 -
 80
80 -
81
-
82
-
83
-
84
-
85
-
86
-
87
-
88
-
89
-
90
-
91
-
92
-
93
-
94
-
95
-
96
-
97
-
98
 |
 |
