Pfaff performance 2058 Owner's Manual - Page 58
Buttonhole with gimp cord, Eyelet buttonhole with gimp cords
 |
View all Pfaff performance 2058 manuals
Add to My Manuals
Save this manual to your list of manuals |
Page 58 highlights
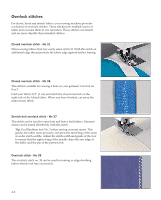
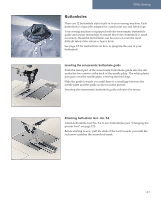
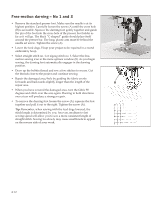
Buttonhole with gimp cord Buttonholes that are sewn with gimp cord under the satin stitch columns are more stable, durable and professional looking. Use pearl cotton or regular gimp thread. • Insert the sensormatic buttonhole guide. • Place the center of a length of gimp cord over the metal hook extending from the center back of the buttonhole foot. Pass the cord ends under the foot and pull up into the right and left guides on the front of the presser foot. • Snap on the buttonhole foot. Before starting to sew, move the foot to align the arrow with the second red mark. Buttonholes 50, 51, 52 or 53 work well for this technique. Follow the instructions on page 3:8 of how to program the size of your buttonhole. • After completing the buttonhole, pull the ends of gimp cord until the loop of thread is hidden under the buttonhole bartack. • Thread the gimp cord ends into a hand sewing needle and pull them to the wrong side of the garment. Tie the gimp threads and cut off the excess thread. Eyelet buttonhole with gimp cords • Insert the sensormatic buttonhole guide. Place the center of a length of gimp cord over the metal hook extending from the center front of the buttonhole foot. Pass the cord ends under the foot and pull them up into the right and left guides on the back of the presser foot. • Snap on the buttonhole foot and pull the slide of the foot towards you until the back white part of the foot touches the back of the slide. The red arrow will match the first red mark. Before starting to sew, press the needle up/down button (3). See page 3:8 for instructions on how to program the size of your buttonhole. 4:8
-
 1
1 -
2
-
3
-
4
-
5
-
6
-
7
-
8
-
9
-
10
-
11
-
12
-
13
-
14
-
15
-
16
-
17
-
18
-
19
-
20
-
21
-
22
-
23
-
24
-
25
-
26
-
27
-
28
-
29
-
30
-
31
-
32
-
33
-
34
-
35
-
36
-
37
-
38
-
39
-
40
-
41
-
42
-
43
-
44
-
45
-
46
-
47
-
48
-
49
-
50
-
51
-
52
-
 53
53 -
 54
54 -
 55
55 -
 56
56 -
 57
57 -
 58
58 -
 59
59 -
 60
60 -
 61
61 -
 62
62 -
 63
63 -
64
-
65
-
66
-
67
-
68
-
69
-
70
-
71
-
72
-
73
-
74
-
75
-
76
-
77
-
78
-
79
-
80
-
81
-
82
-
83
-
84
-
85
-
86
-
87
-
88
-
89
-
90
-
91
-
92
-
93
-
94
-
95
-
96
-
97
-
98
 |
 |
