Pioneer DEQ 9200 Owners Manual - Page 17
Setting, Adjusting, Volume
 |
UPC - 012562290973
View all Pioneer DEQ 9200 manuals
Add to My Manuals
Save this manual to your list of manuals |
Page 17 highlights
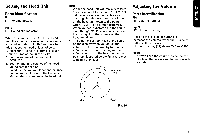
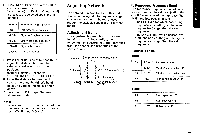
Setting the Head Unit Parts Identification Fig 1 [1] Volume buttons Fig. 3 [161 Sound clip indicator When this unit is connected to the head unit, the volume, balance and fader can be adjusted with this unit. Before operating this unit, set the head unit as follows. 1. Press the (-) side of buttons [1] to set the volume of the unit to "V 0". 2. Set the volume of the head unit to "VOL 23". 3. Set the fader and balance of the head unit to center position. • To adjust the volume, fader and balance on the head unit, refer to the Owner's Manual that accompanies the head unit. Note: • When the head unit volume is excessive (excessive input to the unit►, "CLIP" [161 will be indicated on the display as a warning. In this case, turn the volume on the head unit down to the point where "CLIP" is no longer displayed. • When you feel a distortion in the sound even though "CLIP" is not indicated on the display, turn the volume on the head unit down. • The volume's set point is not indicated on the display when you adjust the volume on the head unit by tuning the volume control. In this case, set the volume control on the head unit to the position illustrated below, in accordance with step 2. (Fig. 25) r------ _ Adjusting range Adjusting the Volume Parts Identification Fig. 1 [11 Volume buttons Fig. 3 [17] Numeric display Pressing the (+) side of buttons [1] increases the volume, while the (-) side of buttons [1] decreases it. (Numeric display [17] shows "V 0 - V 30".) Note: • Always keep the volume inside the car at a level that allows you to hear outside sounds. MIN MAX Fig. 25 17
-
 1
1 -
2
-
3
-
4
-
5
-
6
-
7
-
8
-
9
-
10
-
11
-
 12
12 -
 13
13 -
 14
14 -
 15
15 -
 16
16 -
 17
17 -
 18
18 -
 19
19 -
 20
20 -
 21
21 -
 22
22 -
23
-
24
-
25
-
26
-
27
-
28
-
29
-
30
-
31
-
32
-
33
-
34
-
35
-
36
-
37
-
38
 |
 |