Pioneer PRO-1410HD Owner's Manual - Page 11
Picture Settings Menu
 |
View all Pioneer PRO-1410HD manuals
Add to My Manuals
Save this manual to your list of manuals |
Page 11 highlights
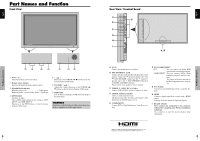
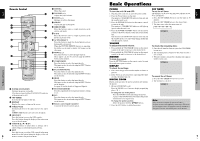
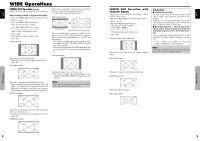
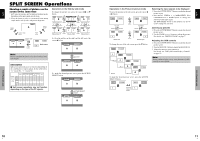
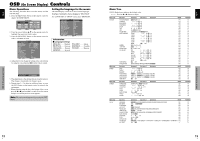
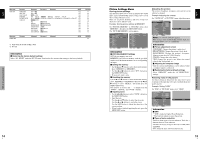
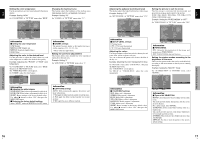
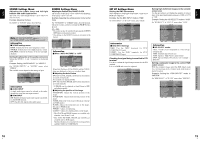
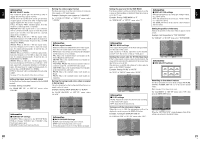
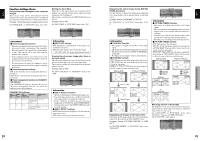
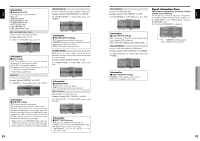
English Main menu FUNCTION Sub menu POWER MGT. INPUT SKIP SUB. P DETECT ZOOM NAV PICTURE FREEZE LONG LIFE Sub menu 2 Sub menu 3 Sub menu 4 RESET ON←→OFF YES ON←→OFF YES AUTO←→OFF YES OFF←→S BY S←→BTM LFT←→BTM RGT←→TOP RGT←→TOP LFT YES OFF←→S BY S1←→S BY S2←→BTM LEFT←→BTM RIGHT←→TOP RIGHT←→TOP LEFT YES MANUAL/AUTO YES ABL 100/75/50/25 YES ORBITER OFF/AUTO1/AUTO2 YES INVERSE/WHITE OFF/INVERSE/WHITE YES SCREEN WIPER ON/OFF YES SOFT FOCUS OFF/LEVEL1-4 YES OSD ORBITER ON/OFF YES OSD CONTRAST LOW/NORMAL YES Main menu SIGNAL INFO. Sub menu Sub menu 2 Sub menu 3 Sub menu 4 RESET - REFERENCE 22 22 22 23 23 23 24 24 24 24 24 25 25 REFERENCE 25 *1 Only when AUTO PICTURE is OFF. *2 PC only Information Ⅵ Restoring the factory default settings Select "ALL RESET" under the SET UP menu. Note that this also restores other settings to the factory defaults. OSD (On Screen Display) Controls 14 En English OSD (On Screen Display) Controls Picture Settings Menu Storing picture settings This function allows you to store in memory the current input signal and PICTURE menu settings and to recall these settings when necessary. There are six picture memories, and notes of up to 15 characters can be added to each. Example: Storing picture settings at MEMORY1 On "PICTURE MEMORY" of "PICTURE" menu, select "MEMORY1", then press the MENU/SET button. The "PICTURE MEMORY" screen appears. PICTURE MEMORY MEMORY1 SET INPUT : COMPNT1 SIGNAL : 480P NOTE : DVD/STAR WARS MEMORY2 INPUT : - SIGNAL : - NOTE : - MEMORY3 INPUT : - SIGNAL : - NOTE : - 1/2 RESET NEXT PAGE SEL. ADJ. MENU OK PICTURE MEMORY PREVIOUS PAGE MEMORY4 SET INPUT : - SIGNAL : - NOTE : - MEMORY5 INPUT : - SIGNAL : - NOTE : - MEMORY6 INPUT : - SIGNAL : - NOTE : - 2/2 RESET SEL. ADJ. MENU OK EXIT RETURN Information Ⅵ PICTURE MEMORY Settings OFF: Picture memory not used. MEMORY1 to 6: Picture memory with the specified number used. Maximum memories are 6, not depending on inputs. Ⅵ Setting the memory • Use the L and M button to select the desired memory place, MEMORY1 to MEMORY6. • Use the ᮤ and ᮣ buttons to select "SET", then press the MENU/SET button. • If necessary, input a note. Ⅵ Resetting the memory Use the L and M button to select the desired memory place, MEMORY1 to MEMORY6, then use the ᮤ and ᮣ buttons to select "RESET", and finally press the MENU/SET button. The memory is cleared, and "-" is displayed in the "INPUT", "SIGNAL" and "NOTE" columns. Ⅵ Inputting notes • Use the ᮤ and ᮣ buttons to select "NOTE", then press the MENU/SET button. • Input the note. Use the L and M button to select the character. Use the ᮤ and ᮣ buttons to move the cursor. Use the EXIT button to delete the character at the cursor position. • When you have finished inputting the note, press the MENU/SET button. Adjusting the picture The contrast, brightness, sharpness, color and tint can be adjusted as desired. Example: Adjusting the contrast On "CONTRAST" of "PICTURE" menu, adjust the contrast. PICTURE PICTURE MEMORY : OFF CONTRAST BRIGHTNESS SHARPNESS COLOR TINT R G DNR : LOW COLOR TEMP. : MIDDLE CONTRAST 10 GAMMA : 2.1 LOW TONE : AUTO SET UP LEVEL : 0 COLOR MGT PURECINEMA : ON AV SELECTION : DYNAMIC SEL. ADJ. EXIT RETURN Note: If "CAN NOT ADJUST" appears ... When trying to enter the PICTURE submenu, make sure AV SELECTION is not set to DEFAULT. Information Ⅵ Picture adjustment screen CONTRAST: Changes the picture's white level. BRIGHTNESS: Changes the picture's black level. SHARPNESS: Changes the picture's sharpness. Adjusts picture detail of VIDEO display. COLOR: Changes the color density. TINT: Changes the picture's tint. Adjust for natural colored skin, background, etc. Ⅵ Adjusting the computer image Only the contrast and brightness can be adjusted when a computer signal is connected. Ⅵ Restoring the factory default settings Select "DEFAULT" under the "AV SELECTION" settings. Reducing noise in the picture Use these settings if the picture has noise due to poor reception or when playing video tapes on which the picture quality is poor. Example: Setting "HIGH" On "DNR" of "PICTURE" menu, select "HIGH". PICTURE PICTURE MEMORY : OFF CONTRAST BRIGHTNESS SHARPNESS COLOR TINT R G DNR : LOW COLOR TEMP. : MIDDLE GAMMA : 2.1 LOW TONE : AUTO SET UP LEVEL : 0 COLOR MGT PURECINEMA : ON AV SELECTION : DYNAMIC SEL. ADJ. EXIT RETURN DNR : HIGH Information Ⅵ DNR * "DNR" stands for Digital Noise Reduction. * This function reduces noise in the picture. Ⅵ Types of noise reduction There are three types of noise reduction. Each has a different level of noise reduction. The effect increases stronger in the order of LOW, MID and HIGH. OFF: Turns the noise reduction function off. 15 En
-
 1
1 -
2
-
3
-
4
-
5
-
 6
6 -
 7
7 -
 8
8 -
 9
9 -
 10
10 -
 11
11 -
 12
12 -
 13
13 -
 14
14 -
 15
15 -
 16
16 -
17
-
18
-
19
 |
 |