Pioneer PRO-1410HD Owner's Manual - Page 9
AB AB - settings
 |
View all Pioneer PRO-1410HD manuals
Add to My Manuals
Save this manual to your list of manuals |
Page 9 highlights
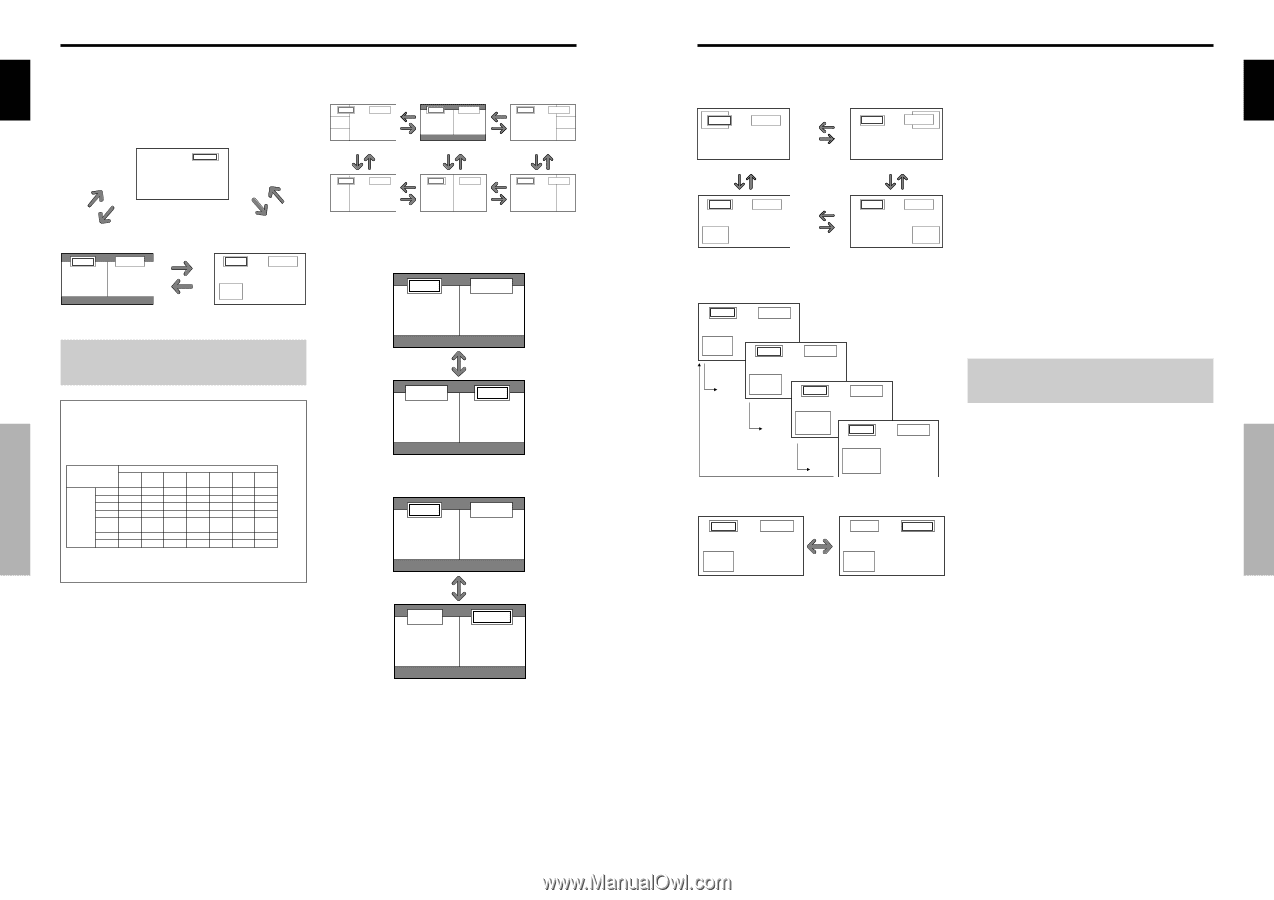
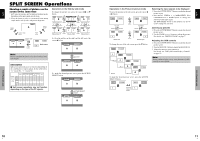
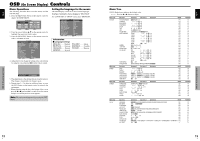
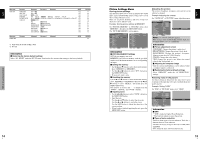
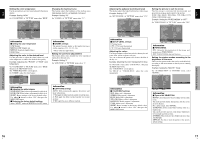
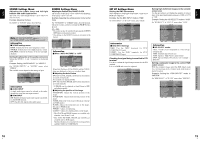
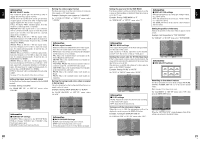
English English SPLIT SCREEN Operations Showing a couple of pictures on the screen at the same time * A PC-input picture may not be displayed in these modes, depending on the input signal specifications. 1. Press the button to select a screen mode from among single mode, side-by-side, and picture-in-picture. SINGLE button VIDEO1 A SIDE BY SIDE button P IN P button SINGLE button Operations in the Side-by-side mode To change the picture size, press the cursor ᮤ ᮣ or ᮢ button. VIDEO1 PC2-BNC ᮤ button VIDEO1 PC2-BNC ᮤ button VIDEO1 PC2-BNC A B A B A B ᮣ ᮣ Side-by-Side2-R button Side-by-Side1 button Side-by-Side2-L ᮢ button VIDEO1 ᮢ button ᮤ PC2-BNC button ᮢ button VIDEO1 ᮢ ᮢ button button ᮤ PC2-BNC button VIDEO1 ᮢ button PC2-BNC A B A B A B ᮣ ᮣ Side-by-Side4-R button Side-by-Side3 button Side-by-Side4-L VIDEO1 A PC1DSUB B SIDE BY SIDE button P IN P button VIDEO1 PC1DSUB Sub screen Main screen To swap the picture on the right and the left, press the cursor ᮡ button. VIDEO1 A PC1DSUB B Note: Picture A and B on the above screen are not always of the same height. Information Split screen operations may not function depending on the combination of input signals. In the table below, "ࠗ" means Yes means No. VIDEO1 Pictures VIDEO1 ן displayed on VIDEO2 ן the left/sub VIDEO3 ן screen COMPONENT1 ࠗ (Select2) PC2 ࠗ COMPONENT2 PC1 ࠗ HDMI ࠗ Pictures displayed on the right/main screen (Select1) VIDEO2 VIDEO3 COMPONENT1 PC2 PC1 COMPONENT2 ן ן ࠗ ࠗ ࠗ ן ן ࠗ ࠗ ࠗ ן ן ࠗ ࠗ ࠗ ࠗ ࠗ ן ࠗ ࠗ ࠗ ࠗ ࠗ ן ࠗ ࠗ ࠗ ࠗ ࠗ ן ࠗ ࠗ ࠗ ࠗ ࠗ HDMI ࠗ ן Ⅵ Split screen operations may not function depending on the type of the PC signals. PC1DSUB B ᮡ button VIDEO1 A To make the desired picture active, press the ACTIVE SELECT button. VIDEO1 A PC1DSUB B VIDEO1 A ACTIVE SELECT button PC1DSUB B Operations in the Picture-in-picture mode To move the position of the sub screen, press the cursor ᮤ or ᮣ button. VAIDEO1 PC2-BNC B Top Left ᮣ button ᮤ button VIDEO1 PC2-BNC B A Bottom Left ᮣ button ᮤ button ᮤ button ᮣ button VIDEO1 PC2-BNAC B Top Right ᮤ button ᮣ button VIDEO1 PC2-BNC B A Bottom Right To change the size of the sub screen, press the ᮢ button. VIDEO1 PC1DSUB B A VIDEO1 PC1DSUB B A ᮢ button VIDEO1 PC1DSUB ᮢ button B A VIDEO1 PC1DSUB ᮢ button ᮢ button B A To make the desired picture active, press the ACTIVE SELECT button. VIDEO1 PC1DSUB B A ACTIVE SELECT button VIDEO1 PC1DSUB B A Selecting the input signals to be displayed 1. Press the ACTIVE SELECT button to make the desired picture active. 2. Press the PC1, VIDEO1, 2, 3, COMPONENT1, PC2/ COMPONENT2 or HDMI button to change the selection of the input signal. The INPUT/EXIT button on the monitor can also be used to change the selection. Zooming up pictures 1. Press the ACTIVE SELECT button to make the desired picture active. 2. Use the ZOOM ( or )button to enlage the picture. For details, see "DIGITAL ZOOM" on page 7. Adjusting the OSD controls 1. Press the ACTIVE SELECT button to make the desired picture active. 2. Press the MENU/SET button to display the MAIN MENU. 3. Adjust the setting to your preference. For details, see "OSD (On Screen Display) Controls" on page 12. Note: During enhanced split screen, some functions of OSD controls are not available. SPLIT SCREEN Operations SPLIT SCREEN Operations 10 11 En En
-
 1
1 -
2
-
3
-
 4
4 -
 5
5 -
 6
6 -
 7
7 -
 8
8 -
 9
9 -
 10
10 -
 11
11 -
 12
12 -
 13
13 -
 14
14 -
15
-
16
-
17
-
18
-
19
 |
 |