Pioneer SC-27 Owner's Manual - Page 109
The Advanced MCACC menu, Making receiver settings from the Advanced MCACC menu
 |
UPC - 012562957487
View all Pioneer SC-27 manuals
Add to My Manuals
Save this manual to your list of manuals |
Page 109 highlights
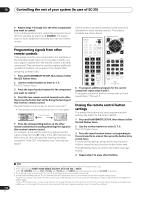
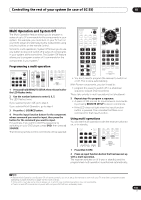
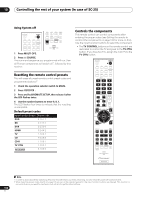
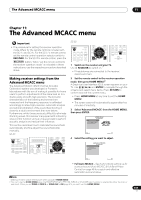
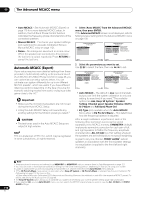
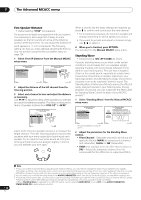
The Advanced MCACC menu 11 Chapter 11: The Advanced MCACC menu Important • The procedure for setting the receiver operation mode differs for the remote controls included with the SC-27 and SC-25. For the SC-27's remote control, set the remote control operation selector switch to RECEIVER. For the SC-25's remote control, press the RECEIVER button. When "set the remote control to the receiver operation mode" is indicated in these instructions, use the respective procedure described above. Making receiver settings from the Advanced MCACC menu The Advanced MCACC (Multi Channel ACoustic Calibration) system was developed in Pioneer's laboratories with the aim of making it possible for home users to perform adjustments of the same level as in a studio easily and with high precision. The acoustic characteristics of the listening environment are measured and the frequency response is calibrated accordingly to allow high precision, automatic analysis and optimal calibration of the sound field to bring it closer to a studio environment than ever before. Furthermore, while it was previously difficult to eliminate standing waves, this receiver is equipped with a standing wave control function using a unique process to perform acoustic analysis and reduce their influence. This section describes how to calibrate the sound field automatically and fine-adjust the sound field data manually. SC-27: RECEIVER MAIN ZONE2 SOURCE 3 MULTI OPERATION DVD BD TV DVR HOME MEDIA VIDEO1 VIDEO2 HDMI GALLERY USB iPod CD CD-R TUNER MULTI CH PHONO IN XM SIRIUS TV SOURCE RECEIVER CH VOL VOL TV CONTROL INPUT AUDIO PARAMETER LIST TOP MENU BAND PRESET MUTE TUNE MUTE VIDEO PARAMETER TOOLS ENTER T.EDIT GUIDE PRESET CATEGORY HOME MENU iPod CTRL TUNE STATUS PHASE CTRL RETURN CH LEVEL SC-25: RECEIVER SOURCE DVD BD DVR HDMI HOME MEDIA TV CD CD-R GALLERY iPod USB TUNER XM SIRIUS INPUT AUDIO PARAMETER LIST VIDEO PARAMETER TUNE TOOLS TOP MENU BAND T.EDIT GUIDE PRESET ENTER PRESET CATEGORY HOME MENU TUNE iPod CTRL RETURN ANT MPX PQLS MEMORY AUDIO INFO CH DISP MULTI OPE TV CTRL RECEIVER REMOTE SETUP ZONE 2 ZONE 3 MAIN 1 Switch on the receiver and your TV. Use RECEIVER to switch on.1 • If headphones are connected to the receiver, disconnect them. 2 Set the remote control to the receiver operation mode, then press HOME MENU.2 A Graphical User Interface (GUI) screen appears on your TV. Use and ENTER to navigate through the screens and select menu items. Press RETURN to confirm and exit the current menu. • Press HOME MENU at any time to exit the HOME MENU. • The screen saver will automatically appear after five minutes of inactivity. 3 Select 'Advanced MCACC' from the HOME MENU, then press ENTER. HOME MENU A/V RECEIVER 1. Advanced MCACC 2. MCACC Data Check 3. Data Management 4. System Setup Exit Return 4 Select the setting you want to adjust. 1.Advanced MCACC A/V RECEIVER a. Full Auto MCACC b. Auto MCACC c. Manual MCACC d. Demo Exit Return • Full Auto MCACC - See Automatically setting up for surround sound (Auto MCACC & Full Band Phase Control) on page 46 for a quick and effective automatic surround setup. Note 1 Make sure not to switch off the power when using the HOME MENU. 2 You can't use the HOME MENU when the HOME MEDIA GALLERY, XM, SIRIUS or iPod/USB input function is selected (in either the main or sub zone). When you set ZONE 2, ZONE 3 or ZONE 2&3 to ON (page 91), you can't use the HOME MENU. 109 en
-
 1
1 -
2
-
3
-
4
-
5
-
6
-
7
-
8
-
9
-
10
-
11
-
12
-
13
-
14
-
15
-
16
-
17
-
18
-
19
-
20
-
21
-
22
-
23
-
24
-
25
-
26
-
27
-
28
-
29
-
30
-
31
-
32
-
33
-
34
-
35
-
36
-
37
-
38
-
39
-
40
-
41
-
42
-
43
-
44
-
45
-
46
-
47
-
48
-
49
-
50
-
51
-
52
-
53
-
54
-
55
-
56
-
57
-
58
-
59
-
60
-
61
-
62
-
63
-
64
-
65
-
66
-
67
-
68
-
69
-
70
-
71
-
72
-
73
-
74
-
75
-
76
-
77
-
78
-
79
-
80
-
81
-
82
-
83
-
84
-
85
-
86
-
87
-
88
-
89
-
90
-
91
-
92
-
93
-
94
-
95
-
96
-
97
-
98
-
99
-
100
-
101
-
102
-
103
-
 104
104 -
 105
105 -
 106
106 -
 107
107 -
 108
108 -
 109
109 -
 110
110 -
 111
111 -
 112
112 -
 113
113 -
 114
114 -
115
-
116
-
117
-
118
-
119
-
120
-
121
-
122
-
123
-
124
-
125
-
126
-
127
-
128
-
129
-
130
-
131
-
132
-
133
-
134
-
135
-
136
-
137
-
138
-
139
-
140
-
141
-
142
-
143
-
144
-
145
-
146
-
147
-
148
-
149
-
150
-
151
-
152
-
153
-
154
 |
 |