Pioneer SPH-10BT Owners Manual - Page 11
INITIAL settings - update
 |
View all Pioneer SPH-10BT manuals
Add to My Manuals
Save this manual to your list of manuals |
Page 11 highlights
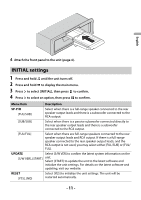
English 4 Attach the front panel to the unit (page 4). INITIAL settings 1 Press and hold until the unit turns off. 2 Press and hold to display the main menu. 3 Press to select [INITIAL], then press to confirm. 4 Press to select an option, then press to confirm. Menu Item Description SP-P/O [FUL/SUB] Select when there is a full-range speaker connected to the rear speaker output leads and there is a subwoofer connected to the RCA output. [SUB/SUB] Select when there is a passive subwoofer connected directly to the rear speaker output leads and there is a subwoofer connected to the RCA output. [FUL/FUL] Select when there are full-range speakers connected to the rear speaker output leads and RCA output. If there is a full-range speaker connected to the rear speaker output leads, and the RCA output is not used, you may select either [FUL/SUB] or [FUL/ FUL]. UPDATE Select [S/W VER] to confirm the latest system information on the [S/W VER], [START] unit. Select [START] to update the unit to the latest software and initialize the unit settings. For details on the latest software and updating, visit our website. RESET [YES], [NO] Select [YES] to initialize the unit settings. The unit will be restarted automatically. - 11 -
-
 1
1 -
2
-
3
-
4
-
5
-
 6
6 -
 7
7 -
 8
8 -
 9
9 -
 10
10 -
 11
11 -
 12
12 -
 13
13 -
 14
14 -
 15
15 -
 16
16 -
17
-
18
-
19
-
20
-
21
-
22
-
23
-
24
-
25
-
26
-
27
-
28
-
29
-
30
-
31
-
32
 |
 |
