RCA CC4352 User Guide - Page 23
Setting the Time and Date, To Correct the Date or Time - parts for
 |
UPC - 034909820223
View all RCA CC4352 manuals
Add to My Manuals
Save this manual to your list of manuals |
Page 23 highlights
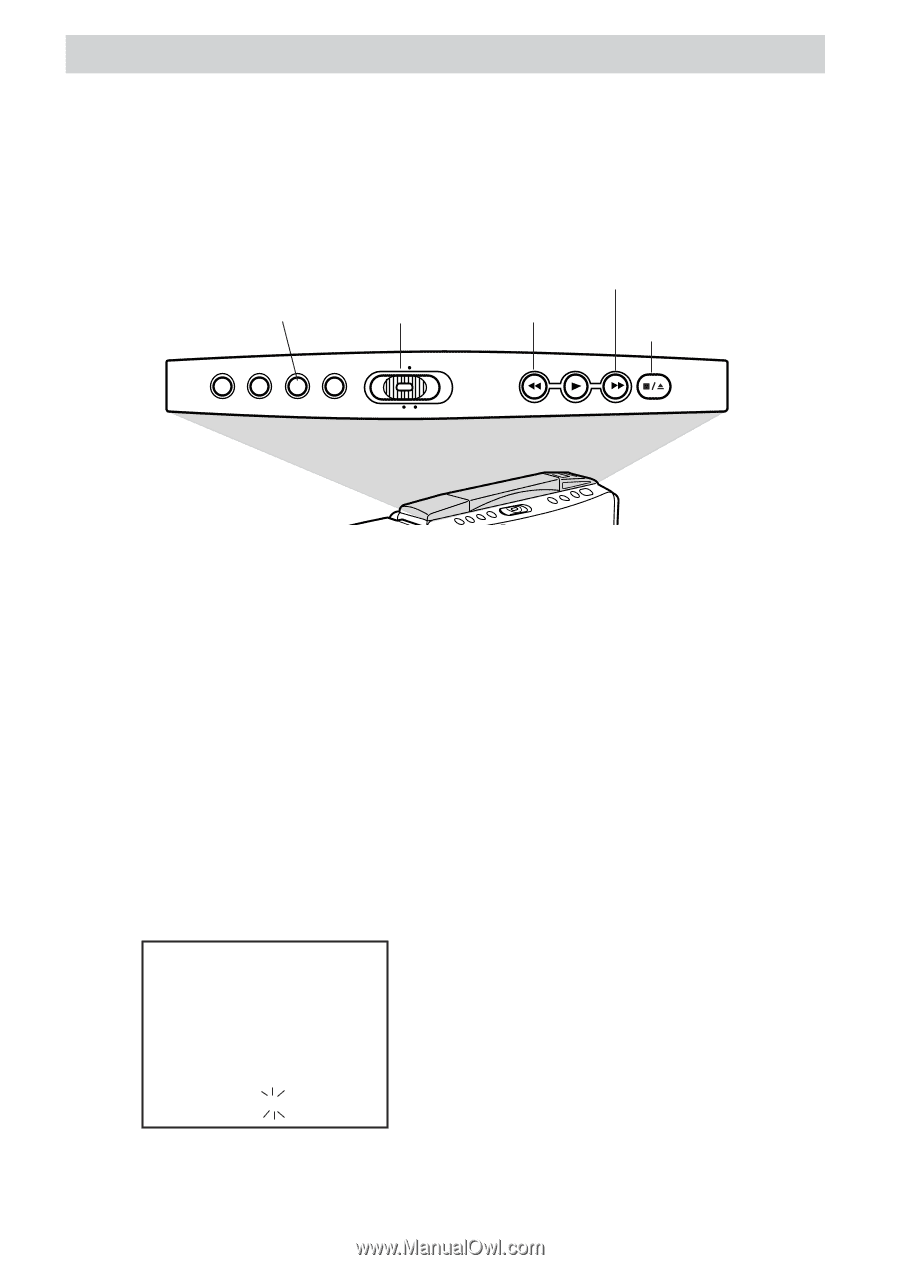
Date and Time Display Setting the Time and Date You must set the correct date and time before it can be displayed and recorded on your tapes. The built-in clock cell must be charged as described on the next page. NOTE: If you leave the camcorder on for 10 minutes without a cassette inserted when the date has not been set or the builtin clock battery is dead, the camcorder demonstration mode will start. To cancel the demonstration mode, disconnect power from the camcorder and reconnect it, or insert a cassette. DATE/TIME Button CAMERA/ OFF/VCR Switch REW/ REVIEW Button F.FWD Button STOP/EJECT Button 1. Attach a power supply to the camcorder. 2. Press and hold the small button on the CAMERA/OFF/VCR switch while you set it to CAMERA. 3. Press the DATE/TIME button to display the date and time on the LCD monitor or in the viewfinder. A flashing cursor lets you know which part of the display you are setting. If the flashing cursor does not appear, press and hold DATE/TIME and then press STOP/EJECT. 4. Repeatedly press the F.FWD or REW/ REVIEW until the correct month appears. Press and hold the button to advance the digits faster. 5. When the correct month is displayed, press STOP/EJECT. The cursor moves to the next part of the display. 6. Repeat steps 4 and 5 to set the correct month, day, year, hour, minute(s), and AM/PM. 7. After setting AM or PM, press the DATE/TIME button to remove the flashing cursor and start the internal clock. To Correct the Date or Time 12:00AM 1 1/1999 To correct the date or time, press and hold the DATE/TIME button and then press STOP/EJECT. The display and the flashing cursor appear. Use STOP/ EJECT, F.FWD, and REW/REVIEW to correct the time or date. Press DATE/ TIME to remove the flashing cursor and start the clock. 20
-
 1
1 -
2
-
3
-
4
-
5
-
6
-
7
-
8
-
9
-
10
-
11
-
12
-
13
-
14
-
15
-
16
-
17
-
 18
18 -
 19
19 -
 20
20 -
 21
21 -
 22
22 -
 23
23 -
 24
24 -
 25
25 -
 26
26 -
 27
27 -
 28
28 -
29
-
30
-
31
-
32
-
33
-
34
-
35
-
36
-
37
-
38
-
39
-
40
-
41
-
42
-
43
-
44
-
45
-
46
-
47
-
48
-
49
-
50
-
51
-
52
-
53
-
54
-
55
-
56
-
57
-
58
-
59
-
60
-
61
-
62
-
63
-
64
-
65
-
66
-
67
-
68
-
69
-
70
-
71
-
72
-
73
-
74
-
75
-
76
-
77
 |
 |