Reebok Super Ramp Rl 7.0 Elliptical English Manual - Page 12
See How To Plug
 |
View all Reebok Super Ramp Rl 7.0 Elliptical manuals
Add to My Manuals
Save this manual to your list of manuals |
Page 12 highlights
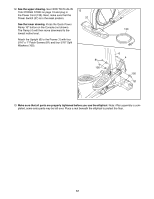
12. See the upper drawing. See HOW TO PLUG IN THE POWER CORD on page 13 and plug in the Power Cord (133). Next, make sure that the Power Switch (37) is in the reset position. See the lower drawing. Press the Quick Power Ramp 10º button on the Console (not shown). The Ramp (4) will then move downward to the lowest incline level. Attach the Upright (6) to the Frame (1) with four 5/16" x 1" Patch Screws (81) and four 5/16" Split Washers (105). 12 37 81 105 133 6 4 1 105 81 13. Make sure that all parts are properly tightened before you use the elliptical. Note: After assembly is completed, some extra parts may be left over. Place a mat beneath the elliptical to protect the floor. 12
-
 1
1 -
2
-
3
-
4
-
5
-
6
-
 7
7 -
 8
8 -
 9
9 -
 10
10 -
 11
11 -
 12
12 -
 13
13 -
 14
14 -
 15
15 -
 16
16 -
 17
17 -
18
-
19
-
20
-
21
-
22
-
23
-
24
-
25
-
26
-
27
-
28
-
29
-
30
-
31
-
32
 |
 |

12
12
12.
See the upper drawing.
See HOW TO PLUG IN
THE POWER CORD on page 13 and plug in
the Power Cord (133). Next, make sure that the
Power Switch (37) is in the reset position.
See the lower drawing.
Press the Quick Power
Ramp 10º button on the Console (not shown).
The Ramp (4) will then move downward to the
lowest incline level.
Attach the Upright (6) to the Frame (1) with four
5/16" x 1" Patch Screws (81) and four 5/16" Split
Washers (105).
13.
Make sure that all parts are properly tightened before you use the elliptical.
Note: After assembly is com-
pleted, some extra parts may be left over. Place a mat beneath the elliptical to protect the floor.
133
105
105
81
81
1
4
6
37