Ricoh 1180L Operating Instructions - Page 51
Description of the tab C, Creating a cover template
 |
View all Ricoh 1180L manuals
Add to My Manuals
Save this manual to your list of manuals |
Page 51 highlights
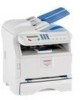
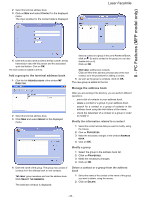
8 - PC Features (MFP model only) Laser Facsimile Field Name of the cover sheet Description Either the name of the page selected by default or the page you have selected to use. Sender You can enter information concerning the sender. You can enter information concerning the recipient. Destination: Name, Company, Department If you want these fields to be automatically filled in for recipients already listed in the directory (as favorites, group or distribution list), type "Auto" in the desired fields. When sending a fax, the cover sheet fields are updated if the recipient is listed in the directory. Comments This is an editing window with all the basic functions of a text editor so that you can enter a text which will be sent in the cover sheet. Preview of the model The preview enables you to see the cover sheet you are going to send. To add a field, proceed as follows: - Select the field you want to insert by clicking the field palette. A stamp replaces the cursor of your mouse. - Click the location where you want to put the field on the model. - You can move or enlarge the field as you like. Important Adjust the size of your field so that the text is readable. 4 As soon as fields are inserted, save the cover sheet. This cover sheet can be selected in the tab COVER PAGE of the fax send window. Creating a cover page template Creating a cover page creates a template which fields (fax number, comment, subject, etc.) will be automatically filled by the Fax Application depending on the information provided for each recipient of a document. To create this cover page template, there are two major steps: • First step : Create a background image with the logos and the layout that you wish. • Second step : Add the field that you want to be displayed in the cover page: fax number, comment, subject, etc. As mentioned before, these fields will be filled by Fax application at emission time. Description of the tab COVER PAGE For the first step, there are two methods to create the background image. You can either • Option (A): Draw this background image in your preferred application (such as Word, Excel,...), OR • Option (B): Scan a sheet of paper containing the layout of the cover page. Details about Option A and B: • Option (A): Open the application that you want to use to edit the background (Word, Wordpad...). Draw the background image then print this document in the printer named "Companion Suite Fax". At that point the MFSendFax dialog is displayed: - 48 -
-
 1
1 -
2
-
3
-
4
-
5
-
6
-
7
-
8
-
9
-
10
-
11
-
12
-
13
-
14
-
15
-
16
-
17
-
18
-
19
-
20
-
21
-
22
-
23
-
24
-
25
-
26
-
27
-
28
-
29
-
30
-
31
-
32
-
33
-
34
-
35
-
36
-
37
-
38
-
39
-
40
-
41
-
42
-
43
-
44
-
45
-
 46
46 -
 47
47 -
 48
48 -
 49
49 -
 50
50 -
 51
51 -
 52
52 -
 53
53 -
 54
54 -
 55
55 -
 56
56 -
57
-
58
-
59
 |
 |
