Ricoh Aficio MP 2352SP Administration Guide - Page 43
Enable single sign-on for Nuance DigiDocFlow, Enable single sign-on for NSi AutoStore
 |
View all Ricoh Aficio MP 2352SP manuals
Add to My Manuals
Save this manual to your list of manuals |
Page 43 highlights
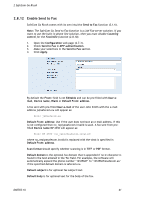
2 SafeCom Go Ricoh 2.8.15 Enable single sign-on for Nuance DigiDocFlow 1. Open the Advanced web page (2.7.10). 2. Enter Computer IP address and Port (default 21) of the computer hosting the Nuance DigiDocFlow solution. 3. Enter User name and Password required to access the Nuance DigiDocFlow solution. The External authentication section is only used for NSi AutoStore (2.8.15). Leave Enable unchecked. 4. Click Apply. 2.8.16 Enable single sign-on for NSi AutoStore From SafeCom obtain the file scNotifyExtAuth.dll. From NSi AutoStore obtain the client2 package that contains ASEQAT.exe. Note: Both SafeCom server and AutoStore MUST be in the same domain3. SafeCom service MUST be started by a user with remote access rights on the AutoStore server. The steps below need to be repeated on each SafeCom server: 1. Run the ASEQAT.exe as administrator and enter the IP address of the AutoStore Server. After installation you should see a new service called ASEQAT. 2. Stop the SafeCom Service and copy the scNotifyExtAuth.dll into the SafeCom installation folder. 3. Right-click SafeCom Service and click Properties. 4. Click Log on tab and click This account. Enter the name and password of an account that has remote access rights on the AutoStore server. 5. Click OK. 6. Restart the SafeCom Service. Note: The SafeCom Service loads the IP address of the AutoStore server when it is started. This implies that a change of the AutoStore server's IP address should be followed by a restart of the SafeCom Service. The steps below need to be performed on the Ricoh device: 1. Increase the Heap Size on the Ricoh device to about 24 MB (2.3). 2. Open the Advanced web page (2.7.10). 3. Check Enable under External authentication. Leave all other fields at their default. 4. Click Apply. 2 The client package is generic in nature, but is most likely known as ‖AutoStore EquiTrac Client‖. 3 At this point in time no testing has been performed with trusted domains. D60703-16 43
-
 1
1 -
2
-
3
-
4
-
5
-
6
-
7
-
8
-
9
-
10
-
11
-
12
-
13
-
14
-
15
-
16
-
17
-
18
-
19
-
20
-
21
-
22
-
23
-
24
-
25
-
26
-
27
-
28
-
29
-
30
-
31
-
32
-
33
-
34
-
35
-
36
-
37
-
 38
38 -
 39
39 -
 40
40 -
 41
41 -
 42
42 -
 43
43 -
 44
44 -
 45
45 -
 46
46 -
 47
47 -
 48
48 -
49
-
50
-
51
-
52
-
53
-
54
-
55
-
56
-
57
-
58
-
59
-
60
-
61
 |
 |