Ricoh Aficio MP 3500P Printer Reference - Page 20
Setting Custom Size Paper Using the Control Panel, Printer Bypass Paper Size
 |
View all Ricoh Aficio MP 3500P manuals
Add to My Manuals
Save this manual to your list of manuals |
Page 20 highlights
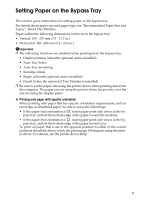
Setting Custom Size Paper Using the Control Panel Follow the procedure below to set the machine using the control panel when loading custom size paper onto the bypass tray. Important ❒ The following procedures are not required if you select [Driver / Command] from [Bypass Tray Setting Priority] in [System] of [Printer Features] (see "Printer Features", General Settings Guide). In that case, set the paper size using the printer driver. ❒ If you select [Machine Settings] from [Bypass Tray Setting Priority] in [System] of [Printer Features] (see "Printer Features", General Settings Guide), the settings made using the control panel have priority over the printer driver settings. ❒ If the printer driver is not used, select [Machine Settings] from [Bypass Tray Setting Priority] in [System] of [Printer Features] (see "Printer Features", General Settings Guide). Set paper size using the control panel. A Press the {User Tools/Counter} key on the control panel. B Press [System Settings]. C Press the [Tray Paper Settings] tab. D Press [TNext] to scroll through the list. E Press [Printer Bypass Paper Size]. F Press [Custom size]. If a custom size is already set, press [Change Size]. G Press [Vertical]. H Enter the vertical size of the paper using the number keys, and then press {#}. I Press [Horizontal]. J Enter the horizontal size of the paper using the number keys, and then press {#}. K Press [OK]. The paper sizes entered are displayed. L Press [OK]. M Press the {User Tools/Counter} key. Note ❒ When loading OHP transparencies or thick paper, set paper size and paper type. 12 ❒ For printer driver settings, see the printer driver Help.
-
 1
1 -
2
-
3
-
4
-
5
-
6
-
7
-
8
-
9
-
10
-
11
-
12
-
13
-
14
-
 15
15 -
 16
16 -
 17
17 -
 18
18 -
 19
19 -
 20
20 -
 21
21 -
 22
22 -
 23
23 -
 24
24 -
 25
25 -
26
-
27
-
28
-
29
-
30
-
31
-
32
-
33
-
34
-
35
-
36
-
37
-
38
-
39
-
40
-
41
-
42
-
43
-
44
-
45
-
46
-
47
-
48
-
49
-
50
-
51
-
52
-
53
-
54
-
55
-
56
-
57
-
58
-
59
-
60
-
61
-
62
-
63
-
64
-
65
-
66
-
67
-
68
-
69
-
70
-
71
-
72
-
73
-
74
-
75
-
76
-
77
-
78
-
79
-
80
-
81
-
82
-
83
-
84
-
85
-
86
-
87
-
88
-
89
-
90
-
91
-
92
-
93
-
94
-
95
-
96
-
97
-
98
-
99
-
100
-
101
-
102
-
103
-
104
-
105
-
106
-
107
-
108
-
109
-
110
-
111
-
112
-
113
-
114
-
115
-
116
-
117
-
118
-
119
-
120
-
121
-
122
-
123
-
124
-
125
-
126
-
127
-
128
-
129
-
130
-
131
-
132
-
133
-
134
-
135
-
136
-
137
-
138
-
139
-
140
-
141
-
142
-
143
-
144
-
145
-
146
-
147
-
148
-
149
-
150
-
151
-
152
-
153
-
154
-
155
-
156
-
157
-
158
 |
 |
