Ricoh Aficio SP C830DN Manuals - Page 62
Black and White printing precautions, Printing with Windows (PCL 5c/5e)
 |
View all Ricoh Aficio SP C830DN manuals
Add to My Manuals
Save this manual to your list of manuals |
Page 62 highlights
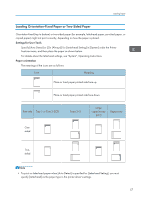
2. Printing the [Print Quality] menu in the "Menu:" box, and then select [On] in the "Barrier-free Color Management:" list. Black and White printing precautions Some applications may recognize grayscale or a black-and-white area of a document as a color image. Because of this, it may be printed in four colors (CMYK) and counted on the billing counter as such. To ensure that documents are printed in black and white, select [User Setting] in the "Settings for Image:" list on the [Print Quality] menu, and then select [K (Black)] in the "Gray Reproduction:" list. For details, see the printer driver Help. Printing with Windows (PCL 5c/5e) • The default setting is duplex printing. If you want to print on only one side, select [Off] for the duplex setting. • If you send a print job via USB 2.0 while the printer is in Low Power mode or Sleep mode, an error message might appear when the print job is complete. In this case, check if the document was printed. 1. After creating a document, open the [Printing Preferences] dialog box in the document's native application. For details about displaying the [Printing Preferences] dialog box, see p.30 "Displaying the Printing Preferences dialog box in an application". 2. In the "Job Type:" list, select [Normal Print]. 3. To print multiple copies, specify the number of sets in the "Copies:" box. 4. In the "Orientation:" list, select [Portrait] or [Landscape] for the orientation of the document. 5. Select [Color] or [Black and White] in the "Color/ Black and White:" list. Select [Color] for color printing. Select [Black and White] for black and white printing. 6. Click the [Paper] tab. 7. In the "Document Size:" list, select the size of the document to be printed. 8. In the "Input Tray:" list, select the paper tray that contains the paper to which you want to print. If you select [Auto Tray Select] in the "Input Tray:" list, the paper tray is automatically selected according to the paper size and type specified. 9. In the "Type:" list, select the type of paper that is loaded in the paper tray. 60
-
 1
1 -
2
-
3
-
4
-
5
-
6
-
7
-
8
-
9
-
10
-
11
-
12
-
13
-
14
-
15
-
16
-
17
-
18
-
19
-
20
-
21
-
22
-
23
-
24
-
25
-
26
-
27
-
28
-
29
-
30
-
31
-
32
-
33
-
34
-
35
-
36
-
37
-
38
-
39
-
40
-
41
-
42
-
43
-
44
-
45
-
46
-
47
-
48
-
49
-
50
-
51
-
52
-
53
-
54
-
55
-
56
-
 57
57 -
 58
58 -
 59
59 -
 60
60 -
 61
61 -
 62
62 -
 63
63 -
 64
64 -
 65
65 -
 66
66 -
 67
67 -
68
-
69
-
70
-
71
-
72
-
73
-
74
-
75
-
76
-
77
-
78
-
79
-
80
-
81
-
82
-
83
-
84
-
85
-
86
-
87
-
88
-
89
-
90
-
91
-
92
-
93
-
94
-
95
-
96
-
97
-
98
-
99
-
100
-
101
-
102
-
103
-
104
-
105
-
106
-
107
-
108
-
109
-
110
-
111
-
112
-
113
-
114
-
115
-
116
-
117
-
118
-
119
-
120
-
121
-
122
-
123
-
124
-
125
-
126
-
127
-
128
-
129
-
130
-
131
-
132
-
133
-
134
-
135
-
136
-
137
-
138
-
139
-
140
-
141
-
142
-
143
-
144
-
145
-
146
-
147
-
148
 |
 |
