Samsung 242MP User Manual
Samsung 242MP Manual
 |
View all Samsung 242MP manuals
Add to My Manuals
Save this manual to your list of manuals |
Samsung 242MP manual content summary:
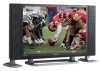
- Samsung 242MP | User Manual - Page 1
SyncMaster 242MP Install Drivers Install Programs - Samsung 242MP | User Manual - Page 2
not disassemble Do not touch Important to read and understand at all times Disconnect the plug from the outlet Grounding to prevent an electric shock Power When not used for an extended period of time, set your computer to DPMS. If using a screen saver, set it to the active screen mode - Samsung 242MP | User Manual - Page 3
cause fire. Installation Be sure to contact an authorized service center, when installing your monitor in a location with the heavy dust, high or operates for 24 hours such as the airport, the train station or etc. z Failure to do so may cause a serious damage to your monitor. Put your monitor in a - Samsung 242MP | User Manual - Page 4
. Do not place the monitor face down. z The TFT-LCD surface may be damaged. Installing a wall bracket must be done by a qualified professional. z Installation by unqualified personnel may result in injury. z Always use the mounting device specified in the owner's manual. When installing the product - Samsung 242MP | User Manual - Page 5
avoid operating the monitor near water or outdoors where it could be exposed to snow or rain. If the monitor is dropped or the casing is damaged, turn the monitor off and unplug the power cord. z The monitor may malfunction, causing an electric shock or fire. z Then contact the Service Center . - Samsung 242MP | User Manual - Page 6
. z This may cause malfunction, an electric shock or fire. z If a foreign substance enters the monitor, unplug the power cord and contact the Service Center . Do not use or store inflammable substances near the monitor. z This may cause an explosion or fire. Never insert anything metallic into the - Samsung 242MP | User Manual - Page 7
resolution may cause undesirable picture quality. 24 inch - 1920 X 1200 Keep the volume at a proper level when you use the headphones. z Excessively loud volume levels may damage hearing. Watching the monitor life of the monitor. When moving the monitor, turn off and unplug the power cord. Make sure - Samsung 242MP | User Manual - Page 8
the consumer of the battery. z The customer can return the used or rechargeable battery to a nearby public recycling center or to a store selling the same type of the battery or rechargeable battery. - Samsung 242MP | User Manual - Page 9
the following items are included with your monitor. If any items are missing, contact your dealer. Contact a local dealer to buy optional items. Unpacking Manual Monitor Quick Setup Guide Warranty Card (Not available in all locations) User's Guide, Monitor Driver, Natural Color software Cable - Samsung 242MP | User Manual - Page 10
D-Sub Cable Power Cord Radio Antenna Audio Cable Others DVI Cable Remote Control Batteries (AAA X 2) Connector Side cover Speaker(Option) Speaker Speaker-cover Speaker-Stand Speaker Brackets Use only for the mounting type installation. Speaker-Audio cable Screws (Black 4EA, Silver 4EA) - Samsung 242MP | User Manual - Page 11
Speaker-Side cover Front 1. MENU 2. CH 3. - VOL + 4. / FM RADIO 5. SOURCE 6. PIP 7. Power button 8. Power Click here to see an animation clip According to broadcasting type in each country, you may not be able to Power button Use this button to turn the monitor on and off. 8. Power indicator Power - Samsung 242MP | User Manual - Page 12
See PowerSaver described in the manual for further information regarding power saving functions. For energy conservation, turn your monitor OFF when it is not needed or when left unattended for long periods. Rear Remove the rear monitor cover before connecting to an external device. When it is - Samsung 242MP | User Manual - Page 13
Scart is mainly used in Europe. As for EXT(RGB) port of the Monitor, it makes TV or Video signal input and output. 4. AV IN 1. SPEAKER-L / ANT IN 1. Headphone sound output terminal 2. Speaker sound output terminal 3. TV antenna terminal For more information > Connecting TV 6. POWER Power - Samsung 242MP | User Manual - Page 14
monitor on and off. 1. POWER 2. Number button 3. +100, -/-4. - + 5. MUTE 6. TTX/MIX 7. MENU 8. ENTER 9. FM RADIO 10. CH/P 11. SOURCE 12. INFO 13. EXIT 14. Up-Down Left-Right buttons 15. AUTO 16. P.MODE, M/B (MagicBright™) 17. P.SIZE 18. STILL 19. PIP 20. S.MODE 21. DUAL/MTS 22. PRE-CH 23. SOURCE 24 - Samsung 242MP | User Manual - Page 15
is pressed in the Mute mode. 6. TTX/MIX TV channels provide written information services via teletext. For more information > TTX / MIX TTX / MIX is mainly external devices that are connected to the monitor at the time. 12. INFO Current picture information is displayed on the upper left corner of the - Samsung 242MP | User Manual - Page 16
current mode is displayed on the lower center of the screen. The Monitor has a built /NICAM MONO/NICAM STEREO can be operated depending on broadcasting type by using DUAL button on the remote control while watching SOURCE Selects the Video source.(PIP Mode) 24. SIZE You can switch the Picture Size. - Samsung 242MP | User Manual - Page 17
device. When it is connected, replace the cover. 1. Connecting to a Computer 1. Connect the power cord for your monitor to the power port on the back of the monitor. Plug the power cord for the monitor into a nearby outlet. 2-1. Using the D-sub (Analog) connector on the video card, Connect - Samsung 242MP | User Manual - Page 18
5. You may enjoy clear and quality sound from the computer sound card using the monitor speakers. (You don't need to install any separate speakers for your computer.) You may get a blank screen depending on the type of video card you are using, if you connect simultaneously both the D-sub and DVI - Samsung 242MP | User Manual - Page 19
. 1-2. Connecting EXT(RGB) - It only applies to AV DEVICE that supports SCART. Connect to the DVD Devices input if the device has a DVD connector. You can watch DVD simply by hooking up the DVD with the monitor as long as the power is on. 1. Connect a video cable between the EXT(RGB) jacks on - Samsung 242MP | User Manual - Page 20
terminal on the rear of the monitor. You need to use a portion of the RF cable straight. 2. Turn on the monitor. 3. Select TV using SOURCE button among the external signal for better reception. In areas where Antenna cable is not supported, first, attach connector to TV antenna . 3. Connecting DVD - Samsung 242MP | User Manual - Page 21
. 4. Connecting Headphone You may connect your Headphone to the monitor. 1. Connect your Headphone to the Headphone connection terminal. 5. Connecting Speakers Make sure to detach the speaker stand before installing the speaker to the monitor. Otherwise damage may be caused to the stand when the - Samsung 242MP | User Manual - Page 22
covers from both sides of the LCD set. z Fit the side hole of the speaker into the bracket and fix it with screws(Silver 4EA). z Detach side covers from Speakers. z Fit the side hole of the speaker into the protruding connector of the bracket. z After both speakers are attached, secure them will the - Samsung 242MP | User Manual - Page 23
assembled speaker on Speaker Stand and then push the speaker to be completely secured. z Be sure that the Speaker Stands are placed correctly referring to following illustration, not to confuse front and back of Speaker Stands. z Place assembled speakers to have adequate distance from the LCD set - Samsung 242MP | User Manual - Page 24
2. Connect the cable in the way the rear terminal of the speaker fits into the rear R-SPEAKER-L terminal of the mains. Using the Stand This monitor supports various types of VESA-standard bases. You need to either fold or remove the base in use in order to install a VESA base. 1. Folding the base - Samsung 242MP | User Manual - Page 25
with the arm-type base, wall mount hanger or other base. To mount the monitor on a wall, you should purchase the wall mounting kit that allows you to mount the monitor at least 10cm away from the wall surface. Contact the nearest Samsung Service Center for more information. Samsung Electronics will - Samsung 242MP | User Manual - Page 26
monitor. Driver installation is slightly different from one operating system to another. Follow the directions appropriate for the operating system you have. Prepare a blank disk and download the driver program file at the Internet web site shown here. z Internet web site : http://www.samsung - Samsung 242MP | User Manual - Page 27
in the "Warning" window. 5. Monitor driver installation is completed. Windows XP/2000 1. Insert CD into the CD-ROM drive. 2. Click "Windows XP/2000 Driver" 3. Choose your monitor model in the model list, then click the "OK" button. 4. Choose your monitor model in the model list, then click the "OK - Samsung 242MP | User Manual - Page 28
this monitor. Driver installation is slightly different from one operating system to another. Follow the directions appropriate for the operating system you have. Prepare a blank disk and download the driver program file at the Internet web site shown here. z Internet web site : http://www.samsung - Samsung 242MP | User Manual - Page 29
Select "Don't search ,I will.." then click "Next" and then click "Have disk". 7. Click the "Browse" button then choose A:(D:\Driver) and choose your monitor model in the model list and click the "Next" button. 8. If you can see following message window, then click the "Continue Anyway" button. Then - Samsung 242MP | User Manual - Page 30
" button. 6. Choose "Display a list of the known drivers for this device so that I can choose a specific driver" then click "Next" and then click "Have disk". 7. Click the "Browse" button then choose A:(D:\Driver). 8. Click the "Open" button, then click "OK" button. 9. Choose your monitor model and - Samsung 242MP | User Manual - Page 31
Panel". 2. Double click "Display" icon. 3. Select the "Settings" tab and click "Advanced Properties" button. 4. Select the "Monitor" tab. 5. Click the "Change" button in the "Monitor Type" area. 6. Choose "Specify the location of the driver". 7. Choose "Display a list of all the driver in a specific - Samsung 242MP | User Manual - Page 32
manually, insert the CD included with the Samsung monitor into the CD-ROM Drive, click the [Start] button of Windows and then select [Execute]. Enter D:\color\eng\setup.exe / 'Control Panel" on the "Start" menu and then double-click "Add/Delete a program". Select Natural Color from the list and then - Samsung 242MP | User Manual - Page 33
: AV : S-Video : Component OSD Description Source List Use to select PC, TV or other external input source connected to the Monitor. Use to select the screen of your choice. The direct button on the remote control is 'SOURCE' button. 1) PC 2) DVI : HDCP supported 3) TV 4) Ext.- EXT(RGB) is mainly - Samsung 242MP | User Manual - Page 34
1) PIP : Turn the PIP Screen on or off. The direct button on the remote control is 'PIP' button. Off / On 2) Source : Select the input source for the PIP. The direct button on the remote control is 'SOURCE' button. PC / DVI : TV / Ext.(EXT(RGB) is mainly used in Europe.) / AV / S-Video / Component - Samsung 242MP | User Manual - Page 35
grayscale gradient to the preference of the user. Increased Mode number - Displays the full screen more naturally and softer and sharpens the dark scale. Decreased Mode number - Displays the full screen sharper and improves the bright scale. 4) 6-Color : 6 types: Red, Green, Blue, Cyan, Magenta and - Samsung 242MP | User Manual - Page 36
of the display 5) Tint : Adds a natural tone to the PIP window. Available : PIP ON 1) Coarse 2) Fine 3) Position TV / Ext. / AV / S-Video / Component Mode OSD Mode Available Mode : PC / DVI : TV : AV : S-Video : Component Description The Monitor has four automatic picture settings ("Dynamic - Samsung 242MP | User Manual - Page 37
the contrast and brightness according to personal preference. 1) Contrast : Adjusts the Contrast. 2) Displays the improved image on the left and the original on the right. 2) Color Tone : Adjusts color tones to the preference of the user. Cool2 / Cool1 / Normal / Warm1 / Warm2 3) 6-Color : 6 types - Samsung 242MP | User Manual - Page 38
Video : Component OSD Mode Custom Auto Volume Dolby Virtual BBE Description The Monitor has a built-in high fidelity stereo amplifier. The direct button on between the left and right speakers. Balance allows you to adjust the sound balance between the left and right speakers and you can hear the - Samsung 242MP | User Manual - Page 39
or the channel that you selected is received. Store : Restores the number user inputs. 3) Add / Delete Adds or deletes channels from the memory. In sets to FM RADIO, turning off the screen. Available : FM RADIO ON Auto Store Manual Store Add / Delete Channel Available Mode : PC / DVI : TV : AV : - Samsung 242MP | User Manual - Page 40
TV : AV : S-Video : Component OSD Description Area Configuration When you turn the power on of the product for the first time since it released from a factory, menu use the monitor. This is because broadcasting type varies according to region and country. You can select broadcasting type in OSD - Samsung 242MP | User Manual - Page 41
language chosen affects only the language of the OSD. It has no effect on any software running on the computer. Use to set the Monitor to be turned off automatically in certain minutes. 1) Off 2) 30 3) 60 4) 90 5) 120 6) 150 7) 180 V-Chip Protects children from viewing inappropriate programs by - Samsung 242MP | User Manual - Page 42
yourself before calling for service. Contact the Service Center for problems that you cannot solve by yourself. Self-Test Feature Check | Not Optimum Mode | Display Adapter Driver Maintenance and Cleaning | Symptoms & Recommended Actions 1. Self-Test Feature Check Your monitor provides a self test - Samsung 242MP | User Manual - Page 43
2. Installing Adapter Driver The instructions given below are for general circumstances. For specific issues, contact the relevant computer or video card manufacturers. 1) Click Start → Settings → Control Panel → Display → Settings → Advanced → Adapter → Update Driver → Next → Display a list of the - Samsung 242MP | User Manual - Page 44
and their solutions are listed. PC Mode Problems It appears the PC does not function normally. The monitor screen flickers. TV Mode TV screen is blurred or shows noise signals. TV signal is not received Solutions z Check if the Display Adapter Driver (VGA Driver) is properly installed. (Refer - Samsung 242MP | User Manual - Page 45
reconfiguring the video card. z Note that video card support can vary, depending on the version of the driver used. (Refer to the computer or the video card manual for details.) z Windows XP : Set the resolution at the Control Panel→Appearance and Themes→Display→Settings. z Windows ME/2000 : Set the - Samsung 242MP | User Manual - Page 46
computer. (Refer to Windows/Computer Manual). z Windows ME/2000 : Set the resolution at the Control Panel→Display→Screen Saver. Set the function at BIOS-SETUP of the computer. (Refer to Windows/Computer Manual). z Disconnect the power cord and then clean the monitor with a soft cloth, using either - Samsung 242MP | User Manual - Page 47
SyncMaster 242MP LCD Panel Size 24.0" Diagonal Display area 518.4(H) x 324(V) Pixel Pitch 0.270mm (H) x 0.270mm (V) Type a-si TFT active matrix Synchronization Horizontal 31 ~ 81kHz Vertical 56 ~ 75 Hz Display Color 16.7M Colors (true 8bit) Resolution Optimum resolution Power Supply - Samsung 242MP | User Manual - Page 48
settings. In most cases, monitor installation will proceed automatically, unless the user wishes to select alternate settings. Design and specifications are subject to change without prior notice. Power Saver This monitor has a built-in power management system called PowerSaver. This system - Samsung 242MP | User Manual - Page 49
go blank while the power LED is on. Refer to the video card manual and adjust the screen as follows. Table 1. Preset Timing Modes Display Mode MAC, 640 x .00 Sync Polarity (H/V) Table 2. Broadcasting Systems According to broadcasting type in each country, you may not be able to choose. - Samsung 242MP | User Manual - Page 50
Cycle is called Horizontal Frequency. Unit: kHz Vertical Frequency Like a fluorescent lamp, the screen has to repeat the same image many times per second to display an image to the user. The frequency of this repetition is called Vertical Frequency or Refresh Rate. Unit: Hz - Samsung 242MP | User Manual - Page 51
Service The address and phone number of the company can be changed without previous notice. AUSTRALIA : Samsung Electronics Australia Pty Ltd. Customer Response Centre 7 Parkview Drive, Homebush Bay NSW 2127 Tel : 1300 362 603 http://www.samsung.com.au/ BRAZIL : Samsung Eletronica da Amazonia Ltda. - Samsung 242MP | User Manual - Page 52
Ciencies, 55-65 (Poligono Pedrosa) 08908 Hospitalet de Llobregat (Barcelona) Tel. : (93) 261 67 00 Fax. : (93) 261 67 50 http://samsung.es/ FRANCE : SAMSUNG ELECTRONICS FRANCE Service Paris Nord 2 66 rue des Vanesses BP 50116 Villepinte 95950 Roissy CDG Cedex Tel : 08 25 08 65 65 Fax : 01 48 63 06 - Samsung 242MP | User Manual - Page 53
öksadress : Johanneslundsvägen 4 Samsung support Sverige: 020-46 46 46 Samsung support Danmark : 8088-4646 Samsung support Norge: 8001-1800 Samsung support Finland: 0800-118001 Tel +46 8 590 966 00 Fax +46 8 590 966 50 http://www.samsung.se/ THAILAND : HAI SAMSUNG Service Center MPA COMPLEX BUILDING - Samsung 242MP | User Manual - Page 54
refer to the standard signals that are required to display desired colors on the monitor. They are divided into Vertical and Horizontal Sync Signals. These signals display normal color images by the set resolution and frequency. Types of Sync Signals Separate This is a scheme of transmitting - Samsung 242MP | User Manual - Page 55
quality of picture in the screen if the best quality of picture is not provided in TFT-LCD. { Resolution: 1920 x 1200 { Vertical frequency (refresh rate): 60 Hz 2. When you clean the monitor and the panel outside, please apply the recommended small amount of cleaner by using soft and dry cloth and - Samsung 242MP | User Manual - Page 56
herein or for incidental or consequential damages in connection with the furnishing, performance, or use of this material. Samsung is the registered trademark of Samsung Electronics Co., Ltd.; Microsoft, Windows and Windows NT are registered trademarks of Microsoft Corporation; VESA, DPMS and DDC - Samsung 242MP | User Manual - Page 57
outlet is equal to or exceeds the monitor voltage rating. For 120 Volt applications, use only UL Listed detachable power cord with NEMA configuration 5-15P type (parallel blades) plug cap. For 240 Volt applications use only UL Listed Detachable power supply cord with NEMA configuration 6-15P - Samsung 242MP | User Manual - Page 58
- Electromagnetic Immunity z EN61000-3-2:1995+A1/A2:1998 - Power Line Harmonics z EN61000-3-3:1995 - Voltage Fluctuations z EN60065 use the equipment according to the instruction manual. TCO'95-Ecological requirements for personal and services to the environment.The main problem as far as monitors and - Samsung 242MP | User Manual - Page 59
a wide range of issues: environment, ergonomics, usability power consumption to a lower level, in one or more stages. The length of time to reactivate the monitor shall be reasonable for the user than 25 ppm (parts per million) of cadmium. The colour-generating layers of display screens must not - Samsung 242MP | User Manual - Page 60
goods and services to the environment. The main problem, as far computer and/or display, after a certain period of inactivity, shall reduce its power consumption to a lower level in one or more stages. The length of time to reactivate the computer shall be reasonable for the user - Samsung 242MP | User Manual - Page 61
back light system of flat panel monitors as today there is no Display requirements: Ergonomics Good visual ergonomics and image quality in order to improve the working environment for the user and to reduce sight and strain problems. Important parameters are luminance, contrast, resolution - Samsung 242MP | User Manual - Page 62
system started with displays in 1992 and is now requested by users and IT-manufacturers all over the world. For more information, Please visit www.tcodevelopment.com TCO'03 Recycling Information (TCO'03 applied model only) For recycling information for TCO'03 certified monitors, for the residents - Samsung 242MP | User Manual - Page 63
instructions , the user is encouraged or field service technician for part or signal output part configures a medical system, and is therefore, responsible that the system complies with the requirements of the system standard IEC 601-1-1. If in doubt, consult the technical services LCD Monitor, LCD - Samsung 242MP | User Manual - Page 64
for 4 hours after 24 hours in use - Turn the power off for 2 hours after 12 hours in use z Use a Screen saver if possible - Screen saver in one color or a moving image is recommended. z Set the Monitor to power off with the PC Display Properties Power Scheme. Suggestions for specific applications Ex - Samsung 242MP | User Manual - Page 65
The best way to protect your monitor from Image retention is to set your PC or System to operate a Screen Saver program when you are not using it. Image retention may not occur when a LCD panel is operated under normal conditions. Normal conditions are defined as continuously changing video patterns
-
 1
1 -
 2
2 -
 3
3 -
 4
4 -
 5
5 -
 6
6 -
 7
7 -
8
-
9
-
10
-
11
-
12
-
13
-
14
-
15
-
16
-
17
-
18
-
19
-
20
-
21
-
22
-
23
-
24
-
25
-
26
-
27
-
28
-
29
-
30
-
31
-
32
-
33
-
34
-
35
-
36
-
37
-
38
-
39
-
40
-
41
-
42
-
43
-
44
-
45
-
46
-
47
-
48
-
49
-
50
-
51
-
52
-
53
-
54
-
55
-
56
-
57
-
58
-
59
-
60
-
61
-
62
-
63
-
64
-
65
 |
 |

Install Drivers
Install Programs
SyncMaster 242MP