Samsung CLX-9352NA Installation Guide Easy Manual Ver.3.00 (English) - Page 54
Installing a network connected machine's driver
 |
View all Samsung CLX-9352NA manuals
Add to My Manuals
Save this manual to your list of manuals |
Page 54 highlights
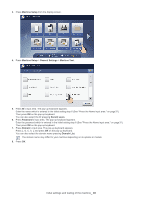
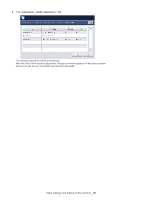
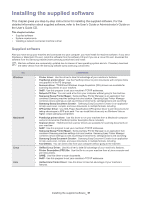
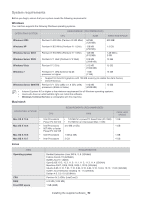
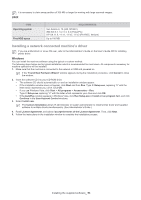
It is necessary to claim swap partition of 300 MB or larger for working with large scanned images. UNIX ITEM Operating system Free HDD space REQUIREMENTS Sun Solaris 9, 10 (x86, SPARC) IBM AIX 5.1, 5.2, 5.3, 5.4 (PowerPC) HP-UX 11.0, 11i v1, 11i v2, 11i v3 (PA-RISC, Itanium) Up to 100 MB Installing a network connected machine's driver If you are a Macintosh or Linux OS user, refer to the Administrator's Guide on the User's Guide CD for installing printer driver. Windows You can install the machine software using the typical or custom method. The following steps below are for typical installation which is recommended for most users. All components necessary for machine operations will be installed. 1. Make sure that the machine is connected to the network or USB and powered on. If the "Found New Hardware Wizard" window appears during the installation procedure, click Cancel to close the window. 2. Insert the software CD into your CD-ROM drive. • The software CD should automatically run and an installation window appear. • If the installation window does not appear, click Start and then Run. Type X:\Setup.exe, replacing "X" with the letter which represents your drive. Click OK. • If you use Windows Vista, click Start > All programs > Accessories > Run. Type X:\Setup.exe replacing "X" with the letter which represents your drive and click OK. • If the AutoPlay window appears in Windows Vista, click Run Setup.exe in Install or run program field, and click Continue in the User Account Control windows. 3. Select Install now. The Custom Installation allows IT administrator or system administrator to install printer driver and supplied software to multiple clients simultaneously. (See Administrator's Guide.) 4. Read License Agreement, and select I accept the terms of the License Agreement. Then, click Next. 5. Follow the instructions in the installation window to complete the installation process. Installing the supplied software_ 53
-
 1
1 -
2
-
3
-
4
-
5
-
6
-
7
-
8
-
9
-
10
-
11
-
12
-
13
-
14
-
15
-
16
-
17
-
18
-
19
-
20
-
21
-
22
-
23
-
24
-
25
-
26
-
27
-
28
-
29
-
30
-
31
-
32
-
33
-
34
-
35
-
36
-
37
-
38
-
39
-
40
-
41
-
42
-
43
-
44
-
45
-
46
-
47
-
48
-
 49
49 -
 50
50 -
 51
51 -
 52
52 -
 53
53 -
 54
54 -
 55
55 -
 56
56 -
 57
57 -
 58
58 -
 59
59 -
60
-
61
 |
 |