Samsung DVD-V4600 User Manual (user Manual) (ver.1.0) (Spanish) - Page 5
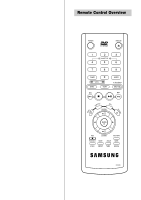
Basic Connections/Auto Setup, Insert Batteries into Remote, Front Panel Display, Front Panel - dvd vhs manual
 |
View all Samsung DVD-V4600 manuals
Add to My Manuals
Save this manual to your list of manuals |
Page 5 highlights
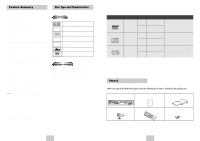
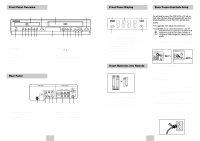
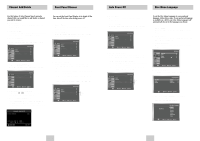
Front Panel Overview 1 2 3 4 5 6 7 8 9 10 11 1 DVD DECK 2 DVD OPEN/CLOSE 3 VCR DECK 4 VCR EJECT 5 POWER 6 EZ VIEW 7 REWIND/REV 8 STOP 9 PLAY/PAUSE Rear Panel 12 13 14 15 16 17 18 10 FAST-FORWARD/FWD 11 RECORD 12 FRONT PANEL DISPLAY 13 CHANNEL / 14 DVD-VCR SELECT 15 PROGRESSIVE 16 LINE IN 2 COMPOSITE VIDEO JACK 17 LINE IN 2 LEFT AUDIO JACK 18 LINE IN 2 RIGHT AUDIO JACK 1 1 S-VIDEO OUT 2 DIGITAL AUDIO OUT(COAXIAL) 3 COMPONENT VIDEO OUT 4 AUDIO LINE OUT TO TV (S-VIDEO OR COMPONENT) 2 34 5 6 7 8 5 LINE IN 1 6 LINE OUT TO TV (COMPOSITE) 7 RF ANTENNA INPUT 8 RF OUT TO TV (RF THROUGH ONLY) ENG-6 Front Panel Display 1 2 3 4 5 1 When the light is on, DVD is operating. 2 The time, counter position, time remaining or current deck status is indicated. 3 VCR is activated. 4 DVD or VCD, CD media is loaded. 5 VHS videotape is loaded. Insert Batteries into Remote • Remove the battery cover on the remote • Insert two 1.5V "AAA" batteries as shown, making sure of the correct polarities(+/-) • Slide the cover back onto remote. Basic Connections/Auto Setup You will need to connect the DVD-VCR to a TV and run Auto Setup. The Auto Setup will automatically search for channels and then set your DVD-VCR's internal clock. NOTES: • See Appendix A for Advanced Connections. • Standard RF or Line connection between your TV and DVD-VCR are required to run DVD+VCR setup menu, even if you connect S-Video or Component Video Output for a better picture quality. 1 Connect the RF Antenna Cable to your DVD-VCR Connect an external indoor/outdoor antenna or wall outlet antenna cable to the Ant-In jack on the rear panel. (RF Through Only) 1 2 From Antenna or Cable To TV's Antenna Input 2 Connect your DVD-VCR to a TV RF Connection Using the RF antenna cable, connect the OUT jack (TO TV) on the rear panel of your DVD-VCR to your TV's Antenna Input. Line Connection Using an RCA-type audio/video cable (red, white, yellow), connect the LINE OUT jacks on the rear panel of your DVD-VCR to your TV's Line In jacks. Use the three cables as follows: red for right audio, white for left audio, and yellow for video. NOTE: If your TV is equipped with RCA jacks, it is better to use the Line Connection method. 3 Plug In Your DVD-VCR's power should be plugged into a standard 120V/60Hz wall outlet. Avoid pressing any buttons on the remote control or on the unit during an Auto Setup. While your DVD-VCR is running an Auto Setup, "AUTO" will blink. When Auto Setup is complete, the current time will be displayed on the front panel displayed. In case Auto Clock set fails to locate a channel to set the clock, you should set the clock manually. See page 12. 3 ENG-7
-
 1
1 -
 2
2 -
 3
3 -
 4
4 -
 5
5 -
 6
6 -
 7
7 -
 8
8 -
 9
9 -
 10
10 -
 11
11 -
12
-
13
-
14
-
15
-
16
-
17
-
18
-
19
-
20
-
21
-
22
-
23
-
24
-
25
-
26
-
27
-
28
-
29
-
30
-
31
-
32
-
33
-
34
-
35
-
36
-
37
-
38
-
39
-
40
 |
 |
