Samsung HL-T5055W Quick Guide (easy Manual) (ver.1.0) (English) - Page 16
Operation, Turning the TV On and Off, Plug & Play Feature - remote manual
 |
View all Samsung HL-T5055W manuals
Add to My Manuals
Save this manual to your list of manuals |
Page 16 highlights
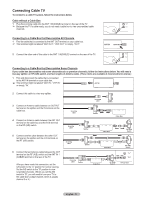
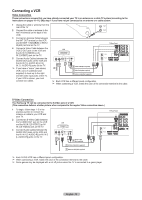
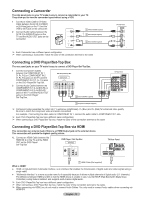
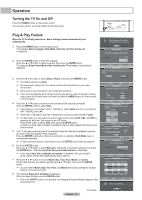
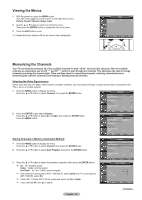
Operation Turning the TV On and Off Press the POWER button on the remote control. You can also use the (Power) button on the front panel. Plug & Play Feature When the TV is initially powered on, basic settings proceed automatically and subsequently: 1 Press the POWER button on the remote control. The message Menu language, Shop Mode, Channels and Time will be set. is displayed. 2 Press the ENTER button to enter the language. Press the ▲ or ▼ button to select language, then press the ENTER button. The message Select Home Mode when installing this TV at home. is automatically displayed. 3 Press the ◄ or ► button to select Shop or Home, then press the ENTER button. ➢ The default selection is Home. ➢ We recommend setting the TV to Home mode for the best picture in your home environment. ➢ Shop mode is only intended for use in retail environments. ➢ If the unit is accidentally set to Shop mode and you want to return to Dynamic (Home) mode, press the Volume button and then hold down the MENU button for five seconds on the TV panel. 4 Press the ▲ or ▼ button to memorize the channels of the selected connection. Press the ENTER button to select Start. ➢ If the antenna is connected to ANT 1 IN(CABLE), select Cable and if it is connected to ANT 2 IN(AIR), select Air. ➢ If both ANT 1 IN(CABLE) and ANT 2 IN(AIR) are connected, select the Air + Cable. ➢ In Cable mode, you can select the correct signal source among STD, HRC, and IRC by pressing the ◄ button, then press the ▲ or ▼ button. Press the ► button to select Start, then press the ENTER button. Contact your local cable company to identify the type of cable system that exists in your particular area. 5 The TV will begin memorizing all of the available channels. After all the available channels are stored, the Auto program menu reappears. Press the ENTER button when channel memorization is complete. Clock Mode menu is automatically displayed. ➢ To stop the search before it has finished, press the ENTER button with stop selected. 6 Press the ENTER button. Press the ▲ or ▼ button to select Manual for setting the current time manually, then press the ENTER button. The message Enter the current date and time. is displayed. ➢ If you select Auto, Set to daylight saving time. is displayed, then go to step 9. (If you want to set the time automatically, skip to step 9.) 7 Press the ◄ or ► button to move to Month, Day, Year, Hour, Minute, or am/pm. Set the date and time you want by pressing the ▲ or ▼ button, then press the ENTER button. ➢ You can set the Month, Day, Year, Hour, and Minute directly by pressing the number buttons on the remote control. 8 The message Enjoy your watching. is displayed. When you have finished, press the ENTER button. ➢ Even if the ENTER button is not pressed, the message will automatically disappear after several seconds. Menu language, Shop Mode, Channels and Time will be set. Start Plugg && PPllaayy Select the language of the OSD. Language English Español Français Move Enter Skip PPlluugg && PPllaayy Select Home Mode when installing this TV at home. Shop Home Move Enter Skip Plug & Play Select the antennas to memorize. Air Cable Air + Cable Start Start Start Move Enter Skip Plug & Play Selects a cable signal type for your location. Analog STD HRC Start IRC Digital STD HRC IRC Move Enter Skip Plug & Play Auto Program in Progress. Air 16 15% Stop Enter Skip Plug & Play Set the Clock Mode. Clock Mode Auto Manual Move Enter Skip Plug & Play Enter the current date and time. Month Day Year -- -- ---- Hour Minute am/pm -- -- -- Adjust Move Enter Skip Enjoy your watching. OK Continued... English - 16
-
 1
1 -
2
-
3
-
4
-
5
-
6
-
7
-
8
-
9
-
10
-
 11
11 -
 12
12 -
 13
13 -
 14
14 -
 15
15 -
 16
16 -
 17
17 -
 18
18 -
 19
19 -
 20
20 -
 21
21 -
22
-
23
-
24
-
25
-
26
-
27
-
28
-
29
-
30
-
31
-
32
-
33
-
34
-
35
-
36
-
37
-
38
-
39
-
40
-
41
-
42
-
43
-
44
-
45
-
46
-
47
-
48
-
49
-
50
-
51
-
52
-
53
-
54
-
55
-
56
-
57
-
58
-
59
-
60
-
61
-
62
-
63
-
64
-
65
-
66
-
67
-
68
 |
 |
