Samsung HT-H5500W User Manual Ver.1.0 (English) - Page 23
Setting Up DLNA, Auto UPgraDe Notification, To downloaD the dLNA Software - firmware
 |
View all Samsung HT-H5500W manuals
Add to My Manuals
Save this manual to your list of manuals |
Page 23 highlights
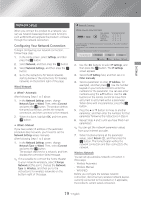
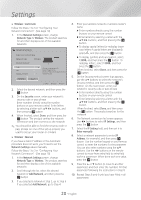
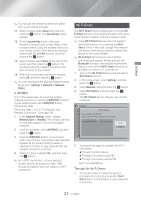
Settings 4. Left click your product's model number in the drop down list. 5. On the page that appears, scroll down to and then click Firmware Manuals & Downloads. 6. Click Firmware in the center of the page. 7. Click the ZIP icon in the File column on the right side of the page. 8. Click Send in the first pop-up that appears. Click OK in the second pop-up to download and save the firmware file to your PC. 9. Unzip the zip archive to your computer. You should have a single folder with the same name as the zip file. 10. Copy the folder to a USB flash drive. 11. Make sure no disc is inserted in the product, and then insert the USB flash drive into the USB port of the product. 12. In the product's menu, go to Settings > Support > Software Upgrade. 13. Select By USB. 14. The home theater searches for the software on the USB drive. When it finds the software, the Update Request pop-up appears. 15. Select OK. The home theater turns off, turns on, and then begins the upgrade. When the upgrade is done, the home theater turns off. 16. Press the POWER button to turn on the home theater. ✎✎There should be no disc in the product when you upgrade the software using the USB Host jack. ✎✎When the software upgrade is done, check the software details in the Software Upgrade menu. Auto Upgrade Notification If your product is connected to the network and you set Auto Upgrade Notification on, the product will notify you if a new software version is available with a pop-up message. 1. Turn on the product. 2. In the Software Upgrade menu, set Auto Upgrade Notification to On. If there is a new software version available, the product will notify you with a pop-up message. 3. To upgrade the firmware, select Yes. The product turns off automatically, turns on, and then begins the upgrade. 4. The update progress popup will appear. When the update is complete, the product will turn off automatically again. 5. Press the POWER button to turn on the product. Setting Up DLNA DLNA enables you to play music, video, and photo files located in your PC using this product. To use DLNA, you must connect the product to your PC via the network (See page 13) and install the SAMSUNG PC Share Manager on the PC. To Download the DLNA Software To use DLNA with your PC, you must install DLNA software on your PC. You can download the PC software and get detailed instructions for using DLNA from the Samsung.com website. 1. Go to www.samsung.com. 2. Click SUPPORT at the top of the page. 3. Enter the product's model number into the search field. As you enter the model number, a drop down will display products that match the model number. 4. Left click your product's model number in the drop down list. 5. On the page that appears, scroll down to and then click Firmware Manuals & Downloads. 6. Click the Software tab. 7. On the software tab, click the EXE icon on the right side of the DLNA line. 8. In the first pop-up that appears, click Send. In the second pop-up, click Save File. 9. Find the DLNA install file on your disk, and then double click the file. 10. In the pop-up that appears, click Run, and then follow the directions that appear on your screen. Download the DLNA Installation/Instruction manual from the same Software Tab by clicking the corresponding PDF file symbol in the File column on the right. The file, in PDF format, will download and open. Follow the directions to install and setup DLNA. You can view and/or save the file. ✎✎To use DLNA with your smart phone, you need to connect your home theater and smart phone to the same network. 23 - English
-
 1
1 -
2
-
3
-
4
-
5
-
6
-
7
-
8
-
9
-
10
-
11
-
12
-
13
-
14
-
15
-
16
-
17
-
 18
18 -
 19
19 -
 20
20 -
 21
21 -
 22
22 -
 23
23 -
 24
24 -
 25
25 -
 26
26 -
 27
27 -
 28
28 -
29
-
30
-
31
-
32
-
33
-
34
-
35
-
36
-
37
-
38
-
39
-
40
-
41
-
42
-
43
-
44
-
45
-
46
-
47
-
48
 |
 |