Samsung LNT2353H User Manual (ENGLISH) - Page 33
Freezing the Picture depending on the model, Setting the Film Mode, HDMI Black Level, STILL, ENTER
 |
UPC - 036725223530
View all Samsung LNT2353H manuals
Add to My Manuals
Save this manual to your list of manuals |
Page 33 highlights
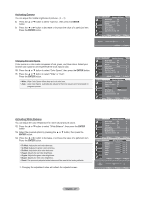
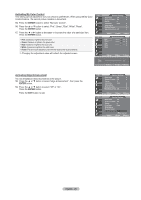
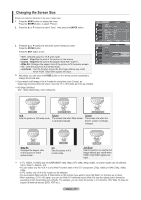
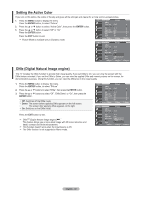
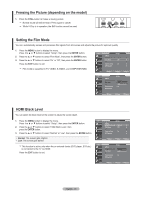
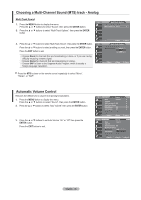
Freezing the Picture (depending on the model) 1. Press the STILL button to freeze a moving picture. Normal sound will still be heard. Press again to cancel. While V-Chip is in operation, the Still function cannot be used. Setting the Film Mode You can: automatically senses and processes film signals from all sources and adjusts the picture for optimum quality. 1. Press the MENU button to display the menu. Press the ▲ or ▼ buttons toselect "Setup", then press the ENTER button. 2. Press the ▲ or ▼ buttons to select "Flim Mode", then press the ENTER button. 3. Press the ▲ or ▼ buttons to select "On" or "Off", then press the ENTER button. Press the EXIT button to exit. Film mode is supported in TV, VIDEO, S-VIDEO, and COMPONENT480i. TV Setup ▲More HDMI Black Level : Normal ► Film Mode : Off ► PIP ► Function Help : On ► SW Upgrade ► Move Enter Return TV Setup ▲More HDMI Black Level : Normal Film Mode : OOfff f PIP On Function Help : On SW Upgrade Move Enter Return HDMI Black Level You can select the black level on the screen to adjust the screen depth. 1. Press the MENU button to display the menu. TV Setup Press the ▲ or ▼ buttons toselect "Setup", then press the ENTER button. ▲More HDMI Black Level : Normal ► 2. Press the ▲ or ▼ buttons to select "HDMI Black Level", then Film Mode : Off ► press the ENTER button. PIP ► Function Help : On ► 3. Press the ▲ or ▼ buttons to select "Normal" or "Low", then press the ENTER button. SW Upgrade ► • Normal: The screen gets brighter. • Low: The screen gets darker. This function is active only when the an external device (DVD player, STB etc.) is connected to the TV via HDMI. Press the EXIT button to exit. Move Enter Return TV Setup ▲More HDMI Black Level : NNoormrmaal l Film Mode : OLffo w PIP Function Help : On SW Upgrade Move Enter Return English - 31
-
 1
1 -
2
-
3
-
4
-
5
-
6
-
7
-
8
-
9
-
10
-
11
-
12
-
13
-
14
-
15
-
16
-
17
-
18
-
19
-
20
-
21
-
22
-
23
-
24
-
25
-
26
-
27
-
 28
28 -
 29
29 -
 30
30 -
 31
31 -
 32
32 -
 33
33 -
 34
34 -
 35
35 -
 36
36 -
 37
37 -
 38
38 -
39
-
40
-
41
-
42
-
43
-
44
-
45
-
46
-
47
-
48
-
49
-
50
-
51
-
52
-
53
-
54
-
55
-
56
-
57
-
58
-
59
-
60
-
61
-
62
-
63
-
64
-
65
-
66
-
67
-
68
-
69
-
70
-
71
-
72
-
73
-
74
-
75
-
76
-
77
-
78
-
79
-
80
-
81
-
82
-
83
-
84
-
85
-
86
-
87
-
88
-
89
-
90
-
91
-
92
-
93
-
94
-
95
-
96
-
97
-
98
-
99
-
100
-
101
-
102
-
103
-
104
-
105
-
106
-
107
-
108
-
109
-
110
-
111
-
112
-
113
-
114
-
115
-
116
-
117
-
118
-
119
-
120
-
121
-
122
-
123
-
124
-
125
-
126
-
127
-
128
-
129
-
130
-
131
-
132
-
133
-
134
-
135
-
136
-
137
-
138
-
139
-
140
-
141
-
142
-
143
-
144
-
145
-
146
-
147
-
148
-
149
-
150
-
151
-
152
-
153
-
154
-
155
-
156
-
157
-
158
-
159
-
160
-
161
-
162
-
163
-
164
-
165
-
166
-
167
-
168
-
169
-
170
-
171
-
172
-
173
-
174
-
175
-
176
-
177
-
178
-
179
-
180
-
181
-
182
-
183
-
184
-
185
-
186
-
187
-
188
-
189
-
190
-
191
 |
 |
