Samsung NX2000 User Manual Ver.1.1 (English) - Page 126
Setting network options, Manually setting the IP address, Using the login browser, IP Setting, Manual
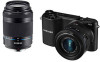 |
View all Samsung NX2000 manuals
Add to My Manuals
Save this manual to your list of manuals |
Page 126 highlights
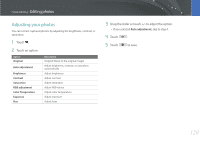
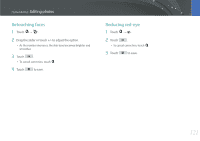
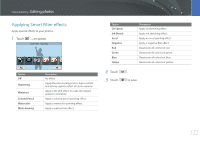
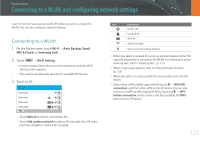
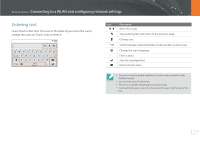
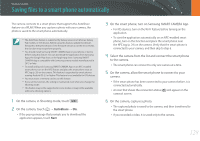
Wireless network > Connecting to a WLAN and configuring network settings Setting network options 1 In the Wi-Fi Setting screen, move to an AP, and then touch . 2 Select each option, and then enter the required information. Option Network Password IP Setting Description Enter the network password. Set the IP address automatically or manually. Manually setting the IP address 1 In the Wi-Fi Setting screen, move to an AP, and then touch . 2 Touch IP Setting → Manual. 3 Select each option, and then enter the required information. Option IP Subnet Mask Gateway DNS Server Description Enter the static IP address. Enter the subnet mask. Enter the gateway. Enter the DNS address. Using the login browser You can enter your login information via the login browser when connecting to some APs, sharing sites, or cloud servers. Icon Description Close the login browser. Move to the previous page. Move to the next page. Stop loading the page. Reload the page. • You may not be able to select some items depending on the page you connected to. This does not indicate a malfunction. • The login browser may not close automatically after you log into some pages. If this occurs, close the login browser by touching , and then proceed with the desired operation. • It may take longer to load the login page due to the page size or network speed. If this occurs, wait until the login information input window appears. 125
-
 1
1 -
2
-
3
-
4
-
5
-
6
-
7
-
8
-
9
-
10
-
11
-
12
-
13
-
14
-
15
-
16
-
17
-
18
-
19
-
20
-
21
-
22
-
23
-
24
-
25
-
26
-
27
-
28
-
29
-
30
-
31
-
32
-
33
-
34
-
35
-
36
-
37
-
38
-
39
-
40
-
41
-
42
-
43
-
44
-
45
-
46
-
47
-
48
-
49
-
50
-
51
-
52
-
53
-
54
-
55
-
56
-
57
-
58
-
59
-
60
-
61
-
62
-
63
-
64
-
65
-
66
-
67
-
68
-
69
-
70
-
71
-
72
-
73
-
74
-
75
-
76
-
77
-
78
-
79
-
80
-
81
-
82
-
83
-
84
-
85
-
86
-
87
-
88
-
89
-
90
-
91
-
92
-
93
-
94
-
95
-
96
-
97
-
98
-
99
-
100
-
101
-
102
-
103
-
104
-
105
-
106
-
107
-
108
-
109
-
110
-
111
-
112
-
113
-
114
-
115
-
116
-
117
-
118
-
119
-
120
-
 121
121 -
 122
122 -
 123
123 -
 124
124 -
 125
125 -
 126
126 -
 127
127 -
 128
128 -
 129
129 -
 130
130 -
 131
131 -
132
-
133
-
134
-
135
-
136
-
137
-
138
-
139
-
140
-
141
-
142
-
143
-
144
-
145
-
146
-
147
-
148
-
149
-
150
-
151
-
152
-
153
-
154
-
155
-
156
-
157
-
158
-
159
-
160
-
161
-
162
-
163
-
164
-
165
-
166
-
167
-
168
-
169
-
170
-
171
-
172
-
173
-
174
-
175
-
176
-
177
-
178
-
179
-
180
-
181
-
182
-
183
-
184
-
185
-
186
-
187
-
188
-
189
-
190
-
191
-
192
-
193
-
194
-
195
-
196
-
197
-
198
-
199
-
200
-
201
-
202
-
203
 |
 |
