Samsung RF31FMESBSR User Manual Ver.0.4 (English, French, Spanish) - Page 30
Maintaining the Ice Bucket, Making Ice, Using the Ice Off Function - ice maker not working
 |
View all Samsung RF31FMESBSR manuals
Add to My Manuals
Save this manual to your list of manuals |
Page 30 highlights
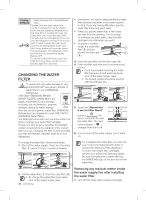
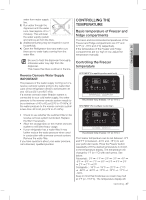
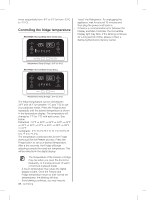
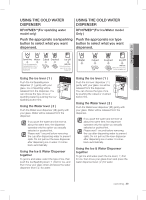
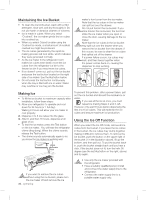
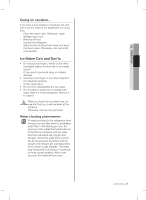
Maintaining the Ice Bucket • To clean the ice bin/bucket, wash with a mild detergent, rinse well, and dry thoroughly it. Do not use harsh or abrasive cleaners or solvents. • Ice is made in cubes. When you select "Crushed", the ice maker grinds the ice cubes into crushed ice. • When you select Cubed Ice after using the Crushed Ice mode, a small amount of residual crushed ice might be produced. • The ice cubes generated by the rapid ice making process will look white, which indicates they were generated normally. • As the ice maker in the refrigerator room makes ice cubes even faster, move the ice cubes from the refrigerator ice bin to the freezer ice bin if you need more ice cubes. • If ice doesn't come out, pull out the ice bucket and press the test button located on the right side of ice maker. See the illustration below. • Do not press the test button continuously when the tray is filled with ice or water. Water may overflow or ice may jam the bucket. maker's front cover from the ice maker. Note that the ice cubes in the ice maker can spill out over the drawer. Do not put food in the ice bucket. If you CAUTION store food in the ice bucket, the food can strike the ice maker when you open or close the door, causing damage to the ice maker. Note that the ice cubes in the ice bucket CAUTION may spill out over the drawer when you remove the ice bucket from the drawer. If this occurs, be sure to clear the ice cubes that spilled out of the drawer. If a power failure occurs, ice cubes may CAUTION melt, and then freeze together when the power comes back on, causing the dispenser to stop working. Making Ice • To fill the ice bucket to maximum capacity after installation, follow these steps: 1. Allow your refrigerator to operate and cool down for 24 hours (or 1 full day). - Waiting 24 hours will allow your ice maker to cool properly. 2. Dispense 4 to 6 ice cubes into the glass. 3. After 8, and then 16 hours, dispense a full glass of ice. • To test the ice maker, press the Test button on the ice maker. You will hear the refrigerator chime (ding-dong). When the chime sounds, release the Test button. • The chime sounds automatically again to let you know the ice maker is working well. check the water level To prevent this problem, after a power failure, pull out the ice bucket and discard the residual ice or water. If you use all the ice at once, you must repeat ice making Steps 2 and 3, left. However, only wait 8 hours before dispensing the first 4 to 6 ice cubes. This will replenish the ice cubes and ensure maximum ice production. Using the Ice Off Function When you select the Ice Off mode, remove all ice cubes from the bucket. If you leave the ice cubes in the bucket, the ice cubes may clump together, making it difficult to remove them. To remove the ice bucket, push the button on the upper right of the bucket (1 in the illustration above), lift up the bottom, and then pull out. To put the bucket back in, push the bucket straight back until you hear a click. If the bucket does not fit, turn the helix 90 degree (see the last illustration on the right, above) and try again. Test button If you want to remove the ice cubes CAUTION without using the ice bucket, please turn the ice maker off and remove the ice 30_ operating • Use only the ice maker provided with CAUTION the refrigerator. • Have a suitably qualified person install and connect the water supply line to the refrigerator. • Connect the water supply line to a potable water supply only.
-
 1
1 -
2
-
3
-
4
-
5
-
6
-
7
-
8
-
9
-
10
-
11
-
12
-
13
-
14
-
15
-
16
-
17
-
18
-
19
-
20
-
21
-
22
-
23
-
24
-
 25
25 -
 26
26 -
 27
27 -
 28
28 -
 29
29 -
 30
30 -
 31
31 -
 32
32 -
 33
33 -
 34
34 -
 35
35 -
36
-
37
-
38
-
39
-
40
-
41
-
42
-
43
-
44
-
45
-
46
-
47
-
48
-
49
-
50
-
51
-
52
-
53
-
54
-
55
-
56
-
57
-
58
-
59
-
60
-
61
-
62
-
63
-
64
-
65
-
66
-
67
-
68
-
69
-
70
-
71
-
72
-
73
-
74
-
75
-
76
-
77
-
78
-
79
-
80
-
81
-
82
-
83
-
84
-
85
-
86
-
87
-
88
-
89
-
90
-
91
-
92
-
93
-
94
-
95
-
96
-
97
-
98
-
99
-
100
-
101
-
102
-
103
-
104
-
105
-
106
-
107
-
108
-
109
-
110
-
111
-
112
-
113
-
114
-
115
-
116
-
117
-
118
-
119
-
120
-
121
-
122
-
123
-
124
-
125
-
126
-
127
-
128
-
129
-
130
-
131
-
132
-
133
-
134
-
135
-
136
-
137
-
138
-
139
-
140
-
141
-
142
-
143
-
144
-
145
-
146
-
147
-
148
-
149
-
150
-
151
-
152
-
153
-
154
-
155
-
156
 |
 |