Samsung SCH-N150 User Manual (user Manual) (ver.3.0) (English) - Page 110
New messages, After finding and entering
 |
View all Samsung SCH-N150 manuals
Add to My Manuals
Save this manual to your list of manuals |
Page 110 highlights
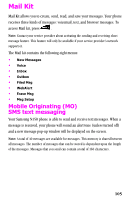
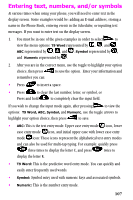
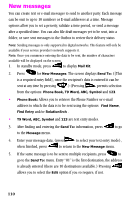
New messages You can create text or e-mail messages to send to another party. Each message can be sent to up to 10 numbers or E-mail addresses at a time. Message options allow you to set a priority, validate a time period, or send a message after a specified time. You can also file draft messages yet to be sent, into a folder, or save sent messages to the Outbox to review their delivery status. Note: Sending messages is only supported in digital networks. This feature will only be available if your service provider's network supports it. Note: Once you commence entering the data to be sent, the number of characters available will be displayed on the screen. 1. In standby mode, press to display Mail Kit. 2. Press for New Messages. The screen displays Send To: ([This is a required entry field], once the recipient's data is entered it can be sent at any time by pressing .) (Pressing permits selection from the options: Phone Book, T9 Word, ABC, Symbol and 123. • Phone Book: Allows you to retrieve the Phone Number or e-mail address to which the data is to be sent using the options: Find Name, Find Entry and/or RelationSrch . • T9 Word, ABC, Symbol and 123 are text entry modes. 3. After finding and entering the Send To: information, press to go to the Message menu. 4. Enter your message data, (press to select your text entry mode), when finished, press to return to the New Message menu. 5. If the same message is to be sent to multiple recipients, press to go to the Send To: menu. Entry "01" is the first destination, the address is already entered (there are 10 destinations available.) Pressing allows you to select the Edit option if you so require, if not. 110
-
 1
1 -
2
-
3
-
4
-
5
-
6
-
7
-
8
-
9
-
10
-
11
-
12
-
13
-
14
-
15
-
16
-
17
-
18
-
19
-
20
-
21
-
22
-
23
-
24
-
25
-
26
-
27
-
28
-
29
-
30
-
31
-
32
-
33
-
34
-
35
-
36
-
37
-
38
-
39
-
40
-
41
-
42
-
43
-
44
-
45
-
46
-
47
-
48
-
49
-
50
-
51
-
52
-
53
-
54
-
55
-
56
-
57
-
58
-
59
-
60
-
61
-
62
-
63
-
64
-
65
-
66
-
67
-
68
-
69
-
70
-
71
-
72
-
73
-
74
-
75
-
76
-
77
-
78
-
79
-
80
-
81
-
82
-
83
-
84
-
85
-
86
-
87
-
88
-
89
-
90
-
91
-
92
-
93
-
94
-
95
-
96
-
97
-
98
-
99
-
100
-
101
-
102
-
103
-
104
-
 105
105 -
 106
106 -
 107
107 -
 108
108 -
 109
109 -
 110
110 -
 111
111 -
 112
112 -
 113
113 -
 114
114 -
 115
115 -
116
-
117
-
118
-
119
-
120
-
121
-
122
-
123
-
124
-
125
-
126
-
127
-
128
-
129
-
130
-
131
-
132
-
133
-
134
-
135
-
136
-
137
-
138
-
139
-
140
-
141
-
142
-
143
-
144
-
145
-
146
-
147
-
148
-
149
-
150
-
151
-
152
-
153
-
154
 |
 |
