Samsung SCX-4300 User Manual (ENGLISH) - Page 30
Setting the paper size and type, Selecting an output location, Printing to the output tray (Face down) - printer driver
 |
UPC - 635753611021
View all Samsung SCX-4300 manuals
Add to My Manuals
Save this manual to your list of manuals |
Page 30 highlights
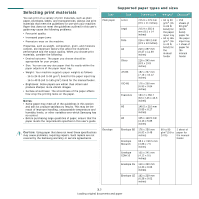
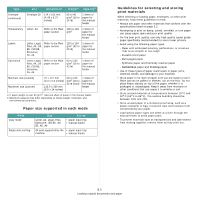
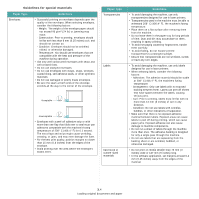
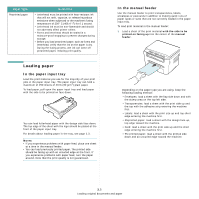
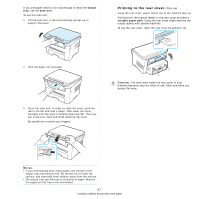
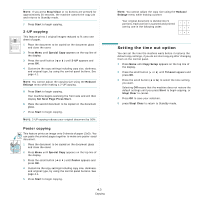
2 Adjust the manual feeder guides to the width of the print material without bending it. 4 Press the scroll button ( or ) to find the paper size you are using and press OK. 5 Press Back to return to the upper level. 6 Press the scroll button ( or ) to select Paper Type and press OK. 7 Press the scroll button ( or ) to find the paper type you are using and press OK. 8 Press Stop/Clear to return to Standby mode. 3 After loading paper, you need to set the paper type and size for the manual feeder. See page 3.6 for copying or the Software Section for PC-printing. NOTE: The settings made from the printer driver override the settings on the control panel. 4 If you want to use the rear cover, open the rear cover. Tips on using the manual feeder • Print materials should be loaded face up with the top edge going into the manual feeder first and be placed in the center of the tray. • Always load only the print materials specified in the Specifications on page 3.2 to avoid paper jams and print quality problems. • When you print on 76 x 127 mm (3 x 5 inches) sized media on the manual feeder, open the rear cover to use the rear cover. • Make sure to open the rear cover when you print on transparencies. If not, they may tear while exiting the machine. Selecting an output location The machine has two output locations: the rear cover (face up) and the output tray (face down). To use the output tray, make sure that the rear cover is closed. To use the rear cover, open the rear cover. NOTES: • If paper coming out of the output tray has problems, such as excessive curl, try printing to the rear cover. • To avoid paper jams, do not open or close the rear cover while the machine is printing. Printing to the output tray (Face down) The output tray collects printed paper face down, in the order in which the sheets were printed. The tray should be used for most print jobs. For the output support to correctly align the pages, you need to pull it out appropriately depending on the paper size. Setting the paper size and type After loading paper in the paper tray, you need to set the paper size and type using the control panel buttons. These settings will apply to Copy mode. For PC-printing, you need to select the paper size and type in the application program you use on your PC. 1 Press Menu until Paper Setting appears on the top line of the display. 2 Press OK when Paper Size appears. 3 Press the scroll button ( or ) to select the paper tray you want to use and press OK. 1 Output support 2 Extension NOTES: • If the output support is incorrectly adjusted, printed pages may be mis-aligned or fall. • If you continuously print many pages, the surface of the output tray may become hot. Be careful not to touch the surface, and especially keep out of children's reach. 3.6 Loading original documents and paper
-
 1
1 -
2
-
3
-
4
-
5
-
6
-
7
-
8
-
9
-
10
-
11
-
12
-
13
-
14
-
15
-
16
-
17
-
18
-
19
-
20
-
21
-
22
-
23
-
24
-
 25
25 -
 26
26 -
 27
27 -
 28
28 -
 29
29 -
 30
30 -
 31
31 -
 32
32 -
 33
33 -
 34
34 -
 35
35 -
36
-
37
-
38
-
39
-
40
-
41
-
42
-
43
-
44
-
45
-
46
-
47
-
48
-
49
-
50
-
51
-
52
-
53
-
54
-
55
-
56
-
57
-
58
-
59
-
60
-
61
-
62
-
63
-
64
-
65
-
66
-
67
-
68
-
69
-
70
-
71
-
72
-
73
-
74
-
75
-
76
-
77
-
78
-
79
-
80
-
81
-
82
-
83
-
84
-
85
-
86
-
87
-
88
-
89
-
90
-
91
-
92
-
93
-
94
-
95
-
96
-
97
 |
 |
