Samsung SCX-4720F User Manual (user Manual) (ver.3.00) (English) - Page 138
When you edit an image which has been scanned in, dpi resolution, the image may differ from
 |
View all Samsung SCX-4720F manuals
Add to My Manuals
Save this manual to your list of manuals |
Page 138 highlights
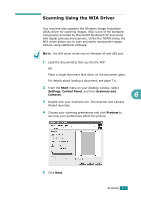
3 Enter your ID and password using the number keypad, and then press Enter. There are several different ways to provide a user ID: •Enter full user ID through the keypad, or •In Smart Search, enter characters in the top line of the LCD display and the bottom line will display the User IDs that begin with the entered character(s). "No Matches" displays in the lower line if no entries starting with the entered character are found. You can press Enter key and browse through the entries in the lower line starting with the entered character in the upper line by using the scroll button ( or ). You can press Upper Level button while browsing and enter the User ID through the keypad. 4 Enter your PIN to prevent other users from sending scanned documents to your computer. Press Enter. You can select the default password option to avoid this menu. 5 Press the scroll buttons ( or ) until "Scan Data" appears on the bottom line and press Enter. 6 Choose the file type and resolution and then press Enter. •Black & White: If you select this option, select file type PDF or TIFF. 6 •Color JPEG-200: If you select this option, 200 dpi resolution and JPEG file type will be automatically selected. •Resolution: Select resolutions of 100 dpi, 200 dpi or 300 dpi. NOTE: When you edit an image which has been scanned in 100 dpi resolution, the image may differ from the original image, depending on the program you use. 7 Press the scroll buttons ( or ) until "Start Scanning" displays and press Enter. If you press Enter when the display shows "Logout", your machine returns to the Standby mode. 8 The document will be scanned to the computer where the Network Scan program is running. If you have chosen TIFF or PDF as the file type, the display asks if you want to scan another document. If you need to scan more than one document, select "Yes" using the scroll button ( or ) and press Enter. The next document is scanned and stored. Repeat this until all documents have been scanned then select "No". SCANNING 6.11
-
 1
1 -
2
-
3
-
4
-
5
-
6
-
7
-
8
-
9
-
10
-
11
-
12
-
13
-
14
-
15
-
16
-
17
-
18
-
19
-
20
-
21
-
22
-
23
-
24
-
25
-
26
-
27
-
28
-
29
-
30
-
31
-
32
-
33
-
34
-
35
-
36
-
37
-
38
-
39
-
40
-
41
-
42
-
43
-
44
-
45
-
46
-
47
-
48
-
49
-
50
-
51
-
52
-
53
-
54
-
55
-
56
-
57
-
58
-
59
-
60
-
61
-
62
-
63
-
64
-
65
-
66
-
67
-
68
-
69
-
70
-
71
-
72
-
73
-
74
-
75
-
76
-
77
-
78
-
79
-
80
-
81
-
82
-
83
-
84
-
85
-
86
-
87
-
88
-
89
-
90
-
91
-
92
-
93
-
94
-
95
-
96
-
97
-
98
-
99
-
100
-
101
-
102
-
103
-
104
-
105
-
106
-
107
-
108
-
109
-
110
-
111
-
112
-
113
-
114
-
115
-
116
-
117
-
118
-
119
-
120
-
121
-
122
-
123
-
124
-
125
-
126
-
127
-
128
-
129
-
130
-
131
-
132
-
 133
133 -
 134
134 -
 135
135 -
 136
136 -
 137
137 -
 138
138 -
 139
139 -
 140
140 -
 141
141 -
 142
142 -
 143
143 -
144
-
145
-
146
-
147
-
148
-
149
-
150
-
151
-
152
-
153
-
154
-
155
-
156
-
157
-
158
-
159
-
160
-
161
-
162
-
163
-
164
-
165
-
166
-
167
-
168
-
169
-
170
-
171
-
172
-
173
-
174
-
175
-
176
-
177
-
178
-
179
-
180
-
181
-
182
-
183
-
184
-
185
-
186
-
187
-
188
-
189
-
190
-
191
-
192
-
193
-
194
-
195
-
196
-
197
-
198
-
199
-
200
-
201
-
202
-
203
-
204
-
205
-
206
-
207
-
208
-
209
-
210
-
211
-
212
-
213
-
214
-
215
-
216
-
217
-
218
-
219
-
220
-
221
-
222
-
223
-
224
-
225
-
226
-
227
-
228
-
229
-
230
-
231
-
232
-
233
-
234
-
235
-
236
-
237
-
238
-
239
-
240
-
241
-
242
-
243
-
244
-
245
-
246
-
247
-
248
-
249
-
250
-
251
-
252
-
253
-
254
-
255
-
256
-
257
-
258
-
259
-
260
-
261
-
262
-
263
-
264
-
265
-
266
-
267
-
268
-
269
-
270
-
271
-
272
-
273
-
274
-
275
-
276
-
277
-
278
-
279
-
280
-
281
-
282
-
283
-
284
-
285
-
286
-
287
-
288
-
289
-
290
-
291
-
292
-
293
-
294
-
295
-
296
-
297
-
298
-
299
-
300
-
301
-
302
-
303
-
304
-
305
-
306
-
307
-
308
-
309
-
310
-
311
-
312
-
313
-
314
-
315
-
316
-
317
-
318
-
319
-
320
-
321
-
322
 |
 |
