Samsung SCX 5530FN User Guide - Page 34
Setting the paper size and type, Selecting an output location, Printing to the output tray
 |
UPC - 635753618044
View all Samsung SCX 5530FN manuals
Add to My Manuals
Save this manual to your list of manuals |
Page 34 highlights
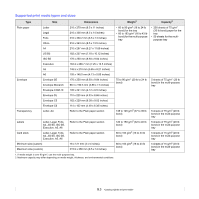
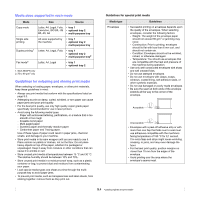
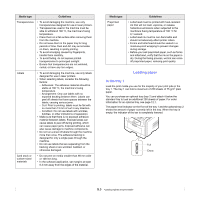
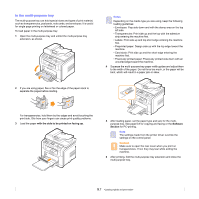
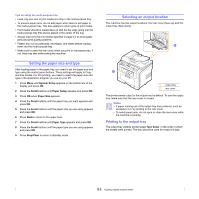
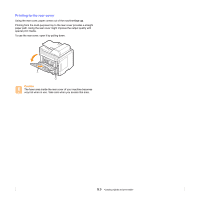
Tips on using the multi-purpose tray • Load only one size of print media at a time in the multi-purpose tray. • To prevent paper jams, do not add paper when there is still paper in the multi-purpose tray. This also applies to other types of print media. • Print media should be loaded face up with the top edge going into the multi-purpose tray first and be placed in the center of the tray. • Always load only the print media specified in page 5.2 to avoid paper jams and print quality problems. • Flatten any curl on postcards, envelopes, and labels before loading them into the multi-purpose tray. • Make sure to open the rear cover when you print on transparencies. If not, they may tear while exiting the machine. Setting the paper size and type After loading paper in the paper tray, you need to set the paper size and type using the control panel buttons. These settings will apply to Copy and Fax modes. For PC-printing, you need to select the paper size and type in the application program you use on your PC. 1 Press Menu until System Setup appears on the bottom line of the display and press OK. 2 Press the Scroll buttons until Paper Setup appears and press OK. 3 Press OK when Paper Size appears. 4 Press the Scroll buttons until the paper tray you want appears and press OK. 5 Press the Scroll buttons until the paper size you are using appears and press OK. 6 Press Back to return to the upper level. 7 Press the Scroll buttons until Paper Type appears and press OK. 8 Press the Scroll buttons until the paper type you are using appears and press OK. 9 Press Stop/Clear to return to Standby mode. Selecting an output location The machine has two output locations: the rear cover (face up) and the output tray (face down). 2 1 1 output tray 2 rear cover The printer sends output to the output tray by default. To use the output tray, make sure that the rear cover is closed. Notes • If paper coming out of the output tray has problems, such as excessive curl, try printing to the rear cover. • To avoid paper jams, do not open or close the rear cover while the machine is printing. Printing to the output tray The output tray collects printed paper face down, in the order in which the sheets were printed. The tray should be used for most print jobs. 5.8
-
 1
1 -
2
-
3
-
4
-
5
-
6
-
7
-
8
-
9
-
10
-
11
-
12
-
13
-
14
-
15
-
16
-
17
-
18
-
19
-
20
-
21
-
22
-
23
-
24
-
25
-
26
-
27
-
28
-
 29
29 -
 30
30 -
 31
31 -
 32
32 -
 33
33 -
 34
34 -
 35
35 -
 36
36 -
 37
37 -
 38
38 -
 39
39 -
40
-
41
-
42
-
43
-
44
-
45
-
46
-
47
-
48
-
49
-
50
-
51
-
52
-
53
-
54
-
55
-
56
-
57
-
58
-
59
-
60
-
61
-
62
-
63
-
64
-
65
-
66
-
67
-
68
-
69
-
70
-
71
-
72
-
73
-
74
-
75
-
76
-
77
-
78
-
79
-
80
-
81
-
82
-
83
-
84
-
85
-
86
-
87
-
88
-
89
-
90
-
91
-
92
-
93
-
94
-
95
-
96
-
97
-
98
-
99
-
100
-
101
-
102
-
103
-
104
-
105
-
106
-
107
-
108
-
109
-
110
-
111
-
112
-
113
-
114
-
115
-
116
-
117
-
118
-
119
-
120
-
121
-
122
-
123
-
124
-
125
-
126
-
127
-
128
-
129
-
130
-
131
-
132
-
133
-
134
-
135
-
136
-
137
-
138
-
139
-
140
-
141
-
142
-
143
 |
 |
