Samsung SCX 5530FN User Guide - Page 92
Installing accessories, Precautions when installing accessories, Installing a memory DIMM
 |
UPC - 635753618044
View all Samsung SCX 5530FN manuals
Add to My Manuals
Save this manual to your list of manuals |
Page 92 highlights
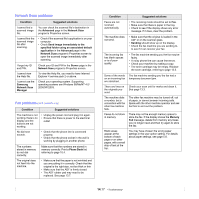
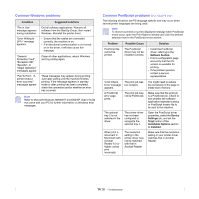
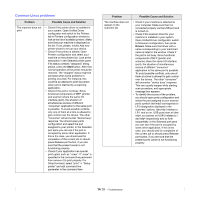
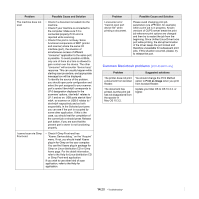
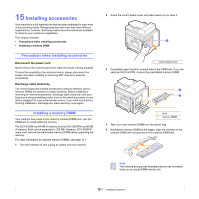
15 Installing accessories Your machine is a full-featured one that has been optimized to meet most of your printing needs. Recognizing that each user may have different requirements, however, Samsung makes several accessories available to enhance your machine's capabilities. This chapter includes: • Precautions when installing accessories • Installing a memory DIMM Precautions when installing accessories Disconnect the power cord Never remove the control board cover while the power is being supplied. To avoid the possibility of an electrical shock, always disconnect the power cord when installing or removing ANY internal or external accessories. Discharge static electricity The control board and internal accessories (network interface card or memory DIMM) are sensitive to static electricity. Before installing or removing an internal accessories, discharge static electricity from your body by touching something metal, such as the metal back plate on any device plugged into a grounded power source. If you walk round before finishing installation, discharge any static electricity once again. Installing a memory DIMM Your machine has a dual in-line memory module (DIMM) slot. Use this DIMM slot to install additional memory. The SCX-5330N has 64 MB of memory and the SCX-5530FN has 96 MB of memory. Both can be expanded to 320 MB. However, SCX-5530FN users must remove the preinstalled memory DIMM before upgrading the memory. For order information for optional memory DIMMs, see page 12.1. 1 Turn the machine off and unplug all cables from the machine. 2 Grasp the control board cover and slide toward you to open it. 1 1 control board cover 3 Completely open the latch on each side of the DIMM slot. If you are using an SCX-5530FN, remove the preinstalled memory DIMM. 1 2 1 latch 2 memory DIMM 4 Take out a new memory DIMM from the plastic bag. 5 Holding the memory DIMM by the edges, align the notches on the memory DIMM with the grooves on the memory DIMM slot. Note The notches and grooves illustrated above may not match those on an actual DIMM and the slot. 15.1
-
 1
1 -
2
-
3
-
4
-
5
-
6
-
7
-
8
-
9
-
10
-
11
-
12
-
13
-
14
-
15
-
16
-
17
-
18
-
19
-
20
-
21
-
22
-
23
-
24
-
25
-
26
-
27
-
28
-
29
-
30
-
31
-
32
-
33
-
34
-
35
-
36
-
37
-
38
-
39
-
40
-
41
-
42
-
43
-
44
-
45
-
46
-
47
-
48
-
49
-
50
-
51
-
52
-
53
-
54
-
55
-
56
-
57
-
58
-
59
-
60
-
61
-
62
-
63
-
64
-
65
-
66
-
67
-
68
-
69
-
70
-
71
-
72
-
73
-
74
-
75
-
76
-
77
-
78
-
79
-
80
-
81
-
82
-
83
-
84
-
85
-
86
-
 87
87 -
 88
88 -
 89
89 -
 90
90 -
 91
91 -
 92
92 -
 93
93 -
 94
94 -
 95
95 -
 96
96 -
 97
97 -
98
-
99
-
100
-
101
-
102
-
103
-
104
-
105
-
106
-
107
-
108
-
109
-
110
-
111
-
112
-
113
-
114
-
115
-
116
-
117
-
118
-
119
-
120
-
121
-
122
-
123
-
124
-
125
-
126
-
127
-
128
-
129
-
130
-
131
-
132
-
133
-
134
-
135
-
136
-
137
-
138
-
139
-
140
-
141
-
142
-
143
 |
 |
