Samsung SGH-I337 User Manual At&t Sgh-i337 Galaxy S4 English User Manual V - Page 20
Sign Up for AT&T, AT&T Locker Setup
 |
View all Samsung SGH-I337 manuals
Add to My Manuals
Save this manual to your list of manuals |
Page 20 highlights
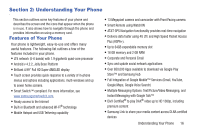
Note: In order to utilize your device to the fullest extent, you will need to create a Google™ Account when you first use your device. With a Google Account, you will have access to more Google applications and applications will always be in sync between your phone and computer. 6. At the Google & location screen, a blue checkmark displays next to the text that explains that you allow Google's location service to collect anonymous location data from your phone. If you disagree, tap the checkmark to remove it. 7. A blue checkmark also displays next to the text that explains that you allows your location to be used for Google search results and other Google services. If you disagree, tap the checkmark to remove it. Tap the Next icon . 8. At the This phone belongs to... display, enter your First and Last names in the provided fields so that your phone can personalize some applications. Tap . 9. At the Set up email display, tap an Email account to set up your email. For more information, refer to "Using Email" on page 111. 13 10. Tap Next. 11. At the Samsung account display, tap Create new account if you don't have one yet or tap Sign in if you have already set up your Samsung account. For more information, refer to "Creating a Samsung Account" on page 14. - or - Tap Skip if you want to wait until later. 12. At the Thank you screen, enter a device name (optional) and tap Next. 13. At the Learn about key features display, tap each function to learn more about them. 14. Tap Finish to complete your setup. 15. At the AT&T Locker Setup display, tap Sign Up for AT&T Locker or tap Skip if you want to sign up later. For more information, refer to "AT&T Locker" on page 179. The main Home screen displays.
-
 1
1 -
2
-
3
-
4
-
5
-
6
-
7
-
8
-
9
-
10
-
11
-
12
-
13
-
14
-
 15
15 -
 16
16 -
 17
17 -
 18
18 -
 19
19 -
 20
20 -
 21
21 -
 22
22 -
 23
23 -
 24
24 -
 25
25 -
26
-
27
-
28
-
29
-
30
-
31
-
32
-
33
-
34
-
35
-
36
-
37
-
38
-
39
-
40
-
41
-
42
-
43
-
44
-
45
-
46
-
47
-
48
-
49
-
50
-
51
-
52
-
53
-
54
-
55
-
56
-
57
-
58
-
59
-
60
-
61
-
62
-
63
-
64
-
65
-
66
-
67
-
68
-
69
-
70
-
71
-
72
-
73
-
74
-
75
-
76
-
77
-
78
-
79
-
80
-
81
-
82
-
83
-
84
-
85
-
86
-
87
-
88
-
89
-
90
-
91
-
92
-
93
-
94
-
95
-
96
-
97
-
98
-
99
-
100
-
101
-
102
-
103
-
104
-
105
-
106
-
107
-
108
-
109
-
110
-
111
-
112
-
113
-
114
-
115
-
116
-
117
-
118
-
119
-
120
-
121
-
122
-
123
-
124
-
125
-
126
-
127
-
128
-
129
-
130
-
131
-
132
-
133
-
134
-
135
-
136
-
137
-
138
-
139
-
140
-
141
-
142
-
143
-
144
-
145
-
146
-
147
-
148
-
149
-
150
-
151
-
152
-
153
-
154
-
155
-
156
-
157
-
158
-
159
-
160
-
161
-
162
-
163
-
164
-
165
-
166
-
167
-
168
-
169
-
170
-
171
-
172
-
173
-
174
-
175
-
176
-
177
-
178
-
179
-
180
-
181
-
182
-
183
-
184
-
185
-
186
-
187
-
188
-
189
-
190
-
191
-
192
-
193
-
194
-
195
-
196
-
197
-
198
-
199
-
200
-
201
-
202
-
203
-
204
-
205
-
206
-
207
-
208
-
209
-
210
-
211
-
212
-
213
-
214
-
215
-
216
-
217
-
218
-
219
-
220
-
221
-
222
-
223
-
224
-
225
-
226
-
227
-
228
-
229
-
230
-
231
-
232
-
233
-
234
-
235
-
236
-
237
-
238
-
239
-
240
-
241
-
242
-
243
-
244
-
245
-
246
-
247
-
248
-
249
-
250
-
251
-
252
-
253
-
254
-
255
-
256
-
257
-
258
-
259
-
260
 |
 |
