Samsung SM-G935P User Guide - Page 31
Smart Switch, Set up as a new device
 |
View all Samsung SM-G935P manuals
Add to My Manuals
Save this manual to your list of manuals |
Page 31 highlights
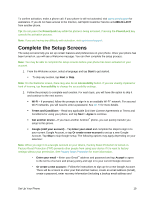
recovery question), an option to join Google+™, and an option to enable purchases from the Google Play™ store app. Tap Next between each screen. • Set up payment info - Select billing options for purchases made through Google Play. Select Remind me later to skip this step. • Get your apps & data - If you are using a Google Account you had set up on a previous Android device, you can choose to use that device's backup information to restore backed-up apps, data, system settings, Wi-Fi passwords, etc., from the previous device to your new phone. Tap Set up as a new device to skip this step. Personalize your phone - If applicable, enter your first and last name and tap Next. This information is used by the phone to personalize certain apps. Set up email - Set up an email account. Google services - Select your Google location and service options and then tap Next. Samsung account - Enter your email account and password to sign in to your current Samsung account, or tap Create account to set up a new Samsung account. Date & time - Adjust the date and time, if necessary. Smart Switch - Transfer content from your old device to this device. Easy mode - Switch between the default screen layout and a simpler layout. The Easy mode layout has larger text and icons, making for a more straightforward visual experience 3. Tap Finish. Your setup is now complete. Follow the prompts to learn about basic tap menu navigation, view tutorials, or just get started. Your phone is now set up for use. If you skipped any part of the setup, you can access additional options through the Apps screen or through Settings. Note: You do not need to sign up for a Google Account to use your phone. However, to download apps from Google Play, you must link your phone to a Google Account. Set Up Your Phone 20
-
 1
1 -
2
-
3
-
4
-
5
-
6
-
7
-
8
-
9
-
10
-
11
-
12
-
13
-
14
-
15
-
16
-
17
-
18
-
19
-
20
-
21
-
22
-
23
-
24
-
25
-
 26
26 -
 27
27 -
 28
28 -
 29
29 -
 30
30 -
 31
31 -
 32
32 -
 33
33 -
 34
34 -
 35
35 -
 36
36 -
37
-
38
-
39
-
40
-
41
-
42
-
43
-
44
-
45
-
46
-
47
-
48
-
49
-
50
-
51
-
52
-
53
-
54
-
55
-
56
-
57
-
58
-
59
-
60
-
61
-
62
-
63
-
64
-
65
-
66
-
67
-
68
-
69
-
70
-
71
-
72
-
73
-
74
-
75
-
76
-
77
-
78
-
79
-
80
-
81
-
82
-
83
-
84
-
85
-
86
-
87
-
88
-
89
-
90
-
91
-
92
-
93
-
94
-
95
-
96
-
97
-
98
-
99
-
100
-
101
-
102
-
103
-
104
-
105
-
106
-
107
-
108
-
109
-
110
-
111
-
112
-
113
-
114
-
115
-
116
-
117
-
118
-
119
-
120
-
121
-
122
-
123
-
124
-
125
-
126
-
127
-
128
-
129
-
130
-
131
-
132
-
133
-
134
-
135
-
136
-
137
-
138
-
139
-
140
-
141
-
142
-
143
-
144
-
145
-
146
-
147
-
148
-
149
-
150
-
151
-
152
-
153
-
154
-
155
-
156
-
157
-
158
-
159
-
160
-
161
-
162
-
163
-
164
-
165
-
166
-
167
-
168
-
169
-
170
-
171
-
172
-
173
-
174
-
175
-
176
-
177
-
178
-
179
-
180
-
181
-
182
-
183
-
184
-
185
-
186
-
187
-
188
-
189
-
190
-
191
-
192
-
193
-
194
-
195
-
196
-
197
-
198
-
199
-
200
-
201
-
202
-
203
-
204
-
205
-
206
-
207
-
208
-
209
-
210
-
211
-
212
-
213
-
214
-
215
-
216
-
217
-
218
-
219
-
220
-
221
-
222
-
223
-
224
-
225
-
226
-
227
-
228
-
229
-
230
-
231
-
232
-
233
-
234
-
235
-
236
-
237
-
238
-
239
-
240
-
241
-
242
-
243
-
244
-
245
-
246
-
247
-
248
-
249
-
250
-
251
-
252
-
253
-
254
-
255
-
256
-
257
-
258
-
259
-
260
-
261
-
262
-
263
-
264
-
265
-
266
-
267
-
268
-
269
-
270
-
271
-
272
-
273
-
274
-
275
-
276
-
277
-
278
-
279
-
280
-
281
-
282
-
283
-
284
-
285
-
286
-
287
-
288
-
289
-
290
-
291
-
292
-
293
-
294
-
295
-
296
-
297
-
298
-
299
-
300
-
301
-
302
-
303
-
304
-
305
-
306
-
307
-
308
-
309
-
310
-
311
-
312
-
313
-
314
-
315
-
316
-
317
-
318
-
319
-
320
-
321
-
322
-
323
-
324
-
325
-
326
-
327
-
328
-
329
-
330
-
331
-
332
-
333
 |
 |
