Seagate Portable Hard Drive Portable External Hard Drive Quick Start Guide - Page 3
Setup - support
 |
View all Seagate Portable Hard Drive manuals
Add to My Manuals
Save this manual to your list of manuals |
Page 3 highlights
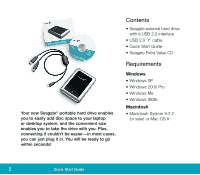
Setup Your Portable External Hard Drive comes with a special USB cable. This cable is shaped like the letter 'Y' with one USB connector on one end of the cable and two connectors at the other end of the cable. This cable supplies power to the drive and handles the data going between the drive and your computer-this means you don't have any other cables to connect. 1. Connect one end of the USB 'Y' cable to your Portable drive and the connector end labelled "Data + Power" to any one of the USB ports on your computer. The drive does not have a power switch, so if your computer is powered on, the drive will begin spinning as soon as you connect it to your computer. Note: If your computer does not supply enough power to the drive through the one USB "Data + Power" connector, plug in the unused connector on the 'Y' cable to another USB port on your computer (or a powered USB hub). This additional connection may be needed to provide additional power to the drive and is only required if connecting the "Data + Power" connector alone does not power up the drive. C0433 Power + Data Data + Power Power Only Power Only C0433 Power + Data Power Only Data + Power USB 1.1 connectors only support transfer rates of 12 Mbits/sec. This is not ideal for disc drives. To take advantage of the speed of this disc drive, connect it to a computer that supports high-speed USB 2.0. High-speed USB 2.0 supports transfer rates up to 480 Mbits/sec (40 times faster than USB 1.1). Note. A DC receptacle is available near the USB connector on the portable hard drive to enable the use of an external DC power supply. This power supply may be used to provide necessary power to the portable hard drive in the event an extra USB port is not available or the USB port(s) don't provide enough power. See page 22 for specifications. Portable External Hard Drive 3
-
 1
1 -
 2
2 -
 3
3 -
 4
4 -
 5
5 -
 6
6 -
 7
7 -
 8
8 -
 9
9 -
10
-
11
-
12
-
13
-
14
-
15
-
16
-
17
-
18
-
19
-
20
-
21
-
22
-
23
-
24
 |
 |
