Seagate STAM2000100 GoFlex™ Home User Guide - Page 29
Next Steps, purchasing a Premium Backup software upgrade. See About Seagate Share Pro
 |
View all Seagate STAM2000100 manuals
Add to My Manuals
Save this manual to your list of manuals |
Page 29 highlights
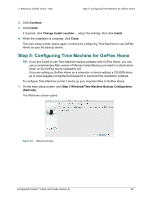
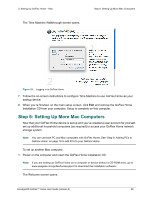
3. Setting Up GoFlex Home - Mac Next Steps 2. Double-click the GoFlex Home Installation icon that appears on your desktop. 3. Double-click GoFlex Home Setup to begin the installation. The main setup screen opens. 4. Click Step 2 Install Desktop Applications (Optional), then follow the steps in "Step 4: Installing GoFlex Home Desktop Applications" on page 25. 5. When the installation is complete and the main setup screen re-opens, click Step 3 Windows/Time Machine Backup Configuration (Optional), then follow the steps in "Step 5: Configuring Time Machine for GoFlex Home" on page 26. 6. Repeat the steps in this section until you have added all the household Mac computers to your GoFlex Home network storage system (as required). Your GoFlex Home network storage system is now fully set up and ready to use. Next Steps Now that GoFlex Home is set up, your next steps are to: • Copy files from your computer to your GoFlex Home folders (see page 39). • Learn how to access and enjoy your files from home and while travelling (see page 43 and page 45). • Share selected files with friends and family (see page 45). • Set up a centralized printer (see page 49). Pass along these chapters of this User Guide to each member of your household: • "Getting Started with GoFlex Home" on page 30 • "Enjoying and Managing Your Files in Seagate Share" on page 52 • "Managing GoFlex Home" on page 64 Don't forget that you can add more user accounts and computers, add other useful GoFlex Home features, or back up additional computers by subscribing to Seagate Share Pro or purchasing a Premium Backup software upgrade. See "About Seagate Share Pro" and "About Premium Backup" on page 9 for more information. FreeAgent® GoFlex™ Home User Guide (Version 2) 29
-
 1
1 -
2
-
3
-
4
-
5
-
6
-
7
-
8
-
9
-
10
-
11
-
12
-
13
-
14
-
15
-
16
-
17
-
18
-
19
-
20
-
21
-
22
-
23
-
 24
24 -
 25
25 -
 26
26 -
 27
27 -
 28
28 -
 29
29 -
 30
30 -
 31
31 -
 32
32 -
 33
33 -
 34
34 -
35
-
36
-
37
-
38
-
39
-
40
-
41
-
42
-
43
-
44
-
45
-
46
-
47
-
48
-
49
-
50
-
51
-
52
-
53
-
54
-
55
-
56
-
57
-
58
-
59
-
60
-
61
-
62
-
63
-
64
-
65
-
66
-
67
-
68
-
69
-
70
-
71
-
72
-
73
-
74
-
75
-
76
-
77
-
78
-
79
-
80
-
81
-
82
-
83
-
84
-
85
-
86
 |
 |
