Sennheiser EK 300 IEM G2 Instructions for Use - Page 58
Channel, Reset, RESET
 |
View all Sennheiser EK 300 IEM G2 manuals
Add to My Manuals
Save this manual to your list of manuals |
Page 58 highlights
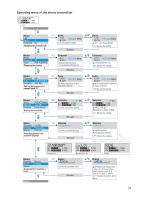
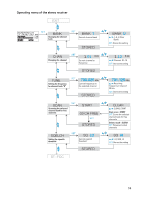
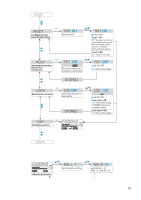
Getting into the operating menu ̈ Press the SET button to get from the standard display into the operating menu. The last menu selected flashes on the display. With the transmitter, the current setting is additionally displayed. Selecting a menu ̈ Press the ̆/̄ buttons to select a menu. ̈ Press the SET button to get into the setting mode of the selected menu. With the receiver, the current setting that can be adjusted flashes on the display. With the transmitter, the name of the menu and the current setting are displayed. Adjusting a setting ̈ Press the ̆/̄ buttons to adjust the setting. By briefly pressing the ̆/̄ buttons, the display jumps either forwards or backwards to the next setting. In the "Channel", "Tune" and "Name" menu, the ̆/̄ buttons feature a "fast search" function. If you hold down a button, the display cycles continuously. The "fast search" function allows you to get fast and easily to your desired setting. With the receiver, the new setting flashes on the display until it is stored. Storing a setting ̈ Press the SET button to store the setting. "Stored" appears on the display, indicating that the setting has been stored. The display then returns to the top menu level. With most menus, new settings become effective immediately without having to be stored. An exception are the "Bank", "Channel", "Tune" and "Reset" menus of the transmitter and the "RESET" menu of the receiver. With these menus, new settings only become effective after they have been stored ("Stored" appears on the display, indicating that the setting has been stored). Exiting the operating menu ̈ Select the "Exit" menu to exit the operating menu and to return to the standard display. When you have entered the operating menu, the transmitter's ON button serves as the ESC (cancel) key, i.e. by briefly pressing this button, you cancel your entry and return to the standard display. The receiver has a separate ESC button with which you can cancel your entry. 56
-
 1
1 -
2
-
3
-
4
-
5
-
6
-
7
-
8
-
9
-
10
-
11
-
12
-
13
-
14
-
15
-
16
-
17
-
18
-
19
-
20
-
21
-
22
-
23
-
24
-
25
-
26
-
27
-
28
-
29
-
30
-
31
-
32
-
33
-
34
-
35
-
36
-
37
-
38
-
39
-
40
-
41
-
42
-
43
-
44
-
45
-
46
-
47
-
48
-
49
-
50
-
51
-
52
-
 53
53 -
 54
54 -
 55
55 -
 56
56 -
 57
57 -
 58
58 -
 59
59 -
 60
60 -
 61
61 -
 62
62 -
 63
63 -
64
-
65
-
66
-
67
-
68
-
69
-
70
-
71
-
72
-
73
-
74
-
75
-
76
-
77
-
78
-
79
-
80
-
81
-
82
-
83
-
84
-
85
-
86
-
87
-
88
-
89
-
90
-
91
-
92
-
93
-
94
-
95
-
96
-
97
-
98
-
99
-
100
-
101
-
102
-
103
-
104
-
105
-
106
-
107
-
108
-
109
-
110
-
111
-
112
-
113
-
114
-
115
-
116
-
117
-
118
-
119
-
120
-
121
-
122
-
123
-
124
-
125
-
126
-
127
-
128
-
129
-
130
-
131
-
132
-
133
-
134
-
135
-
136
-
137
-
138
-
139
-
140
-
141
-
142
-
143
-
144
-
145
-
146
-
147
-
148
-
149
-
150
-
151
-
152
-
153
-
154
-
155
-
156
-
157
-
158
-
159
-
160
 |
 |
