Sennheiser HDE 2020-D-II Instruction manual Tourguide 2020-D - Page 34
Installing the charger
 |
View all Sennheiser HDE 2020-D-II manuals
Add to My Manuals
Save this manual to your list of manuals |
Page 34 highlights
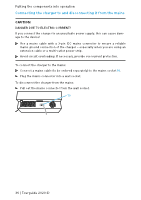
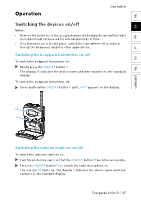
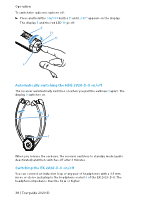
FR EN DE IT COMPLIANCE NL ES Putting the components into operation Installing the charger The housing of the charger is designed so that it fits into a 19" rack. The charger can also be installed in a cabinet or similar. CAUTION RISKS WHEN RACK MOUNTING THE CHARGER! When installing the device in a closed or multi-rack assembly, please consider that, during operation, the ambient temperature, the mechanical loading and the electrical potentials will be different from those of devices which are not mounted into a rack. The ambient temperature within the rack, cabinet or similar must not exceed the temperature limit specified in the specifications. When installing the device, take good care not to affect the ventilation required for safe operation. If necessary, provide additional ventilation. Make sure the mechanical loading of the rack is even to avoid a hazardous condition. When connecting the device to the power supply, observe the information indicated on the type plate. Avoid circuit overloading. If necessary, provide overcurrent protection. Ensure a reliable mains ground connection of the device by taking appropriate measures - especially when you are using an extension cable or a multi-outlet power strip. When installing the device in a closed or multi-rack assembly, please note that intrinsically harmless leakage currents of the individual devices may accumulate, thereby exceeding the allowable limit value. As a remedy, ground the rack via an additional ground connection. Use eight screws to fasten the charger. You can install the charger fixedly, e.g. in a cabinet or similar. For the dimensions required for fixed installation, please refer to the below installation drawing. Tourguide 2020-D | 33
-
 1
1 -
2
-
3
-
4
-
5
-
6
-
7
-
8
-
9
-
10
-
11
-
12
-
13
-
14
-
15
-
16
-
17
-
18
-
19
-
20
-
21
-
22
-
23
-
24
-
25
-
26
-
27
-
28
-
 29
29 -
 30
30 -
 31
31 -
 32
32 -
 33
33 -
 34
34 -
 35
35 -
 36
36 -
 37
37 -
 38
38 -
 39
39 -
40
-
41
-
42
-
43
-
44
-
45
-
46
-
47
-
48
-
49
-
50
-
51
-
52
-
53
-
54
-
55
-
56
-
57
-
58
-
59
-
60
-
61
-
62
-
63
-
64
-
65
-
66
-
67
-
68
-
69
-
70
-
71
-
72
-
73
-
74
-
75
-
76
-
77
 |
 |
