Sharp AX-700S AX-700S Operation Manual - Page 16
Before Operating
 |
View all Sharp AX-700S manuals
Add to My Manuals
Save this manual to your list of manuals |
Page 16 highlights
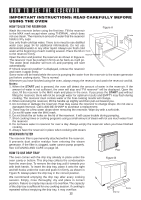
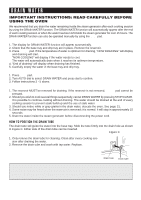
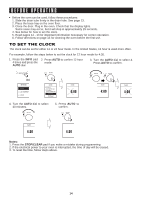
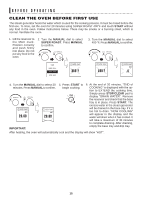
BEFORE OPERATING • Before the oven can be used, follow these procedures: 1. Slide the drain tube firmly in the drain hole. See page 13. 2. Place the base tray on the oven floor. 3. Close the door. Plug in the oven. Check that the display lights. Some noise may occur, but it will stop in approximately 15 seconds. 4. See below for how to set the clock. 5. Read pages 12 - 13 for important information necessary for correct operation. 6. Follow directions on page 15 for cleaning the oven before the first use. TO SET THE CLOCK The clock can be set for either 12 or 24 hour mode. In the United States, 12 hour is used more often. For example, follow the steps below to set the clock for 12 hour mode for 4:30. 1. Press the INFO pad 2. Press AUTO to confirm 12 hour 4 times and press the mode. AUTO dial. 3. Turn the AUTO dial to select 4. Press AUTO to confirm. X4 SETTINGS 1. CLOCK 2. LCD CONTRAST 3. SOUND AUTO CLOCK To select turn AUTO dial. To confirm press AUTO dial. 12 hour 24 hour CLOCK 0:00 AUTO AUTO CLOCK 4:00 CLOCK 4:00 4. Turn the AUTO dial to select 30 minutes. AUTO 5. Press AUTO to confirm. AUTO CLOCK 4:30 4:30 Notes: 1. Press the STOP/CLEAR pad if you make a mistake during programming. 2. If the electrical power to your oven is interrupted, the time of day will be erased. 3. To reset the time, follow steps above. 14
-
 1
1 -
2
-
3
-
4
-
5
-
6
-
7
-
8
-
9
-
10
-
 11
11 -
 12
12 -
 13
13 -
 14
14 -
 15
15 -
 16
16 -
 17
17 -
 18
18 -
 19
19 -
 20
20 -
 21
21 -
22
-
23
-
24
-
25
-
26
-
27
-
28
-
29
-
30
-
31
-
32
-
33
-
34
-
35
-
36
-
37
-
38
-
39
-
40
 |
 |
