Sharp AX-700S AX-700S Operation Manual - Page 34
Exercise Caution At Every Step Of Cleaning Since The Oven And Its Parts Can
 |
View all Sharp AX-700S manuals
Add to My Manuals
Save this manual to your list of manuals |
Page 34 highlights
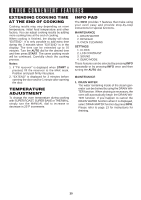
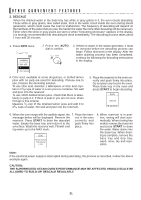
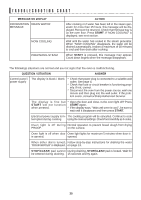
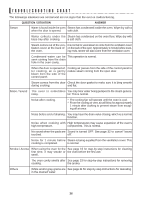
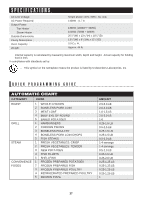
OTHER CONVENIENT FEATURES 3. OVEN CLEANING The OVEN CLEANING function helps to loosen any grease, oil or food residue. The steam will make the oven easy to clean; however, it is not a self-cleaning function. Check to be sure that the base tray is on the oven floor. Fill the reservoir with water to the MAX mark, place in the oven and push firmly into place. Press INFO three times and then press the AUTO dial to confirm. Finally, press START to begin cleaning. It will take approximately 7 minutes for the cleaning cycle. When the oven stops, open the door and remove any residue carefully with a soft, dry cloth. Use dry, heavy oven mitts to prevent burns. Remove the base tray and drip tray, wash, rinse and dry before replacing. Remove the reservoir. When "DRAIN WATER" is in the display and the base tray is in place, press START to begin draining. At end, empty the base tray and dry with a soft cloth. EXERCISE CAUTION AT EVERY STEP OF CLEANING SINCE THE OVEN AND ITS PARTS CAN BE EXCEEDINGLY HOT. Use dry, thick oven mitts for protection. Notes: 1. If "NOW COOLING" is displayed, allow oven to cool before cleaning. 2. If the oven will not be used for some time, turn the oven to THERMAL 450°F for 10 minutes after the oven is drained and wiped dry. SETTINGS 1. CLOCK See page 14. 2. LCD CONTRAST It is possible to adjust the contrast of the display. To adjust the contrast, press INFO 5 times and then press the AUTO dial to confirm. Select display contrast by turning AUTO dial. Press the AUTO dial to confirm. 3. SOUND It is possible to have sound or no sound. To set the sound, press INFO 6 times and then press AUTO dial. Select desired sound setting by turning the AUTO dial. Press the AUTO dial to confirm the chosen setting. 4. DEMO MODE The oven can be set in DEMO MODE so that no function, except the display, operates. To set DEMO MODE, press INFO 7 times and then press the AUTO dial to confirm. Select ON by turning AUTO dial. Press the AUTO dial to confirm "on". Note that DEMO is in the lower right corner of the display. To return the oven to normal operation, follow same steps except press the AUTO dial to confirm "off". DEMO will disappear from the display. 32
-
 1
1 -
2
-
3
-
4
-
5
-
6
-
7
-
8
-
9
-
10
-
11
-
12
-
13
-
14
-
15
-
16
-
17
-
18
-
19
-
20
-
21
-
22
-
23
-
24
-
25
-
26
-
27
-
28
-
 29
29 -
 30
30 -
 31
31 -
 32
32 -
 33
33 -
 34
34 -
 35
35 -
 36
36 -
 37
37 -
 38
38 -
 39
39 -
40
 |
 |
